Not to take this off the rails but deep in the GRBL code reference, it explains how you can do on the fly XYZ work coordinate offsets via probing cycles. This is definitely getting in the weeds even for an adventurous user but here’s the sample code for reference:
N010 (probe to find center and diameter of circular hole)
N020 (This program will not run as given here. You have to)
N030 (insert numbers in place of .)
N040 (Delete lines N020, N030, and N040 when you do that.)
N050 G0 Z F
N060 #1001=
N070 #1002=
N080 #1003=
N090 #1004=
N100 #1005=[/2.0 - #1004]
N110 G0 X#1001 Y#1002 (move above nominal hole center)
N120 G0 Z#1003 (move into hole - to be cautious, substitute G1 for G0 here)
N130 G38.2 X[#1001 + #1005] (probe +X side of hole)
N140 #1011=#5061 (save results)
N150 G0 X#1001 Y#1002 (back to center of hole)
N160 G38.2 X[#1001 - #1005] (probe -X side of hole)
N170 #1021=[[#1011 + #5061] / 2.0] (find pretty good X-value of hole center)
N180 G0 X#1021 Y#1002 (back to center of hole)
N190 G38.2 Y[#1002 + #1005] (probe +Y side of hole)
N200 #1012=#5062 (save results)
N210 G0 X#1021 Y#1002 (back to center of hole)
N220 G38.2 Y[#1002 - #1005] (probe -Y side of hole)
N230 #1022=[[#1012 + #5062] / 2.0] (find very good Y-value of hole center)
N240 #1014=[#1012 - #5062 + [2 * #1004]] (find hole diameter in Y-direction)
N250 G0 X#1021 Y#1022 (back to center of hole)
N260 G38.2 X[#1021 + #1005] (probe +X side of hole)
N270 #1031=#5061 (save results)
N280 G0 X#1021 Y#1022 (back to center of hole)
N290 G38.2 X[#1021 - #1005] (probe -X side of hole)
N300 #1041=[[#1031 + #5061] / 2.0] (find very good X-value of hole center)
N310 #1024=[#1031 - #5061 + [2 * #1004]] (find hole diameter in X-direction)
N320 #1034=[[#1014 + #1024] / 2.0] (find average hole diameter)
N330 #1035=[#1024 - #1014] (find difference in hole diameters)
N340 G0 X#1041 Y#1022 (back to center of hole)
N350 M2 (that’s all, folks)
Table 6. Code to Probe Hol
They are rated to 1500 RPM which was a factor in choosing that particular model.
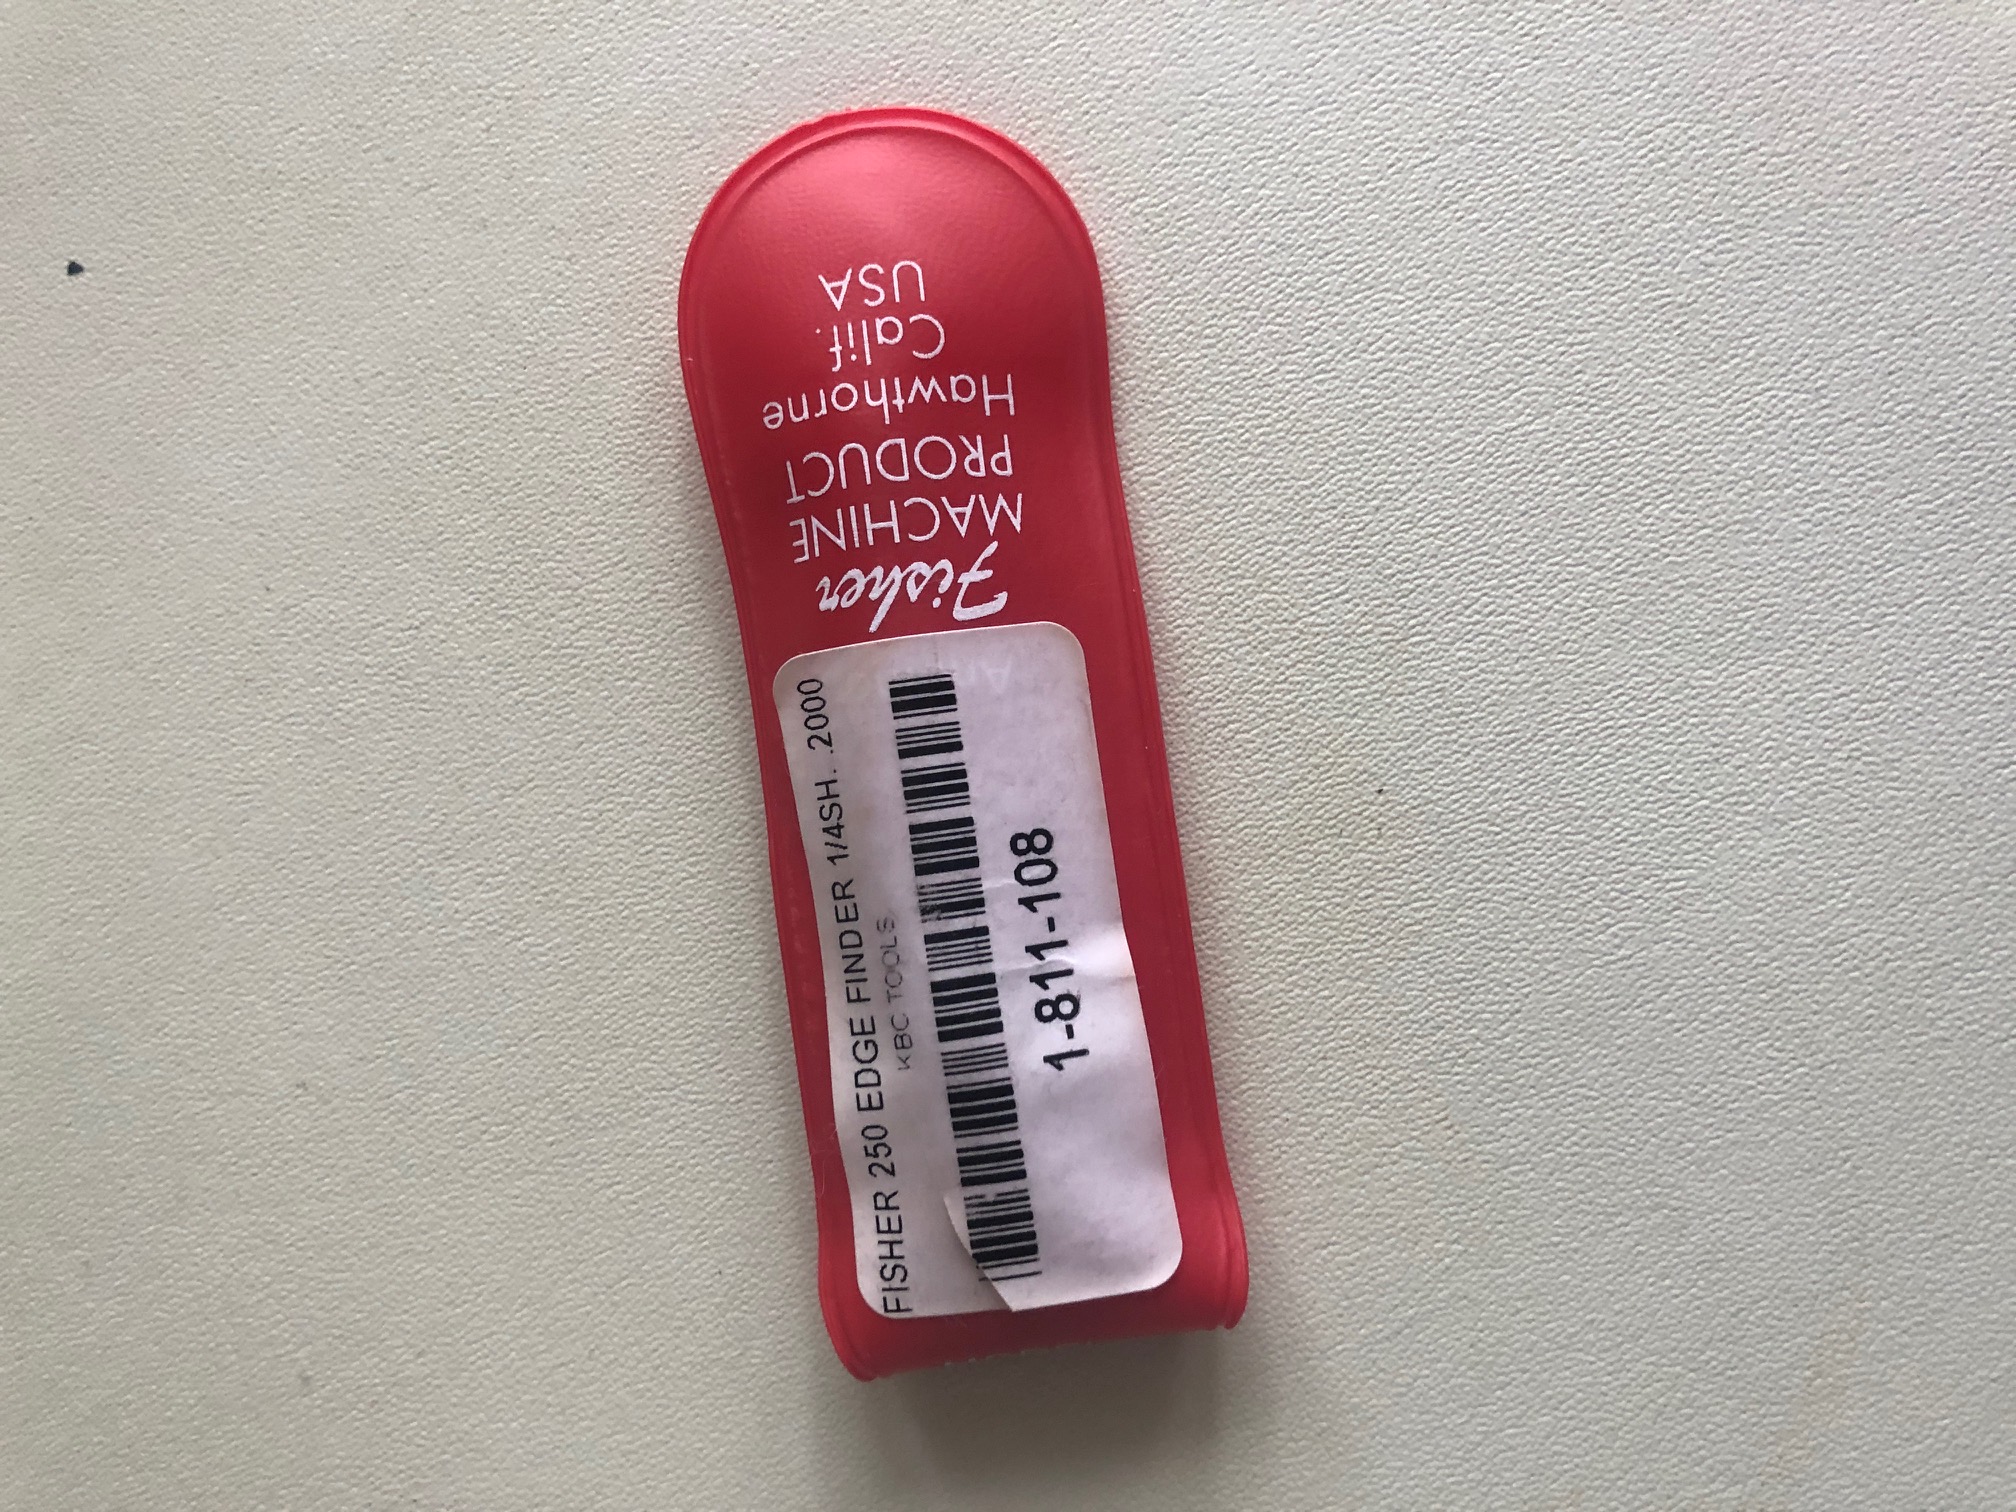
@DanStory - Carbide Motion I believe indicates 1500 RPM while jogging though I know there has been discussion in the past about Nomad 883 and possibly (can’t recall) Nomad 883 pro being limited to 2k RPM spindle speed. Unclear if that is a torque/cutting floor RPM or a “can’t rotate” floor RPM. Can’t recall if anyone has actually measured. For what its worth, 2 years of service with this edge finder and no rapid disassembly so far.
I’m due to take delivery of my Nomad this week, I’m pretty excited but also concerned about the noise after reading this. This is going in a relatively quiet manufacturing environment, so it could be a problem if its annoying the other workers. I suspect we will be mostly doing plastics and circuit board materials.
Keep in mind that I’m talking about metal. I haven’t cut anything other than metal since the starter project, when I cut the gummy material sandwiched between two sheets ot Aluminium.
Plastics and PCBs might be quieter, I expect they will since they’re softer. Worst case, you can build an enclosure like I did. In the enclosure it should definitely be quiet enough for a quiet manufacturing environment.
Lucas jumped straight on to one of the noisiest things to cut because he lives only for excitement and adventure (assumption).
I find the noise level varies greatly by material, speed, depth of cut and type of endmill and flutes… It varies by volume but also by pitch, which can sometimes be more annoying than volume. Often, using CM’s rate adjustment to change the rate by ±10% can sometimes turn a whine into a tolerable hum.
The type of noise varies too. There are variable frequency tones when the axis are moving, and varying-pitch high frequency sounds when its cutting.
For wood and softer materials, with conservative speeds and depths of cuts, I find it’s fine to be in the same room as the Nomad. Under these circumstances it is indeed far less noisy than the vacuum I use to clear the chips. Though, my vacuum is very, very loud… so, relativity in all things, eh?
Forgot to mention previously, but when cutting aluminium I’ve found a little spray of WD40+PTFE knocks off a lot of the higher frequency sounds. Regular WD40 works too but I think it has a different phase equilibrium and evaporates quicker.
A few times throughout the job. If it’s a pocket then the fluid sits in it and you don’t need to spray as much.
If you use a lot, it will affect the way the chips disperse. They will form a sort of a loose amalgam, but as yet I’ve never had that clog a job or anything like that.
I don’t have any of the upper end fancy coated endmills - perhaps they also affect the noise?
@Lucas: I may have missed it in the discussion above, but what CAM are you using to generate toolpaths? When milling aluminium, adaptive clearing toolpaths go a long way to control how quiet/loud you want things to be (i.e. if MRR/cutting time is not a concern, choosing a conservative optimal load will produce a cut that can be moderately quiet, it’s almost an enjoyable sound when it’s set just right and it purrs along nicely )
@Gerry thanks, good to know! I’ll try it out and see how it goes. If it works well I might have to invest in a small FogBuster or something.
I have the fancy ZrN endmills and they definitely make a difference. The Aluminium chips don’t stick to them, like at all.
@Julien I’m using Fusion 360 and generally use adaptive toolpaths. I use Winston’s settings from here, though I play with the feed rate override in Carbide Motion to get it removing as much material as possible without making ugly noises.
I’ve tried using less aggressive settings but I can’t get the machine anything like quiet enough that I can use it without its enclosure. Do you have any suggestions for quiet adaptive feeds and speeds?
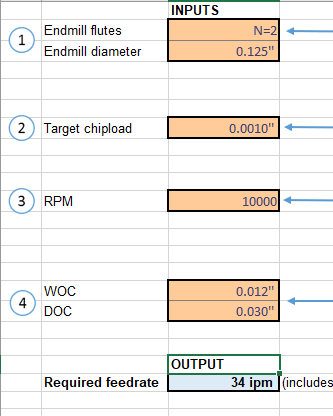
disclaimer: I’m a Shapeoko guy, I don’t even have a Nomad (yet), and my workshop is my garage, so chances are my definition of “moderately quiet” is not the same as yours. I checked the settings from that video, went back to check which ones I used in a couple of my projects (like this one), and I happened to use the exact same 0.012" stepover (~10%D), which is already conservative. You could try and reduce it further (say half), but then you would have to increase your feedrate to maintain the same chipload.
Your settings are
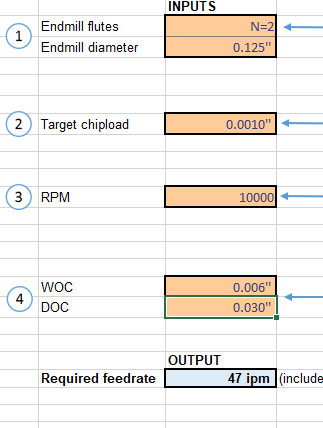
I would maybe try 0.006" optimal load, 47ipm:
My machine is not available right now or I would have tried and measured noise level in both cases, but that last case would shave off so little material at each pass that I imagine it should be quieter.
I tried this and a few other experiments and you’re right, the machine can be made to be much quieter, but still not to the point where I’d run it without the enclosure.
For reference, I run the machine in an apartment, in a room with a wall adjacent to the neighours.
I figure I’ll add some more update here. Disclaimer: I’m a bit frustrated right now so I might be more harsh than is justified.
I have two updates:
I contacted support about what I thought were the more resolvable issues that I raised earlier to give them a chance to respond. This happened a few weeks ago.
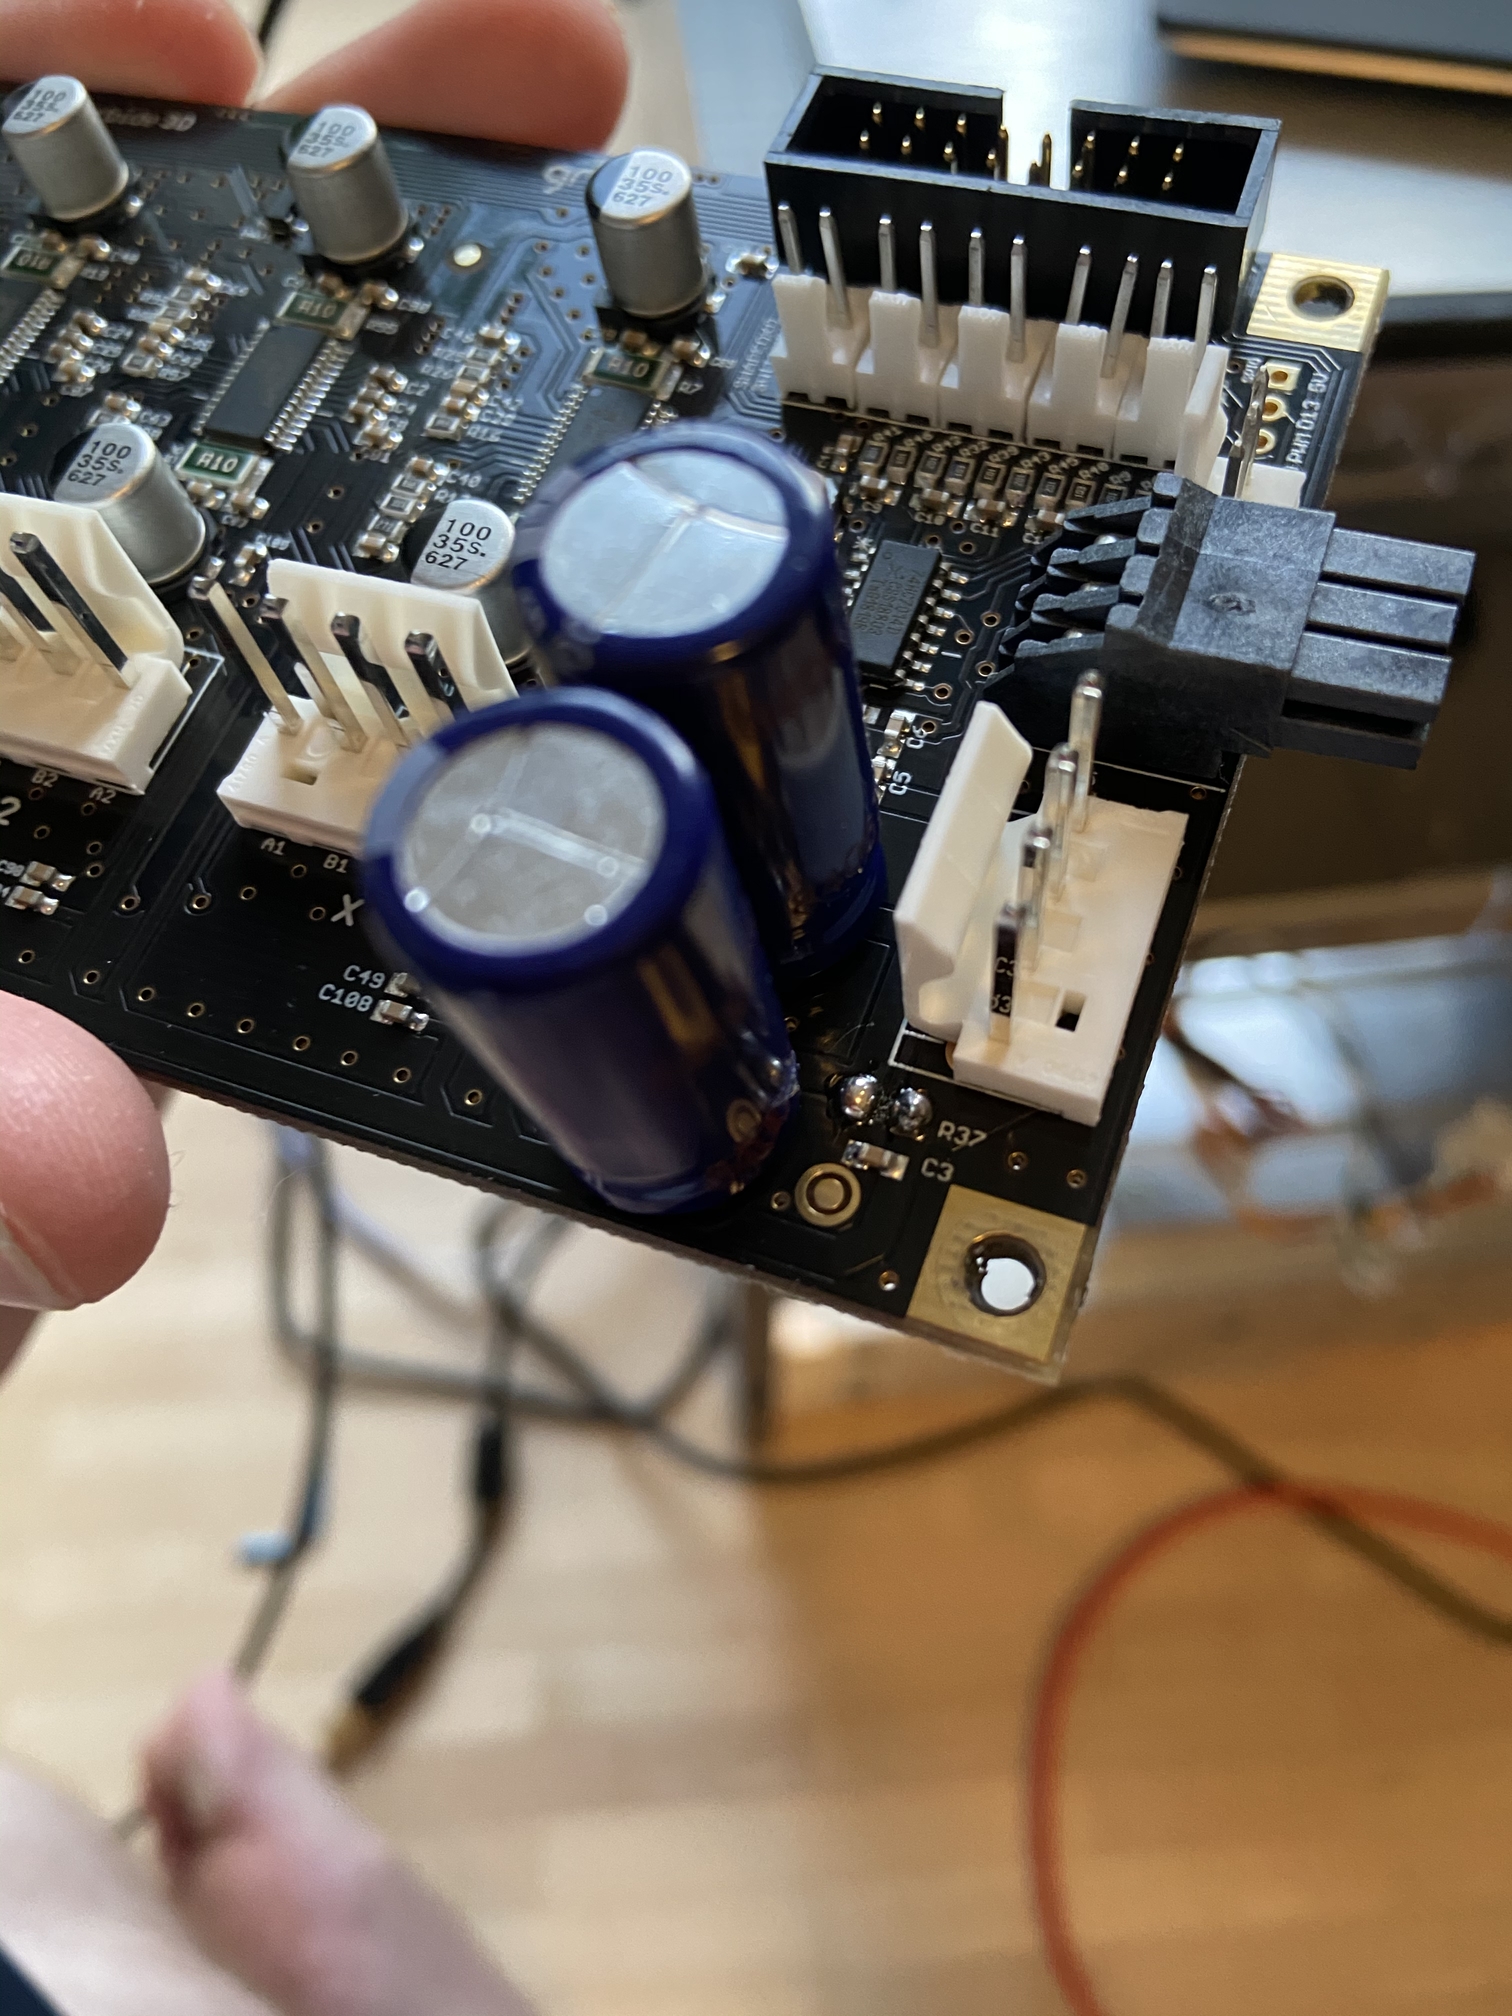
I fried my controller board.
The thread with support boiled down to:
Modifications void the warranty.
Q: How to accurately and repeatably zero the machine, whether it was possible to attach a probe and if so, how
A: Buy an edge-finder
Q: Which edge-finder? The machine’s RPM rating is too high for most
A: I don’t have a source for edge-finders that work with the Nomad
Q: How to clear chips and if a fan, blower, vortex tube, acquarium pump or something would be a good idea
A: Use a small air pump and not compressed air, which would blow chips places they shouldn’t go
Q: How to keep chips away from lead-screws and rails
A: Don’t. Clean the machine between every run instead.
Q: How to cool the machine in an enclosure
A: Use a push-pull fan setup
Q: Whether and how I can connect accessories like LEDs to the machine’s power supply
A: Don’t. Use a separate power supply
This really frustrated me at the time and looking back, still does now. For example, how on earth am I meant to clean the Y-axis rails between every run, when they’re mounted on the bottom of a heavy machine?
The overall problem is that as outlined earlier, the Nomad, as-sold, isn’t suitable for the purposes I suspect it would be bought for. However it’s unlikely the people buying this would have any way of knowing pre-purchase.
Since there are no refunds, you’re stuck with an expensive machine that requires extensive modifications to get to a point where it does what you bought it for, but the manufacturer won’t offer you the most basic information to help you do that.
Which leads me to the second problem: while reverse-engineering the probe interface with a multimeter, I shorted something and fried by controller board. Now I have to wait to see whether I can source a new one, then pay and wait for US to Europe shipping.
On a more positive note, I contacted support about runout and they’ve been receptive and engaged in helping me evaluate/resolve the problem.
Some more actionable feedback I’d like give to Carbide 3D is to document the machine. You don’t have to go and post all the designs and schematics online so someone can download them and build a clone but at least give individual customers whatever tidbit of information they want when they ask so they don’t end up like me. They’re going to void their warranty anyway, at least give them a fighting chance of not screwing their machine.
Controller - The nomad uses the same controller as the shapeoko so pretty much any S3 info you see will be cross compatible. Connecting any probes will be the same and even the BitZero plugs in and works (if you dont ground to the bed).
Y-axis - in my experience the Y rails are very well protected and the Y leadscew actually stays the cleanest out of the three. The easiest way to access the bottom is to tip the machine back. If you have an extra enclosure it would be beneficial to make little accordion protective covers.
At least the PCB is only $135. Also let me know if you want any of my spare Z axis or spindle parts.
The problem is that I can’t even find this info for the Shapeoko. The “reserved” header is only documented as a receptacle for the Carbide 3D touch probe. I think I understand how it works now, maybe once I get my probe working I’ll edit the Shapeoko wiki and save someone else.
The problem with the Y-axis is that all the chips seem to end up in a pile there. When I took my machine out, it was massive. I’m worried that it’ll get high enough to reach the leadscrew and cause some serious problems.
Thanks for the offer of parts, I’ll keep it in mind. For now all I need though is to machine a replacement bottom plate for the Z-axis, with my cutout. But for that to happen I need the controller working again.
Sorry to hear about the controller board - electronics can be a cruel mistress with one little slip making you want to question your life choices and change careers. There is nothing worse than ending the day with some money going up in smoke. Too late now but I grind the tips of my probes quite fine and then use heat shrink I can slide forward to cover the tips as much as possible when I need to probe a delicate area.
Re: Y-axis - the rails and screw seem to stay pretty clean on mine. Agree that getting chips out from underneath is somewhat of a ‘surely there is a better way’ thing and I experimented with putting the Nomad on a couple of wood blocks initially but later changed over to a narrow vacuum hose adapter tube (like you see for vacuuming out dryer lint vents and the like) that i feed through the slots from above and that keeps the chip level underneath to a minimum without having to ‘tip and sweep’ on a frequent basis.
Re: Edge finder. I have my solution that works and seems to work for others but yes, now that the edge finder seems to be withdrawn it does leave a gap - but as far as I can tell its a gap that affects most (all?) desktop machines.
Re: Noise. I somewhat sympathize with this as I too have a shared wall in the room where my Nomad lives. That being said - no special enclosure here and somehow it works out. I am careful not to run it too late at night and if it starts getting incredibly loud I tweak it for maximum quiet cutting. If your neighbors can hear your stepper motors what happens if you vacuum up the chips?
Ultimately is the Nomad the perfect machine? Definitely not.
Is it value for money? Absolutely.
Is it fit for my semi-commercial purposes? You bet.
Was I mislead by the marketing into thinking it was a silent 3d milling machine? No.
If I had unlimited money would I trade up to a Roland MDX-540? Well yes but I have better things to drop $35,000 on.
So I do think there is room for improvement from Carbide and curious about the next gen Nomad coming and what that may bring, but fit for purpose here.
@Gerry I didn’t mean or write it to be an absolute statement. I see plenty of people around here with similar interests to me making cool stuff and seeming very happy with their machine. There are also plenty of use-cases (e.g. engraving, PCB milling) that I think are very well served by it.
But I also suspect I’m not alone in feeling there’s a mismatch between the marketing copy and the reality of the machine.
Just read through the experiences I laid out in the first post and the main product page and tell me if my expectations were wrong.
@PhilG That’s a great idea with the probes. I wonder if I can just buy some smaller ones though.
Re chips: the problem is noise, I can’t run a vacuum cleaner in this room for several hours, my neighbours would kill me.
Re edge finder: there are solutions around though. There are electronic probes that work out of the box and some that would work with some small modifications. It was the process of installing one that triggered the puff of smoke.
Re noise: the neighbours can’t hear very much when the machine is in its enclosure, fortunately.
Re conclusion: I mostly agree, save for the silence. Maybe if you’re reasonably familiar with CNC machines already you have an idea of the noise they make but the product page has claims like:
“at home in any environment”
“soft metals […] cut well on the Nomad”
“fully enclosed”
“The Nomad 883 Pro has a durable and quiet spindle that’s capable of cutting a variety of materials without being so loud that it drives you out of the room.” (emphasis Carbide 3D’s)
I think a reasonable person reading those claims would expect something that makes noise at a volume suitable for a residential environment.
And a new development: when I was pulling out the board to get ready for the replacement, I noticed these solder blobs where a resistor is meant to be. Interestingly, they behave like a diode when I probe them with my multimeter.

 )
)