I hope this photo comes thru…
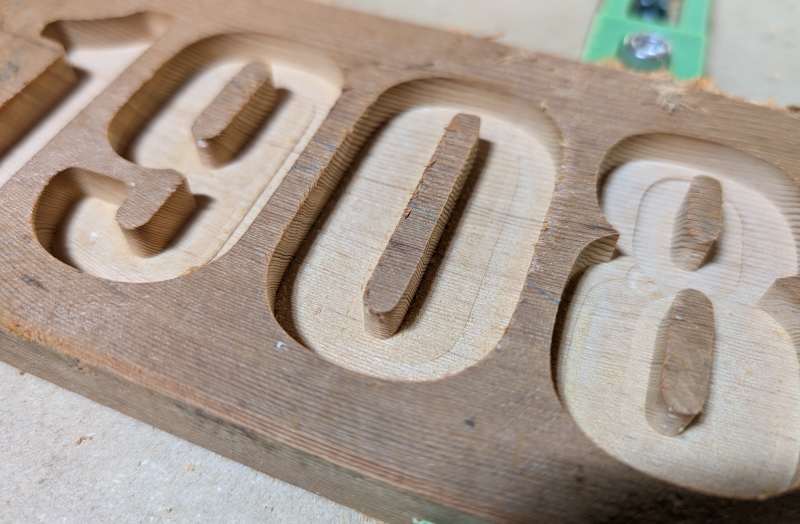
The address numbers were mostly OK- but it left some traces of unfinished business in the bottom.
How does that happen?
Jim
I hope this photo comes thru…
The address numbers were mostly OK- but it left some traces of unfinished business in the bottom.
How does that happen?
Jim
These kinds of machining marks usually come from either bad Tramming (how close the spindle is to perfectly 90 deg to the wasteboard), or to excess movement in the Z axis.
Tram issues are usually directional, for example you might see problems only when the machine is move on the Y axis.
Looking at the ‘8’, it seems your problem is not really directional. I would look for excess movement or play in the Z axis.
With the power On and the spindle OFF, grab the collet of the spindle and see if it moves at all. Don’t apply so much force that you over-power the stepper motors. It should feel locked in place. If there is any movement, the next step is to chase down what is allowing that movement.
If your spindle is good as @mhotchin suggested try reducing your step over in the tool path. However as an address sign it is typically viewed from a good distance away. So those minor imperfections are not really an issue for an address placard. However if those appear on other objects then check your tram and your router bearings. Also try decreasing step over. Some up/down cut bits have a fishtail profile and will leave artifacts behind. If stepover and/or router bearings are not the problem try using the #201 because the profile of the cutter is straight and not fishtail shape.
A little bit of slop in the Z axis or spindle shaft can allow the cutter to be pulled downward when the tool is fully engaged, as in the first cut of a pocket. Those steps look to be about 0.010" - 0.020", so I would set my depth per cut to leave 0.020" in the bottom for the last cut. If it’s 0.250" deep, set your depth of cut to a factor of 0.230", then the last pass will be only 0.020".
I’ve had the stock move/bow up off the waste board before when doing too deep of a cut with an upcut bit. For example: Lets say you are pocketing a “0” using a 1/4" upcut bit with an 1/8" DOC and 1/8" step over. When the bit makes that first plunge the leading edge of the cutter (50%) is in contact with the wood and the stock is sucked upwards ever so slightly. After that first pass when the bit steps over 1/8" (half the bit diameter) only 25% of the bit is in contact with the wood being cut so there is lest force pulling upward and the stock settles back down.
Double sided tape will remedy this.
Just a thought…
No spindle movement. Then…![]()
I found a loose clamp-DUH Removed that wood piece…
I then surfaced the top of a 6" piece of 2x4 with the same 1/4’ DC end mill- .125 deep. It finished the whole surface just fine.
Then I cut the 1908 again and it came out perfect. I ran it again cutting another 1/8" deeper.
That’s impressive to see it follow the EXACT path- just deeper!
At least the process of design, setup, zero, cut is getting easier now after all these tries and retries.
Thanks to all for taking the time to respond. I feel bad that you all went into so much detail with varied aspects of what could be wrong- and it turns out to just be a NEWBIE problem ![]()
But truly your responses made me think and consider them all- leading to the fix!
Jim
Another house sign to try
To me, this looks like wood flex.
When you do the first pass with a .25 EM, the cutter must cut the whole .25 width. The next pass will only be .125" for the pass. I have found that sometimes the full pass will actually “push” the wood, causing it to flex, but then the second pass that is only cutting .125" will not push into the wood and so that pass will be shallower, thus making these little tooling marks.
What I have found fixes this is to do one final finishing pass at .02" deep.
Here’s how you can do that.
Max Depth: .19
Edit your Depth per pass to .19-.02=.17, then divide that by 2. You get a Depth per pass of .085.
First pass is .085, 2nd pass is .17, final or finishing pass is .02.
Yes, it takes a little longer, but it’s better to have the machine work harder than to use your finger to fine-sand out those marks. Also, if you are doing a total DOC down to .5, you must divide the toolpaths by a higher number. You don’t want the Depth per pass to be too much for the bit to handle. IE .5 DOC, .50-.02=.48, .48/5=.096 dpp. With the final pass at .02.
The other way to do it is to use two toolpaths.
Rough Pass goes to .17; use all the standard tool settings.
Finish pass starts at .17 and finishes at .19
This topic was automatically closed after 30 days. New replies are no longer allowed.