I have installed the HDZ, went smooth. However, finished I realized that:
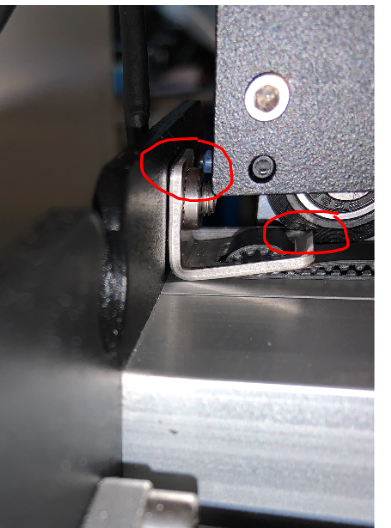
The x-switch touches not the black steel plate but the edge of the belt holding clip. --see pic.
The steel clip which holds the x belt collides with the black v-wheels. – see pic.
I did exactly as in the pdf 3.1 and I have the HDZ 3 (grey one).
It took me a while to figure why I am having this problems, but here it is:
---- The v-wheels delivered with the HDZ3 are beefier than the original. The original are slimmer and pass by the steel clip - … the beefier collide.
– I did push the clip as far as I could to the side but is not doing well.
What is the solution here. Please help, I am pretty much stuck.
Remove the screw holding the clip and start by using a pick or small file to remove the powder coating inside the hole. If that does not work, you’ll have to ever so slightly slot the hole to give that extra mm you need.
I had to do it with my machine when I upgraded the wheels as well. I used my dremel and a small bit and it took literally two or three taps to get the clearance I needed.
@Madhatter, thanks - I do realize this is a solution.
However, Carbide did design the new HDZ and is selling it for 400 bucks. I expect they know the problem and have a solution like a redesigned v-wheel or steel bracket.
So I want to wait their answer to this.
I really would like to avoid slotting and making holes into my machine because I invested into a new nice z-mount!
I had the same problem today assembling the HDZ, the black V wheel bangs on the bracket holding the belt and cannot go further enough to activate the micro switch.
Also i cannot see well in your picture, but the micro switch is installed on the front or the back of the plate? Check the pictures in the assembly manual, i think that it should be installed in the back to be able to reach the black plate instead of banging on the vertical side on the belt bracket.
No need to file anything and make a larger hole, just hold the bracket with a flat screwdriver away from the front while you tighten the screw and will be enough, i had the same problem today and when i received the machine two months ago.
@AlfredoM - yea, pic is no good but as a newbie here I am allowed to post only one picture!
So the installation manual pdf shows the limit switch to be positioned towards the spindle. That dosent work as the height and position in then exactly on the edge of the steel bracket.
So I have reposition it now outside towards the elcotronics. That is ok - but wrong in the installation manual. But I can live with that.
What I cant live with is making holes into my machine. I already damaged the V-Rail trying to reposition the steel bracket to the backside of the machine. This is really annoying.
But I am sure Carbide knows that - they may have a solution. If they can design a great machine like that - they will design a solution to the bracket. Lets wait.
It doesn’t work for me … and already mentioned, doing that with the screwdriver was no a good idea - I damaged the V-Rail doing it as I slipped with the screw driver …!
don’t elongate the hole in the machine plate do the hole in the bracket itself you only need a little bit to clear and the bracket is easy to replace if it has an issue