I hope I can get a little help with a project i’m working on. I’ve made a nice little box out of walnut which will be a gift for a family member and id like to do a design on the lid with the characters from one of her favorite tv shows. Since i can’t draw to save my life, I used the following image and the trace feature in CC. My problem is I’m not quite sure how to run the tool paths and with which cutters for optimal results since the lines are so close together. Do I have any hope of working with this? Thanks for any advice that can be shared!
Generally something like this will be done using a vcarve operation. This works with a V shaped bit which descends into the material until the sides of the cutter reach the lateral extents of the line. For finer lines you usually want a V cutter with a sharper angle as otherwise your cuts will be very shallow. When lines become very close together it’s very easy to get chip out between lines. What I would do in this case is remove some of the finer detail that has lines too close together. You’ll definitely want to make some test cuts into scrap or cheap material like MDF before you run the operation on more expensive material.
The trace function works but if you download the free Inkscape (very useful) you can open the bitmap image, select it, and use the Path Menu and then the Trace Bitmap. When you get the preview just click ok and then Save As Plain SVG. The Inkscape SVG has worked but dont tempt fate.
The file is saved as a plain SVG that you can directly import. With the SVG image in CC you can delete any unwanted elements and make your tool paths. As Bubba suggested a vcarve with a 60 or 90 degree vee bit would work well. If you have a smaller angle vee bit you could try that.
Try selecting all the image parts and make a tool path for a simple vcarve. Look at the simulation to see what you will get. I start at the top of the material and use stock bottom or the “t”. The reason is if you limit depth you may not get a good vee cut. The simple vcarve will cut as deep as the line is wide so the vee bit can touch both sides. Because you lines are rather narrow you want them to cut as deep as possible to get good definition of the image.
After you get the image cut and cleaned up use a coat or two of dewaxed shellac on the surface before painting. The shellac will keep the paint from soaking into the hollow straws of the wood that you expose when cutting. Paint with acrylic paint then sand off the paint that you get on the surface. Then finish as you usually would.
On boxes with a captured lid I usually prefinish the lid and use painters tape around the edges so any glue will not get on the finished lid. It is very hard to get finish under the groove in the box and as time goes by the wood may shrink and expose unfinished parts of the lid.
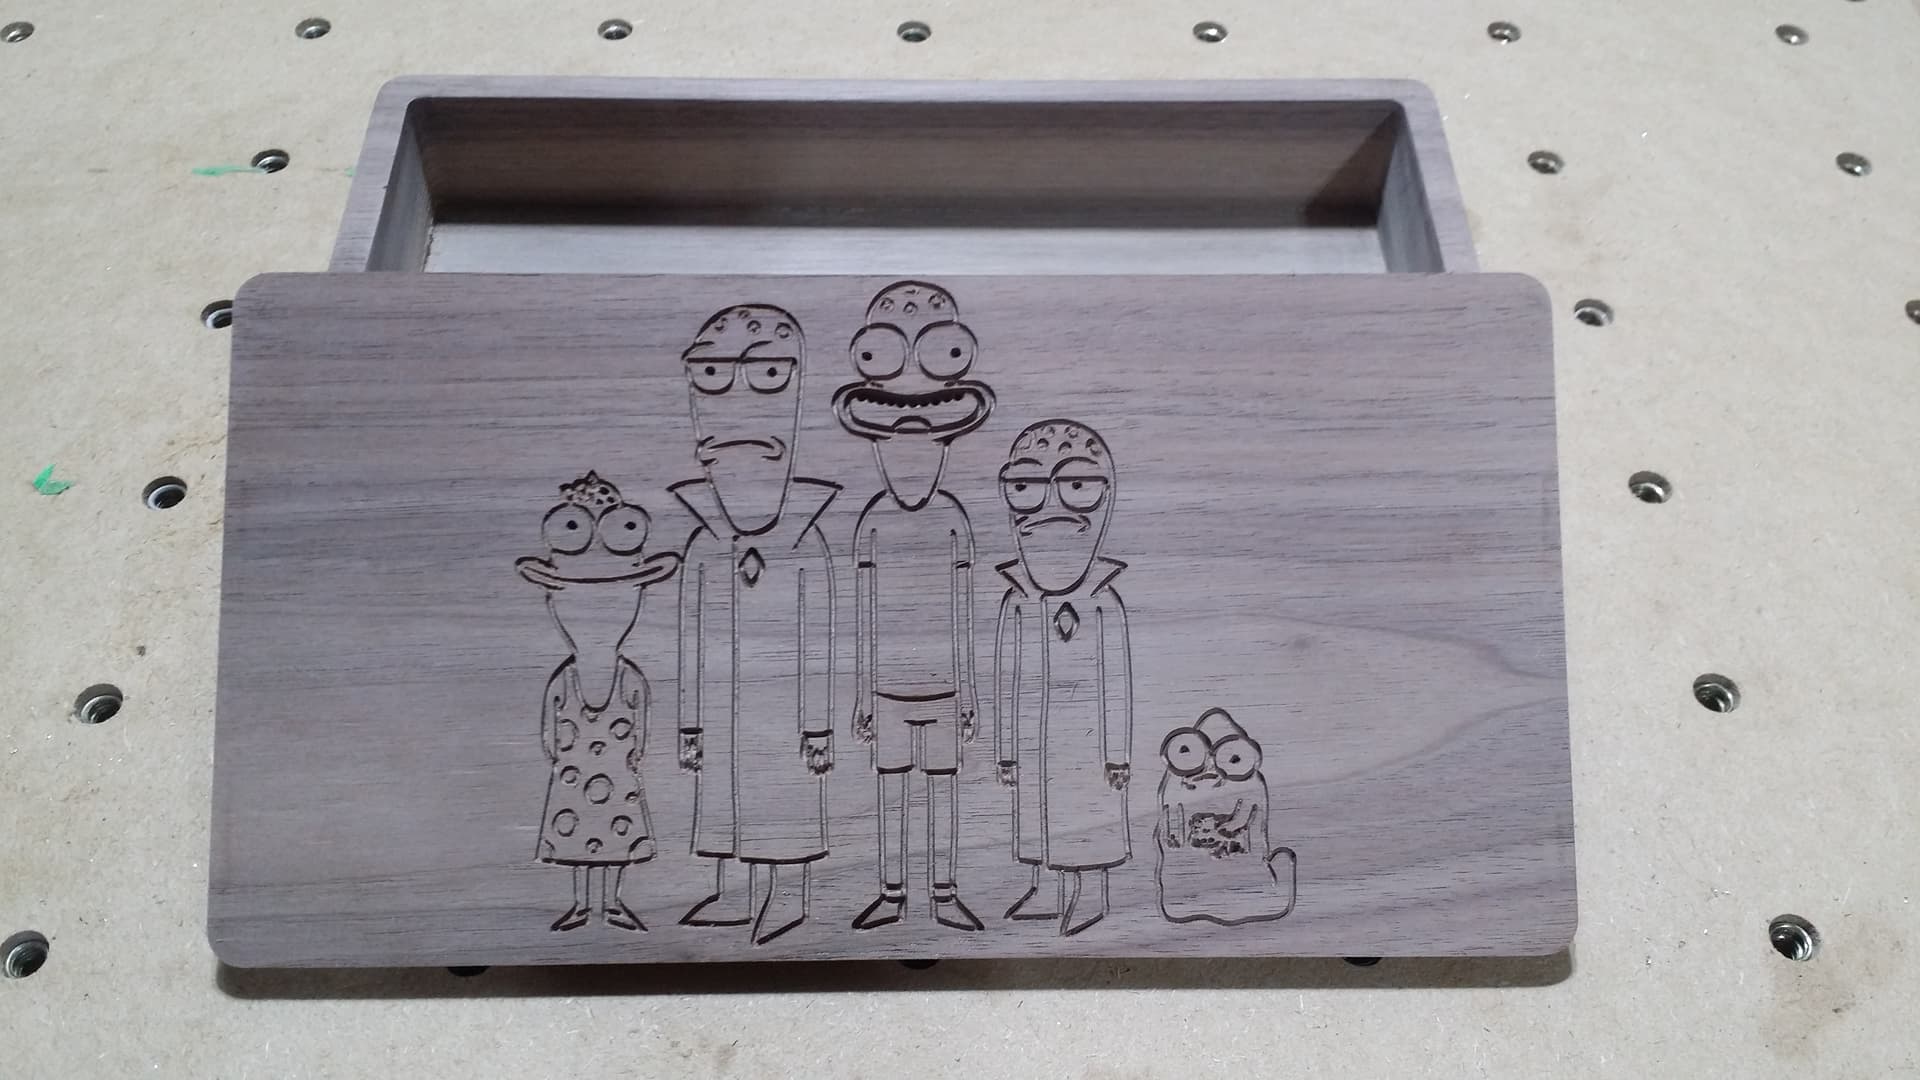
Here is a jewelry box lid and I prefinished the lid before gluing it in the box.
Just do a .03 contour, no offset with a 60 Degree v bit. It will do a simple “drawing”. That looks like your pic. If you want to get fancy, then advanced vcarve is the way to go. I guess its all about YOUR vision of what you want. Relax, its gonna be cool no matter what. You’re making it!
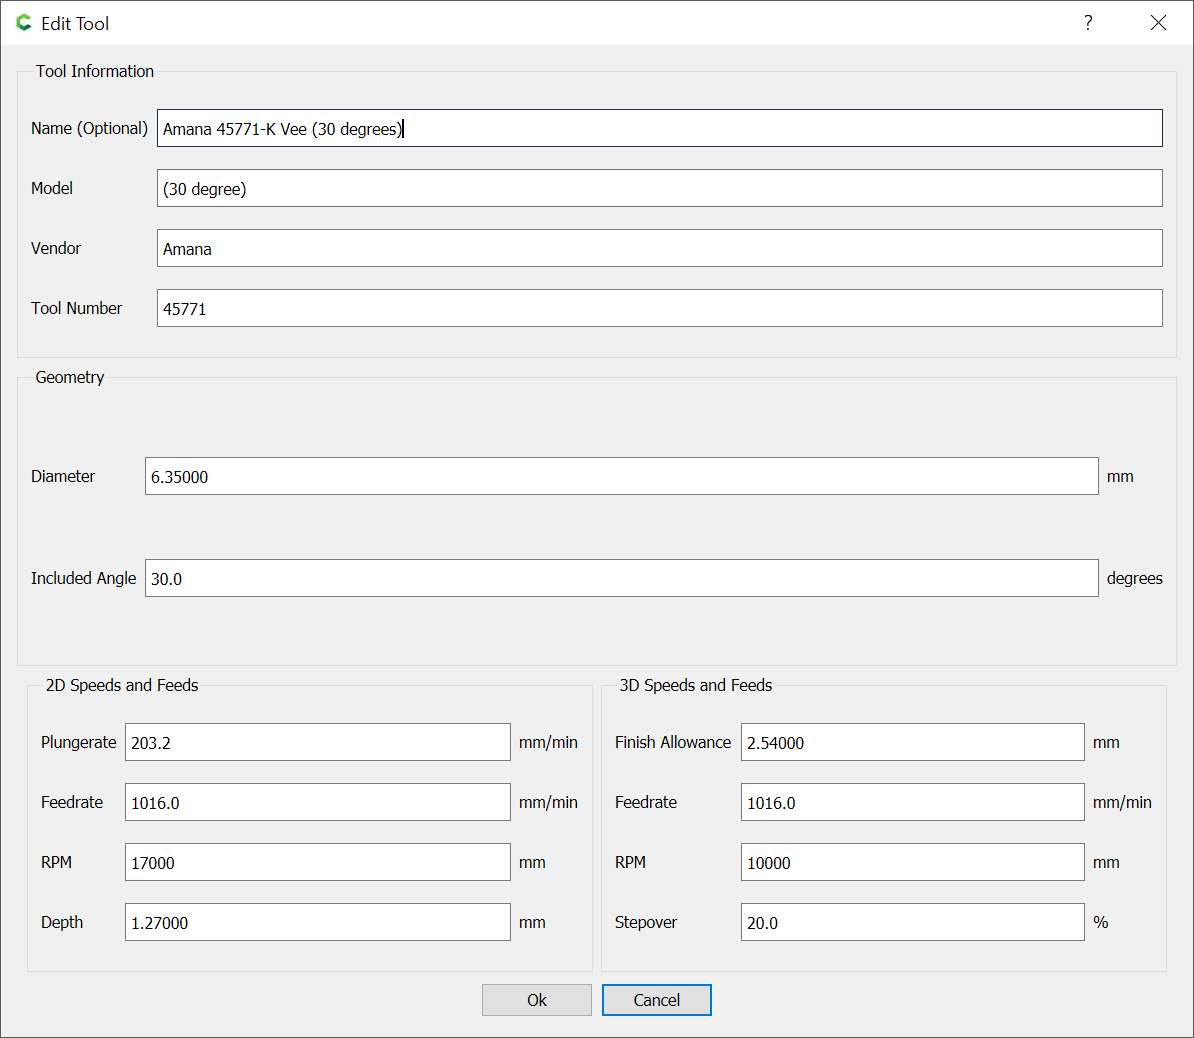
Your jewelry Box is fantastic Guy, very nice. I have a 60 and 90 degree vbit but i think i might pick up a 30 degree for max depth and try running as a vcarve. I was looking at 30 degree vbits on amazon, some have a tip diameter of .015 while others are .005. Do you think one would be better than the other for my design? I assume the smaller diameter would be best but that .005 tip seems like it could break quite easily.
Yeah, I think i’ll go with the .015 tip just to give myself a little wiggle room incase my F&S are off a little. Speaking of which, I’m looking at the spe brand 30 degree bit on amazing and their recommended settings are 18000 rpm with a feed rate of 54 ipm for hardwood and doc of .015 . Does that seem a little too aggressive or is that a good starting point?
So the RPM is the same.
The IPM is 1.5 times higher then the 34 recommended by C3D. Now your angle is 30 vs 60 degree so your bit is steeper. However you will cut just as deep if not deeper with the 30 degree bit.
Remember a simple vcarve will try to touch both sides of your line. So depending on how wide your lines will determine the depth of the vee cutter. Your lines in your art work look thin but depending on how big or small you size the art will determine how deep your vee cutter will cut.
Since this is a small project I would use the C3D cutting parameters. During the cut if everything is going fine then increase at 10% intervals. But since this is a small project it will not take long to carve so just leave well enough alone.
There are chip calculators here on this forum and on the internet. So if you want to get precise use the F&S calculators. For quick and dirty use the C3D parameters and see.
One note of caution about OEM F&S calculations. Every OEM that I have gone to and tried to get F&S they way over recommend IPM. Not sure why but they may be calculating for industrial machines and not hobby machines. So when in doubt use the F&S developed for the Shapeoko on the forum to get precise.
Thanks, I think that’s probably a good idea to start off conservative and go from there. One last question for you: When adding the 30 degree bit to the tool library, do i enter the diameter as .015 or do i need to enter a different value?
I have a custom tool for the Groovee Jenny 60 degree Vee Bit. Here are the parameters I imputed.
number
vendor
model
URL
name
type
diameter
cornerradius
flutelength
shaftdiameter
angle
numflutes
stickout
coating
metric
notes
machine
material
plungerate
feedrate
rpm
depth
cutpower
finishallowance
3dstepover
3dfeedrate
3drpm
702
Cadance Mfg
Groovee Jenny
Groovee Jenny
vee
0.375
0
0.375
0.25
60
3
1.5
0
Shaepoko
Hardwood
20
35
18000
0.08
0.08
2
35
18000
You add your tool through CC. However you can add by going to “About” and open the “Data Directory” then the “Tools” directory and double click on your custom tool database. That should open it up in a spreadsheet and you can add anything in the fields you want. Just be sure to save it as a “Text CSV” file. The spreadsheet wants to save in its native format which the CC database cannot read. it has to be a .csv file.
Be sure to give your custom tool a unique tool number.
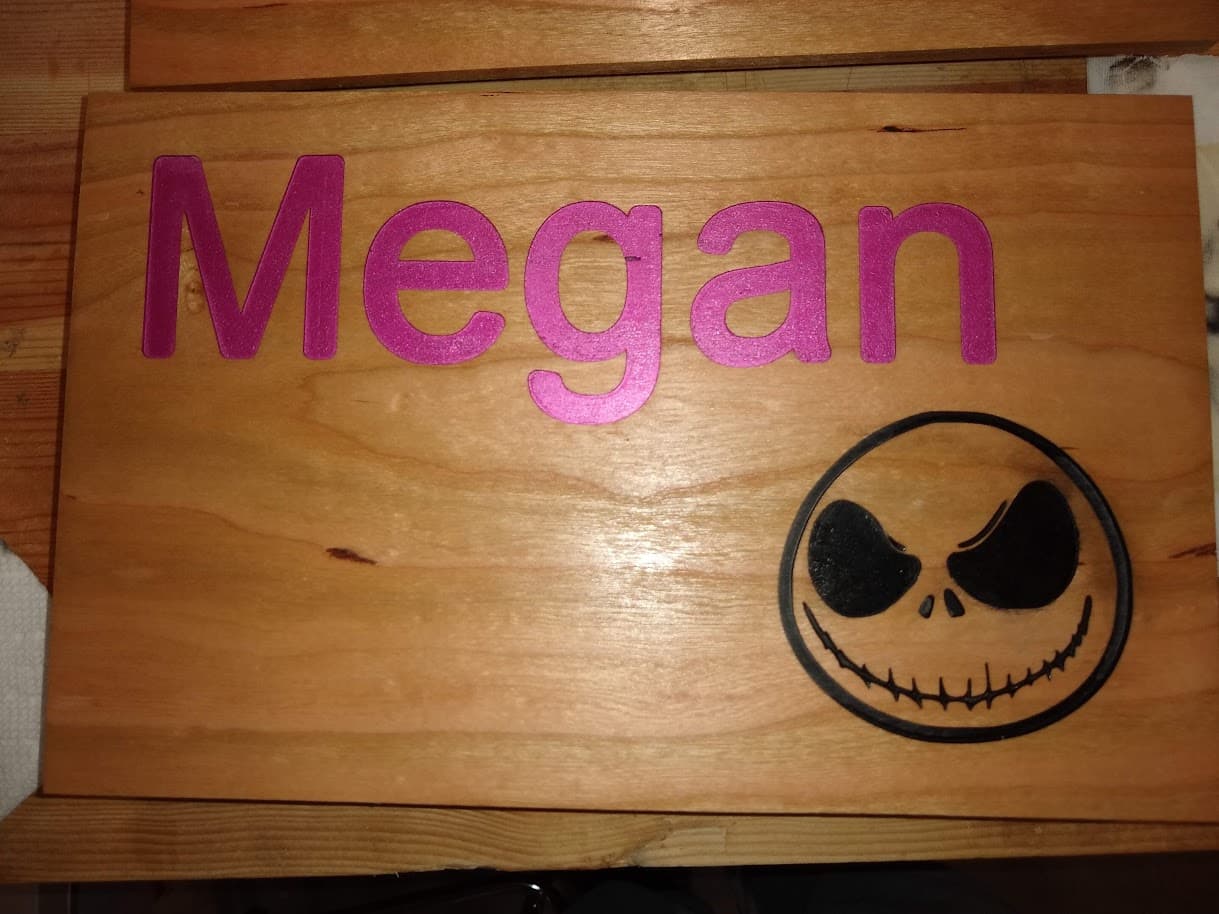
Just thought i’d share how the lid turned out. Ran into a couple small issues but overall im thrilled with the results. Now i just have to figure out the best way to finnish it thanks again to everyone who helped out.
The picture is kind of bland. If it is walnut try dewaxed shellac to seal it and then either water or oil based polyurethane. On the inside just finish with paste wxs. Polyurethane has an odor that hits you every time you open the box. The paste was will give it a good finish on the inside and not smell.
By prepping with a sealer you will need less coats of finish. Weather you use water or oil sand between coats with 320/400 sand paper to knock off the nibs. If using water based products use a damp rag to wipe the surface with water. Then sand, this is called preraising the grain. Water based products raise the grain and make the surface bumpy. Sand one last time at 220/320 before sealing and/or finishing.
I like the dewaxed shellac because it seals the wood and is compatible with water or oil based finishes. Oil based finishes give a warm glow to the wood and on walnut enhances it. Water based finishes are clear and do not warm up the wood appearance. It will take 2-3 coats of what ever finish you use.
Another option that is quick is lacquer. They make lacquer sealers and use rattle can lacquer to spray the box. Lacquer is fast drying and can be recoated in about 30 minutes. Sand between coats with 320/400 sand paper to remove dust and nibs that form. Lacquer is not as durable as polyurethane but a trinket box will not get much wear and it is fast fast fast.
Thanks so much for the finishing advise, that’s one area I’m still struggling a little bit with being very new to wood working. It is walnut so i’m leaning towards an oil based finish to add a little warmth and hopefully more “pop” to the carving. Do you find one finishing oil better then others for walnut? I know there’s lots of different types available.
Personally I like Minwax wipe on satin polyurethane. For small projects it is easy to apply but slow to dry. So you can get two coats a day if you put one on in the morning and one before you go to bed. The rattle can polyurethane is quick to dry but has to be done in a ventilated area preferably outside because of the overspray. You can get a big card board box and spray inside that. A turntable (lazy susan) helps in confined spaces. I use painters pyramids to hole the objects up so they dry evenly. However just some small pieces of wood. I always finish the bottom first. Then turn it over and do the top.
The advantage of wipe on polyurethane is you only need a container to hold the poly and a rag like an old tee shirt. The spray works fine but as noted earlier you need to spray outside.
Finishing is the last 10% of the project but preparation, sanding, is 90% of the appearance. Do not rush finishing. Rushing finishing can ruin all your hard work up to that point.
If you use paste wax on the inside be careful not to get wax on the outside with your fingers. Use painters tape to mask off the top sides of the box to avoid was on that. Wax will not take top coats and will look spotty.