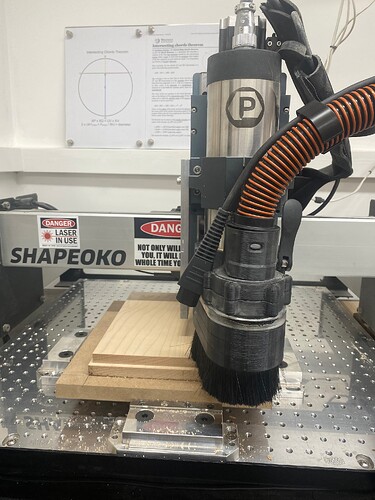
Hey all looking fir quick dependable and repeatable way to hold down material; sometimes it takes longer to figure out hold down than the actual job
Which machine? What material?
The usual options are
- clamps coupled w/ either T-track or threaded inserts (or a metal plate w/ threaded holes)
- some sort of adhesive, either double-sided tape or blue painter’s tape and cyanoacrylate glue
vacuum clamping brings up a distant third…
I used my spindle to drill (pocket) out 1/2" holes (1/4" deep) every few inches front to back and left to right so I have a grid of holes along the machines X and Y. I then cut a 1/2" dowl into 1/2" lengths. I can take 4 of those 1/2" dowls and place them in two holes on the X and two holes on the Y to form a fence on the left and along the bottom. Then I use these guys (third from left) to lock it in place.
I spent the first year of machine ownership trying different methods. MDF with inserts and various clamping options and painter’s tape with CA glue. I wanted the ease and repeatability of using a fixture tooling plate. As luck would have it, I found an American company that made a fixture tooling plate for my machine and posted it to the UK. I have not looked back since using the plate with a couple of pairs of SMW modular vices.
Any sort of workholding is completely secure, rigid and repeatable. A by-product of using the fixture tooling plate was an increase in rigidity of my S3 standard sized Shapeoko CNC machine. I have successfully cut 20mm thick aluminium to a tolerance of ±0.001" and on one occasion, using a new cutter and very carefully adjusted belts, I was able to achieve a tolerance of ±0.0004" The main advantage of using this system is that bolting and unbolting the modular vices, one knows that they are in the position of the 6mm threaded holes, which are set 20mm apart. One vice of the pair is held in place by a couple of slots and can be moved about 25mm and the othe vice of the pair is held in place by counter sunk bolts so it does not move.
Image illustrating workholding.
At this point just hardwood on the 5XL
I have a 5xl so to me that means drilling into the mdf waste board, which I don’t have a problem w/just making sure I understand
I think this may be what I’m looking for, Thanks!
Yes, drilling into waste board. If I remember I’ll get a picture when I get home.
work holding so 5 pro.c2d (200 KB)
