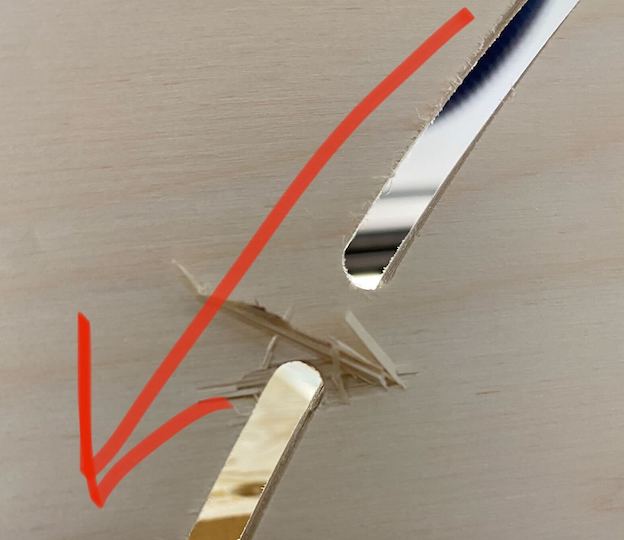
I normally cut 0.5-0.75" baltic birch with 2 passes with a compression bit. Each component I cut has 2-6 tabs that are usually .4" wide x .15" thick. The edges come out great, but the tabs usually have some small tearout on the plunge-side of the tab (Rise – Move over tab – Plunge on other side). It’s enough to cause a ~1/4" sliver to be broken off and essentially ruins the component (or enough to put it in the “seconds” pile). Is there a recommended size or method to deal with this sort of problem?
I’ve tried reducing the plunge rate from 80 to 30 IPM, but it’s still happening. It seems like the thin veneer is not being cut and it just being pushed down on the plunge. It could be a spoil board issue when I do multiple of the same cuts since there won’t be sufficient back-support for that final layer of veneer, but I can’t replace my spoilboard every cut.
I would think ramping after cutting over the tab width, then a reverse cut to the final width would work, like how ramping on a standalone line works (forward ramping, reverse cut to start of line, forward cut to end of line.
Anyone else have this issue?
My speeds and feeds:
.375" DOC
~18000 RPM
150 IPM
Plunge: 80 IPM (bad tear out), 30 IPM (better, but still there, see pic below)
Ramp doesn’t honor the tab in CC. Best I can think of is to cut down to the tab height, then do a finish pass and break the vector into sections by cutting out the tabs. Then each section will have ramps.
Making sure the material is held down firmly in those areas would help prevent it from being pushed out.
The tool may be pulling upward on the material leaving a gab beneath that allows to tearout. ??
How much use has your bit had it may be dull. Making deep passes in most anything especially plywood will do this. In the picture you are cutting against the direction of the fibers and with a dull bit this could happen.
How do you “break the vector into sections by cutting out the tabs”? in CC? That sounds like the best option, but I guess I’m not familiar with how to go about doing that.
I wish i could hold it down better in the center but 4’x4’ sheets are big. I can go back to see if the tabs closer to the edges with better clamping have less tearout than the ones closer to the center.
It could be a dull bit, but the other edges come out very clean. I have a few extra bits I could test with, but if memory serves, a brand new one still had this issue.
Are you using double stick tape or the painters tape with CA equivalent? Having support behind those spots would really help but you don’t want it to throw off your thickness.
I use Xfasten tape and still do tabs but probably could skip them it holds so well. I am worried about a slight wiggle, not the piece flying up.
I would, but I’m cutting a 4’x4’ sheet. There’s ~130 tabs across the various components I’m cutting out so putting tape on the back of these is not feasible in my case.
Create any other geometry that intersects your vector, and use the Trim Vectors tool to make gaps.
It results in open vectors, so you may need 2 operations to keep all the paths on the inside or outside, as once broken there is no inside/outside, and right/left might be different on some of the sections.
As for workholding, If you have room you could place some heavy weights on areas the need extra hold down. Or if there is a place for it, use some screws to hold the center areas down. ??
Even some smaller pieces of 2-way tape could help prevent pull up.
Keep an eye out for where the tab is. If it’s right over one of the Hybrid Table T-Slots, there will be no MDF behind it to provide support which would otherwise help.
When the tabs are being cut the plunge back down is putting stress on the bottom of the board and basically pushes the material out.
You could do a finish cut when you get to the depth the tabs are at and make the plunge a lot slower. Depending on the plywood vernier thickness you could measure the lawyers and make the tab height one or several layers thick to reduce the stress when plunging.
When bits are dull the force of cutting increases and causes more pressure on the material. Even if your bit is sharp on the sides the flat bottom of the bit can be dull.
Warped material no matter how slight and not secured enough to eliminate the curve can also lead to the tear out. This can be reduced by placing the material on the table where the outer clamps will be pulling the curve out the material and forcing the center down to the table.
Another option I use depending on the size of the project is the thick card stock that is used to bind tablets of paper it is roughly 1/16 inch thick ( I never measured it) and place this under the entire project and this will give a little support to the areas of the project that are over the t slots and reduce the tear out. If your project is large you can get the rolls of thick floor covering that is used to protect floors in construction areas. I use both methods.
If additional hold downs in the center can be machined in the project this will help.
Cutting on larger projects also causes the material to warp and or pull away from the spoil board. all woods have stress in it and machining it will make the stress show an many different ways.
If you can’t add clamps to the center of the project a more expensive option is composite nails. Put as many in as you need and this will not damage your bits.