If you had to replace the C3D control board anyway, would you switch to something else?

I noted the new spindle kit and am intrigued. I’ve not done much in terms of upgrades, just switching out to steel core belts and the Z-plus. I bought my machine in ~April 2019 and noted that I’ll need a new controller board ($140) as a result.

I’d already been looking into 4th axes options and know it’s a can of worms. I’m still wrapping my head around the electronics and configuration required to pull it off. I add this, as upgrading electronics down the road had already come to mind, and I’ve seen that others here have done it.

My question boils down to: if I have to buy a replacement C3D board anyway, would I be better off going with something else?

I’d also be open on any input on why not to go with C3D’s spindle. The plug and play compatibility is very attractive, and for my small setup I don’t plan to go water cooled anyway (more to worry about, small space, added complexity).


@Julien maybe this is off-topic/too detailed for your e-book… but I did wonder if dedicated, formalized sections on electronics upgrade options, what maintains Carbide Motion compatibility vs. not, other considerations, all that… might be of interest?


I wanted to keep the top short to cut to the chase, but will add the following if it helps in answering.

Controllers that have come up and aren’t too much more include Ethernet Smoothstepper, BlackBox, xPro X5, and the Gecko 540. Or heck, something crazy like this. If I were to go 4th axis, I don’t think any of these could do true 4th axis; I’d be swapping Y for A when I use it, as they only have 4 motor outputs (maybe minus the ESS?). Feel free to correct my thinking, as I admit the full picture of electronics still confuses me a bit… like whether the board determines that one must use GRBL, and differentiating options that have built-in drivers vs. being purely a G-code receiving interface for dedicated, separate drivers.

Also, I admit I can’t really define a specific thing I’d be looking to resolve, per se, I just don’t want to sink $140 on getting the same thing I already have if there are advantages to doing something else (for not a ton more). I’ve seen folks allude to limitations/downsides of GRBL for example, but not explicitly state what’s sup-optimal? I do experience random and very infrequent disconnects. Sometimes I think it’s me bumping the USB cord and momentarily disconnecting, very rarely it seems totally random during a cut, and more frequently I’ve correlated it to turning off my router at a specific time (like right before doing to home position after a cut, which I figure is some EMF thing).
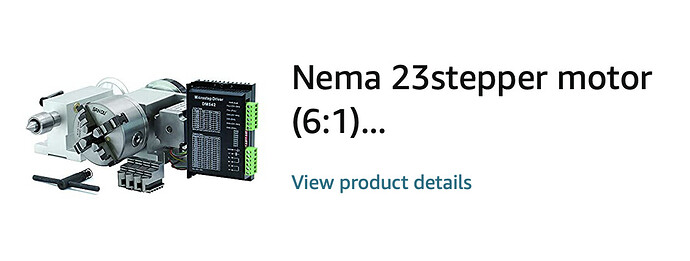
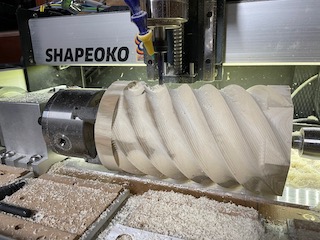
I chose the KeyeStudio Ramps 1.4 combined PCB, step-stick 2290 (?) drivers and now have XYYZA axis control. I had to switch to GRBL-MEGA-5X as the firmware as GRBL don’t yet appear ready with their multi-axis support. Some tuning of stepper torque/driver current to match the original setup, but I now have a solidly reliable S3XL/HDZ complete with VFD spindle and Rotary axis that has worked flawlessly for over 8 months now. Happy to share specifics if it’s of interest

2 Likes

Interesting. Is this what you’re referring to? Or maybe by combo, something like this (combo = ramps 1.4 + mega)?

Did you swap some stuff around? For example I notice their wiring diagram shows doubled up z motors; did you use those for y? And are you using the extruder motor output for the rotary?

For the stepstick, thinking these? Am I interpreting correctly that the board provides what look like sockets for these drivers, then?

I can probably look into the flashing myself, but good to know re. Mega-5x GRBL flavor. What do you use for sending with this setup? And do you have a link to the 4th axis you went with?

I guess in short… ha, yes I am interested in specifics :slight_smile: Really appreciate it and you’re giving me hope!

Edit: oh, and in the spirit of my original question… was the 4th axis your primary motivation in switching control board/drivers? Or were there other benefits/advantages you already had in mind?

I replaced mine with one of these and I could not be happier:

https://duet3d.com/duet3mainboard6hc

Their next firmware revision is going to have a number of CNC focused updates. The built in steppers can handle three times the current as the C3D ones and are silent. It supports Macros which has let me do things like write surfacing macros so I can surface a part without having to use a CAD/CAM package.

3 Likes

Thanks for the tip. What drove you to pursue this, out of curiosity?

And by “the built in steppers […] are silent,” do you mean the drivers? Interesting; I’ve not noticed the C3D drivers (on the control board, right?) making noise, just that the steppers themselves of course make some whining noises. I’m intrigued, but might need some clarification to follow what you mean.

Very cool on not having to make a file/CAM for simple operations like that! What software are you using, then?

If I were to swap out my controller, I would probably go with the ethernet smoothstepper with Mach4 because that’s what I am familiar with. It can handle 6 independent axis at once and has many times more I/O options. It is not a cheap option though. You need a lot more than the ESS by itself. You would need the license for Mach4, break out boards, a power supply, stepper drivers, cabling and some sort of enclosure. You are probably looking at between $1-2K worth of stuff. End result would be a much more powerful controller but it comes with a cost.

2 Likes

I love duet boards for my 3d printers!

What gcode sender are you using and how compatible is the duet board in that sender? Did you have any big problems?

I meant stepper drivers. The silent step portion doesnt have much of an impact when your spindle is on, but with it off it does.

If you search on here for my posts you will see that I cannot leave well enough alone. LOL. Half the fun of having a tool for me is modifying it. The Duet has a number of very useful features like a web interface, high end stepper driver chips, fusing, extra GPIO for controlling random devices, and tons of expansion possibilities with its add on boards. They about to release a closed loop board which allows you to use servos and rotary encoders for far higher accuracy on your cuts.

2 Likes

I use Duet Web Control. IE the built in web interface.

I’m assuming you a 3d printer using a duet board to have tried it yourself… If so, how does the interface for CNCs compare? Does it make sense and flow reasonably for the slightly different workflows?

Do you have a bitsetter and/or bit zero? Are those just handled via hooks (aka specifically named gcode files)?

There is a CNC mode for the interface and it works just fine. They are focusing on CNC improvements for their next release as well like backlash compensation.

I have a bitsetter and bit zero and both work fine. They are hooked up to the 4th end stop. I have macros for using them.

1 Like

Thanks for clarifying. I learned of the ESS from Avid’s package… does something about ESS deterministically mean one must use Mach4? Indeed, I was not looking to pay for some extra software package, but noted that Avid’s site refers to Mach4, as did a youtube video I saw where someone went over it.

Can it not be driven with something else? Thanks for the price ballpark; I had not gone that far down the path to figure that out. I noted a youtube vid of someone using a Masso had what looked like these drivers. Would those work?

If so, it think we’re looking at:

Anything I’m missing? And indeed… comes at a cost, though for sure being a bit more future proof and capable, depending on the additional cost, seems better than paying $140 if I can already know it’s incompatible with my desired use-cases. Thanks for the info/input!

I am not sure if you have to use Mach4 or Mach3 (don’t use Mach3, it is very outdated and is no longer receiving updates even though it is still sold) with the ESS but I know it was designed for it and I am not aware of any other options.

You are missing:

  • Enclosure
  • Internal wiring management
  • Internal and bulkhead wiring connectors
  • Some sort of e-stop and external power and enable switches
  • Fuses/breakers and any other circuit protection stuff

If you are going to invest in a controller like this I would go all the way and make the wiring very clean using DIN rail mounted components and plan for future modifications and add-ons. More time now will make the future much easier.

One other thing to think about is that the PC you use with Mach4 really needs to be dedicated for only that. Unlike GRBL, Mach4 does all the motion planning and I/O control on the PC itself and there is just a small buffer on the ESS. If your PC has a communication hiccup longer than the amount of time in the buffer, it can cause all sorts of problems. Typically you make a bunch of changes to the PC in order to prevent communication issues that make it unwise to use it for anything other than running the CNC.

Anything that takes a step and direction input will work just fine.

1 Like

My first motive for replacing the controller board was to add a rotary axis, without having to switch constantly between Y and A control.
I researched and found a stepper-driven 4-axis chuck that would suitable for CNC addition, with a stepper of similar capacity and drive requirements to the existing machine (ShapeOKO 3XL). There was no point considering a higher capability rotary as it would not be matched by the rest of the machine.
The KeyeStudio PCB is Atmel 2560 based with 5 axes, and can use step-stick (look at Pololu modules for what these are) driver OR headers for external, higher capability drivers. I did look at the Duet and others, but their capability and level of ‘difference’ to the stock board seemed excessive considering the relatively modest change (rotary) and that the S3XL is not a super-power machine… I think I paid $21 from either AliExpress or Amazon - I will dig out a link. Being a 3D printer/CNC targeted controller, it has some additional I/O that may prove useful in future, but not currently used.
Reading up on the stepper drivers on the S3 standard PCB, then looking for a reasonable match, I settled on the TCM2209 step-stick drivers as ‘entirely capable’ and the comfort of knowing the new PCB could also drive external driver modules should that prove necessary. Cost from Amazon was something like $7 per.
I was also only seeking to add rotary axis awareness to the GRBL side, to match Vectric VCarve or Fusion 360 rotary axis designs and output, and proven post-processor such as Neil Ferries. Working back from sender apps, given that CM doesn’t support the extra axis, I settled on UGS in the end and got involved helping to improve various aspects - to encourage the work on rotary visualisation development that is beyond my skill set (I worked on macro enhancements and inline interpreters).
This also pointed me towards one of two GRBL enhancement projects, the ‘official’ branch who seemed to be some way off a working product, and the GRBL MEGA-5X branch who already had it working AND on the Atmel 2560 processor. I tweaked the config to closely match the original Carbide/ShapeOKO setup, added in the rotary axis config, and compiled/uploaded this using the Arduino.cc IDE tool (free, and freely available). Runs on Win, Mac and Linux/Pi and needs nothing more than a USB port to be able to program Arduino or Arduino-like boards.
Read up on how to choose and then calibrate the micro-stepping, current etc parameters for the stepper drivers and ran some test cuts to compare behaviour of the machine before and after upgrade. I then spent some time working out the best acceleration and speed parameters for GRBL $$ on the A axis.
Bought an extruded enclosure, used the S3 to cut end panels and wired it in neatly. Only slightly larger than the original S3 controller box, mostly because I added in a couple of tiny fans - just in case I had been a little optimistic in choosing the 2209 stepper drivers. The fans are not necessary, but nice to have.

So if you want to build basically ‘like for like’ and add Rotary, the above is an example of how to achieve that. If you want to upgrade and upgrade because that’s cool too, then some of the other posts have share their journey and preferences.

Links to the key bits:

4 Likes

Solution in action"

IMG_5446

6 Likes

Incredible information. I’m grateful for the walkthrough/clarifications and breadcrumbs on the key steps required to pull this off. I think for now my only other question is whether or not you needed that dedicated driver for the rotary package? I assumed this is what the RAMPS 1.4 + the TMC2209’s were doing (and there are 5 of them). Or am I not following entirely and/or the demands of the 4th axis are different than merely retrofitting the Shapeoko motors?

Thanks again!! This is so helpful and exactly what I was looking to understand.

You can only have 1 controlling ‘processor’ that the sender talks to, so the number of stepper channels has to be a factor in choosing the controller PCB. Whether you want to stick with GRBL or are happy to experiment with some other protocols/derivatives is another factor. This new PCB is replacing the stock PCB.
Finally, whether you want precision control over the rotary axis or whether you intend using it as an indexer (0-90-180-270 positions only) as steps require precision/stepper driver/stepper motor and indexing could be achieved a number of ways.
That is why I chose a 5-channel controller PCB, Arduino based, GRBL based and kept the differences to the original machine to a minimum by doing so.
Each channel refers to a GRBL axis letter, each channel has a H-Bridge stepper driver (in mine TCM2209’s) and connections to the relevant stepper motor. ShapeOKO XL uses 2 Y axes, so my axis config is XYYZA making 5 axes in total, with the two Y’s contra-rotating. All 5 axes are live and possible to control simultaneously via GRBL commands - provided your CAD software can to that.
I use Vectric VCarve Pro for a number of reasons, but one specific one being that it can create and output rotary designs. When doing so you have to choose which axis combo the Post Processor will output (XZA or YZA) as Vectric’s ‘engine’ currently only does 3 axes at one time. Not sure what Fusion360 or the newly announced SolidWorks Maker-CAM do, but I expect ‘proper’ multi-axis.
The design choice of a 5-axis controller PCB, GRBL based means I can use it exactly like a standard S3XL with CC/CM or whatever, and without any machine setup/config/wiring changes can also use it for rotary work at whatever precision of rotation I want. The video I uploaded shows making a chunky lamp stand, the 3D form being spiral pyramids wrapped around a Septagon core and text running around the base. The headstock (chuck) is in a fixed position on my machine, and is fixed to an aluminium guide rail that extends all the way across the machine bed - the tail-stock slides along this rail to ensure it is aligned, and then local clamp-down threaded inserts are used to lock it in the chosen place. A very simple, but pretty much adequate, version of a lathe bed/spine and tailstock.

2 Likes

One erratum to the above. Carbide code a ‘secret’ into their controller PCB so CM will only talk to Carbide machines. As I have changed the PCB and am using a different GRBL stack, I can no longer use CM. However, I find UGS, CNCjs and gSender better tools so this is no real loss.

2 Likes

Excellent. Thanks again for all the information!

Last clarification: are you using that driver shown in the Amazon link for the 4th axis, or just the TCM2209? If I found the right thing based on your attached picture, I noted options with and without a dedicated stepper driver (and your pic shows it).

I wasn’t sure if your comment about steps/precision of the A axis implied you needed this dedicated driver or if you were using a 5th 2209 to control it?

Also, noted re. CM. I played with CNCjs a bit and liked it, but didn’t get super into it. Changing senders doesn’t really bother me. It’s good to be aware of all of these things, though!

All axes are using the 2209 drivers. I got the external driver shown in case it were needed, but it wasn’t.

1 Like