If you had to replace the C3D control board anyway, would you switch to something else?

I use Duet Web Control. IE the built in web interface.

I’m assuming you a 3d printer using a duet board to have tried it yourself… If so, how does the interface for CNCs compare? Does it make sense and flow reasonably for the slightly different workflows?

Do you have a bitsetter and/or bit zero? Are those just handled via hooks (aka specifically named gcode files)?

There is a CNC mode for the interface and it works just fine. They are focusing on CNC improvements for their next release as well like backlash compensation.

I have a bitsetter and bit zero and both work fine. They are hooked up to the 4th end stop. I have macros for using them.

1 Like

Thanks for clarifying. I learned of the ESS from Avid’s package… does something about ESS deterministically mean one must use Mach4? Indeed, I was not looking to pay for some extra software package, but noted that Avid’s site refers to Mach4, as did a youtube video I saw where someone went over it.

Can it not be driven with something else? Thanks for the price ballpark; I had not gone that far down the path to figure that out. I noted a youtube vid of someone using a Masso had what looked like these drivers. Would those work?

If so, it think we’re looking at:

Anything I’m missing? And indeed… comes at a cost, though for sure being a bit more future proof and capable, depending on the additional cost, seems better than paying $140 if I can already know it’s incompatible with my desired use-cases. Thanks for the info/input!

I am not sure if you have to use Mach4 or Mach3 (don’t use Mach3, it is very outdated and is no longer receiving updates even though it is still sold) with the ESS but I know it was designed for it and I am not aware of any other options.

You are missing:

  • Enclosure
  • Internal wiring management
  • Internal and bulkhead wiring connectors
  • Some sort of e-stop and external power and enable switches
  • Fuses/breakers and any other circuit protection stuff

If you are going to invest in a controller like this I would go all the way and make the wiring very clean using DIN rail mounted components and plan for future modifications and add-ons. More time now will make the future much easier.

One other thing to think about is that the PC you use with Mach4 really needs to be dedicated for only that. Unlike GRBL, Mach4 does all the motion planning and I/O control on the PC itself and there is just a small buffer on the ESS. If your PC has a communication hiccup longer than the amount of time in the buffer, it can cause all sorts of problems. Typically you make a bunch of changes to the PC in order to prevent communication issues that make it unwise to use it for anything other than running the CNC.

Anything that takes a step and direction input will work just fine.

1 Like

My first motive for replacing the controller board was to add a rotary axis, without having to switch constantly between Y and A control.
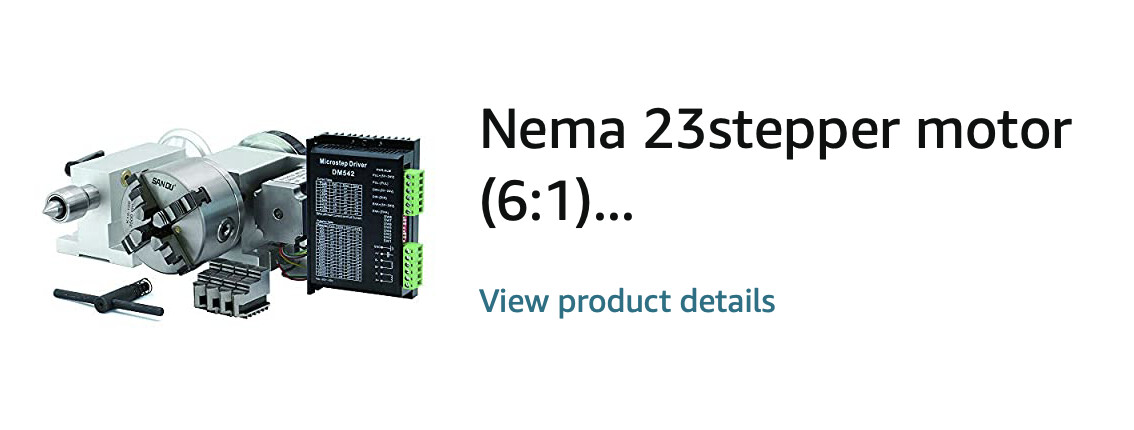
I researched and found a stepper-driven 4-axis chuck that would suitable for CNC addition, with a stepper of similar capacity and drive requirements to the existing machine (ShapeOKO 3XL). There was no point considering a higher capability rotary as it would not be matched by the rest of the machine.
The KeyeStudio PCB is Atmel 2560 based with 5 axes, and can use step-stick (look at Pololu modules for what these are) driver OR headers for external, higher capability drivers. I did look at the Duet and others, but their capability and level of ‘difference’ to the stock board seemed excessive considering the relatively modest change (rotary) and that the S3XL is not a super-power machine… I think I paid $21 from either AliExpress or Amazon - I will dig out a link. Being a 3D printer/CNC targeted controller, it has some additional I/O that may prove useful in future, but not currently used.
Reading up on the stepper drivers on the S3 standard PCB, then looking for a reasonable match, I settled on the TCM2209 step-stick drivers as ‘entirely capable’ and the comfort of knowing the new PCB could also drive external driver modules should that prove necessary. Cost from Amazon was something like $7 per.
I was also only seeking to add rotary axis awareness to the GRBL side, to match Vectric VCarve or Fusion 360 rotary axis designs and output, and proven post-processor such as Neil Ferries. Working back from sender apps, given that CM doesn’t support the extra axis, I settled on UGS in the end and got involved helping to improve various aspects - to encourage the work on rotary visualisation development that is beyond my skill set (I worked on macro enhancements and inline interpreters).
This also pointed me towards one of two GRBL enhancement projects, the ‘official’ branch who seemed to be some way off a working product, and the GRBL MEGA-5X branch who already had it working AND on the Atmel 2560 processor. I tweaked the config to closely match the original Carbide/ShapeOKO setup, added in the rotary axis config, and compiled/uploaded this using the Arduino.cc IDE tool (free, and freely available). Runs on Win, Mac and Linux/Pi and needs nothing more than a USB port to be able to program Arduino or Arduino-like boards.
Read up on how to choose and then calibrate the micro-stepping, current etc parameters for the stepper drivers and ran some test cuts to compare behaviour of the machine before and after upgrade. I then spent some time working out the best acceleration and speed parameters for GRBL $$ on the A axis.
Bought an extruded enclosure, used the S3 to cut end panels and wired it in neatly. Only slightly larger than the original S3 controller box, mostly because I added in a couple of tiny fans - just in case I had been a little optimistic in choosing the 2209 stepper drivers. The fans are not necessary, but nice to have.

So if you want to build basically ‘like for like’ and add Rotary, the above is an example of how to achieve that. If you want to upgrade and upgrade because that’s cool too, then some of the other posts have share their journey and preferences.

Links to the key bits:

4 Likes

Solution in action"

IMG_5446

6 Likes

Incredible information. I’m grateful for the walkthrough/clarifications and breadcrumbs on the key steps required to pull this off. I think for now my only other question is whether or not you needed that dedicated driver for the rotary package? I assumed this is what the RAMPS 1.4 + the TMC2209’s were doing (and there are 5 of them). Or am I not following entirely and/or the demands of the 4th axis are different than merely retrofitting the Shapeoko motors?

Thanks again!! This is so helpful and exactly what I was looking to understand.

You can only have 1 controlling ‘processor’ that the sender talks to, so the number of stepper channels has to be a factor in choosing the controller PCB. Whether you want to stick with GRBL or are happy to experiment with some other protocols/derivatives is another factor. This new PCB is replacing the stock PCB.
Finally, whether you want precision control over the rotary axis or whether you intend using it as an indexer (0-90-180-270 positions only) as steps require precision/stepper driver/stepper motor and indexing could be achieved a number of ways.
That is why I chose a 5-channel controller PCB, Arduino based, GRBL based and kept the differences to the original machine to a minimum by doing so.
Each channel refers to a GRBL axis letter, each channel has a H-Bridge stepper driver (in mine TCM2209’s) and connections to the relevant stepper motor. ShapeOKO XL uses 2 Y axes, so my axis config is XYYZA making 5 axes in total, with the two Y’s contra-rotating. All 5 axes are live and possible to control simultaneously via GRBL commands - provided your CAD software can to that.
I use Vectric VCarve Pro for a number of reasons, but one specific one being that it can create and output rotary designs. When doing so you have to choose which axis combo the Post Processor will output (XZA or YZA) as Vectric’s ‘engine’ currently only does 3 axes at one time. Not sure what Fusion360 or the newly announced SolidWorks Maker-CAM do, but I expect ‘proper’ multi-axis.
The design choice of a 5-axis controller PCB, GRBL based means I can use it exactly like a standard S3XL with CC/CM or whatever, and without any machine setup/config/wiring changes can also use it for rotary work at whatever precision of rotation I want. The video I uploaded shows making a chunky lamp stand, the 3D form being spiral pyramids wrapped around a Septagon core and text running around the base. The headstock (chuck) is in a fixed position on my machine, and is fixed to an aluminium guide rail that extends all the way across the machine bed - the tail-stock slides along this rail to ensure it is aligned, and then local clamp-down threaded inserts are used to lock it in the chosen place. A very simple, but pretty much adequate, version of a lathe bed/spine and tailstock.

2 Likes

One erratum to the above. Carbide code a ‘secret’ into their controller PCB so CM will only talk to Carbide machines. As I have changed the PCB and am using a different GRBL stack, I can no longer use CM. However, I find UGS, CNCjs and gSender better tools so this is no real loss.

2 Likes

Excellent. Thanks again for all the information!

Last clarification: are you using that driver shown in the Amazon link for the 4th axis, or just the TCM2209? If I found the right thing based on your attached picture, I noted options with and without a dedicated stepper driver (and your pic shows it).

I wasn’t sure if your comment about steps/precision of the A axis implied you needed this dedicated driver or if you were using a 5th 2209 to control it?

Also, noted re. CM. I played with CNCjs a bit and liked it, but didn’t get super into it. Changing senders doesn’t really bother me. It’s good to be aware of all of these things, though!

All axes are using the 2209 drivers. I got the external driver shown in case it were needed, but it wasn’t.

1 Like

The steps/precision topic is more complex than it first seems. The full-step resolution of the stepper motors is will defined (1.8deg or 0.9deg) and the H-Bridge driver chips can sub-step this to improve step resolution - but at the expense of holding torque. Turning up the drive current on the driver can re-increase torque, but the stepper motors have limits and the drivers too.
The highest resolution is not always the most accurate, there being a world of difference between the two terms. I don’t want dropped steps if cuts get more aggressive, but I do want the best accuracy I can have from the hardware.
I concocted a few test cuts where I knew I could turn up speeds/feeds and push the steppers to their limits and then experiment with micro-steps and drive current until I felt I had the best of all worlds. I read up on the stock Carbide controller PCB driver chips, looked at the component values and (with a little uncertainty) concluded that the drive current and torque had ended up at or just above the original machine’s, but with the TCM2209’s ‘Trinamic’ logic, the steppers run much quieter.
There is a default behaviour on the 2209 to reduce holding current when the steppers are not moving, relying on the fact that maximum stepper torque is when static and trading a bit of that for overall reduced current draw. The 2209’s have to be hooked up to a UART interface to adjust this setting, and if I recall turning this behaviour off is a ‘one time, permanent’ action on the chips - so I decided not to and to see if I had good enough holding torque, which I believe I have

1 Like

FWIW, I’ve gone down a bunch of routes for controllers by now (i.e. wired the following to my machine in some manner):

My thoughts on this thread based on this experience is:

  • A GRBL or GRBL-like board is probably the right choice if you don’t already know it isn’t. GRBL is cheap enough and wiring is flexible enough that I don’t think you should feel the need to jump out and jump into something more capable right this second. I love my LinuxCNC but it’s painful and somewhat costly to set up, so why bother if you don’t even know you need it? If you find you need something more capable later, you can buy it and wire it up then.
  • Trinamic stepper drivers are :heart: (I used these, they’re made to play nice with many of the GRBL boards and they’re high-powered).

The path I followed was this:

  • I was annoyed at how loud the Nomad 883 Pro was. When I put it into a well soundproofed box, the spindle noise was gone but the damn steppers are crazy loud, so I wanted to use Trinamic drivers. That meant replacing the controller.
  • I played around with some GRBL or GRBL-like boards (like g2core with the Arduino Due) but was ultimately unsatisfied. GRBL was waaay too limited (couldn’t even hook up alarm pins from the Trinamic drivers for step-loss E-stop) and g2core didn’t feel ready for prime time (badly documented, really hard to set up).
  • An aquaintance recommended EdingCNC, so I tried it and ended up sticking with it for quite a while. The board has plenty of I/O for all my I/O needs and the hardware has accompanying software that’s very “batteries included”. Combined with the Trinamic drivers (on a custom carrier PCB), it worked really nicely, it even fit in the Nomad’s electronics box.
  • After a while I started lusting for closed-loop control and ended up buying servo drivers. EdingCNC would have been able to shout instructions at them but it wasn’t able to count their encoder pulses, so only the driver → motor loop would have been closed, the controller → motor loop would still be open. This got me looking at LinuxCNC.
  • I started running LinuxCNC on a Mesa card for a while but found that the wiring was a massive pain in the arse, a pain to set up and I couldn’t get the closed-loop control working with the particular board I bought.
  • So I switched to EtherCAT for everything. The wiring is literally just Ethernet cables, the configuration is just a few text files. There’s no breakout board at all, you just wire the daisy-chained servo drivers and VFD to the computer running LinuxCNC.

And that’s where I am today. I haven’t yet run the latest iteration of my machine though because I need to buy some laser-cut panels to complete its enclosure and I’m waiting for the car I just bought to be delivered so I can pick up the panels instead of paying ~$200 for the supplier to send an entire truck to me.

There are two ways you can set it:

  • OTP: Of course, this is a one-time thing. Once you flip the OTP bit, you can’t flip it back, being OTP and all.
  • UART: This makes the change until power is cycled. I had an ESP32 wired to my drivers so that I could change the configuration on startup, fiddle with parameters on my computer while the machine was running and for monitoring (the Trinamic drivers have nice monitoring metrics).

One thing I really wanted to get to but never did is CoolStep. You can configure the driver to dynamically adjust current to match the detected load, kinda like a servo. This means much lower power usage (so less heat).

1 Like

Currently working up a GRBLHAL build with this board. https://www.grbl.org/grblhal-breakout-board

Additional input, outputs, and supports an another axis (or two). I am converting a Shapeoko 3 standard rebuild to a 4-axis machine. For drivers, I’m thinking about TMC5160 step sticks, but they’re hard to come by ATM.

Have a look on AliExpress, there are plenty there.

Just scanning the available GRBL versions, given that my research into this was originally over a year ago, and GRBL HAL has come on in leaps and bounds. Were I starting from scratch, I would certainly take a look at this and see what hardware/PCB options made sense from there at the more budget end of the scale - a cursory look this morning doesn’t seem to show much as yet.
MEGA-5X is possibly a bit of a dead-end fork knowing this, without (I hope) any disrespect to anyone involved in its creation.

But this can and will likely forever be a no-win game of what’s best, and tomorrow that will have changed. If the goal is a working machine, then today’s solutions are best. If the goal is freedom to eternally extend and upgrade etc., then maybe HAL is the smarter option.

What I have works perfectly and as a ‘working machine’ complete with its controller, I have zero complaints… but what if Vectrics or Fusion 360 etc introduce a new feature not supported? If that bridge ever needs crossing, I will have to cross it then. I have what I set out to get.

When I chose to buy my Pro4 XXL, the main deciding factor for me was the mechanical construction of the machine, and not the electronics. I am not a fan of grbl, as I have been using Mach3 for over 15 years on my Sieg X2 mill I converted to CNC.
If I was to change the controller, it would either be a Mach3 setup, using a Windows pc, a Warp9 SmoothStepper, a PMDX Breakout boar, and a slew of Geckodrive’s stepperdrives.
2nd choice would be the Duet3, as I use the Duet2 WiFi in one of my 3D printers.

I have run into the “I’m not a fan of GRBL” line many times while perusing board/associated software offerings. Could anyone in this camp expand on this concretely? Like, what are 5 things I’m missing out on because I currently use CM (and the underlying GRBL hardware/protocol)?

GRBL is the Toyota Camry of the CNC world. It is a very basic CNC firmware that gets the job done.

Most GRBL controllers are still 8bit microcontrollers with limited memory and low clock speeds. This includes the Carbide board as far as I know. For the few boards that are running 32bit the GRBL firmware running on it has not been programmed to utilize the hardware as of yet so it is like running MS-DOS on a modern PC. Sure it is fast as hell, but it lacks 99% of the features you would expect.

I like the Duet + RepRapFirmware because RepRapFirmware was designed from the ground up around 32bit microcontrollers. It is fast and feature rich because it was never limited by 8bit. I have a ton of experience with it from 3D printing. It is however not a perfect match for running a CNC as it does lack certain Gcodes for things like tool changes and making circles. That however can be overcome with a good post processor and with custom Macros to implement those Gcodes. You just create a Macro called M6.g and when an M6 call is made that file gets executed.

1 Like