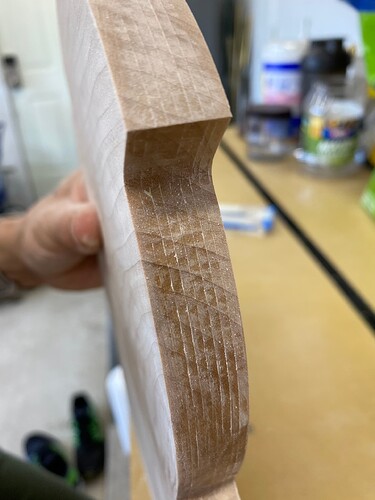
I’m looking for ways to improve the wall finish of projects I cut out of wood. This photo is from another forum member but it’s exactly what I’m trying to improve. Looking through other forum posts, there seems to be a few ways to add a finishing pass with CC and just wanted to touch base here to make sure I understand correctly.
Option 1: Add offset geometry to cut most of the way through as a pocket then select the original out line and assign a contour tool path to finishing cutting through to the desired final depth.
Option 2: Add a offset of about .01 or so and assign a contour tool path to the offset so the piece is cut out slightly larger then the desired size. Then select the original outline and apply a full doc contour to cut the remaining .01 in one pass.
Option 1 may not improve the wall finish (but it will reduce tooling engagement and make cutting more reliable).
Option 2 will work, but if the first operation is slotting, is not good practice.
Best is to combine both. Note that one way to do this is to use two different tool definitions, the first (roughing) having a larger defined diameter so that it will leave material uncut, then use the finishing cut definition which can match the effective cutting diameter when making a full-depth cut and finishing.
Thanks Will. Just to clarify, what you’re suggesting is to create a fake tool to run first with a diameter slightly larger then the endmill being used, something like .135 for a 1/8’ endmill. This will leave .01 of stock around the piece that will then be removed by a second full depth cut with the defined 1/8’ endmill?
Will is suggesting you use a pocket cut instead of a contour for the rough path.
You can use a fake tool, or 2 offsets to machine a pocket that leaves some stock on the wall.
Then come back with the real tool on the real vector & finish to full depth.
So either do 2 offsets at 0.010 & something like 0.150, and pocket between those.
Or do one offset at 0.160 & use an oversized tool to program the rough path.
Note: a 0.135 tool will leave 0.005" stock. The other 0.005 is on the other side of the tool.
Ahh, thanks for explaining that so clearly. Really helped make it “click” for me. Ive had my pro for about a year and a half but still have much to learn