I would like to make an inlay with .020" glue gap, .100" depth with a .060" saw gap.
Can someone tell me what dimensions I should use for female and male parts
Thanks
You actually have all of these inputs that can be configured in the inlay part of the program. When you go to contour there is an inlay option that allows for you to click and then a set of options pop up to give you the glue gap you want, the total depth of your inlay, and the saw gap as well.
But if you are figuring up the design yourself, you would run the female side of the inlay to the depth of the .100". As for the male side of the inlay carving, first off make sure you are using the same angle cutter because some people tried to change the bits and it doesn’t marry together well. As for the male side, you would cut the depth to .140" deep to account for the .020" glue gap and the .060 saw gap. If all of my math is mathing correctly (LOL), then these would be your settings. What I calculated was .100" max deep for the female side, subtracted the .02" glue gap, then added in your saw gap. This computes to the .140" by adding this equation. .100-.020+.060=.140". The angle would be deep enough for the glue gap and saw gap.
Also, make sure that the male side is a mirror image of the female side as well, meaning the lettering or carve should be in reverse of what you would be seeing in the female design.
Correction on where to find your inlay in the program. It is under Advanced Vcarve. When you click on Advanced Vcarve after selecting your design for toolpath, you will have a dialog box pop up and down towards the bottom of that dialog box is a box to check for “Inlay.” Once you select that box, options come up with D and S for plug depth and top gap. Input these desired depths and the program will accommodate what you desire for your inlay.
Thank you very much.
Should the starting depth of the male be 0 or .020
The starting depth of the male side should be zero. If you make the starting point deeper, the V bit will go too deep in the male side, thus causing the plug to be cut deeper. The deeper you cut the male the more pointed the top edge of the plug/male side. This will reduce your glue gap, or even completely eliminate it altogether.
Here is one of many posts here about the inlay of our machines. This could shed some light on the subject for you. If this doesn’t help, you could put in a search in here for “Inlay” and there will be a bunch of threads pop up with many questions that others had that could better explain what you are looking for in your questions.
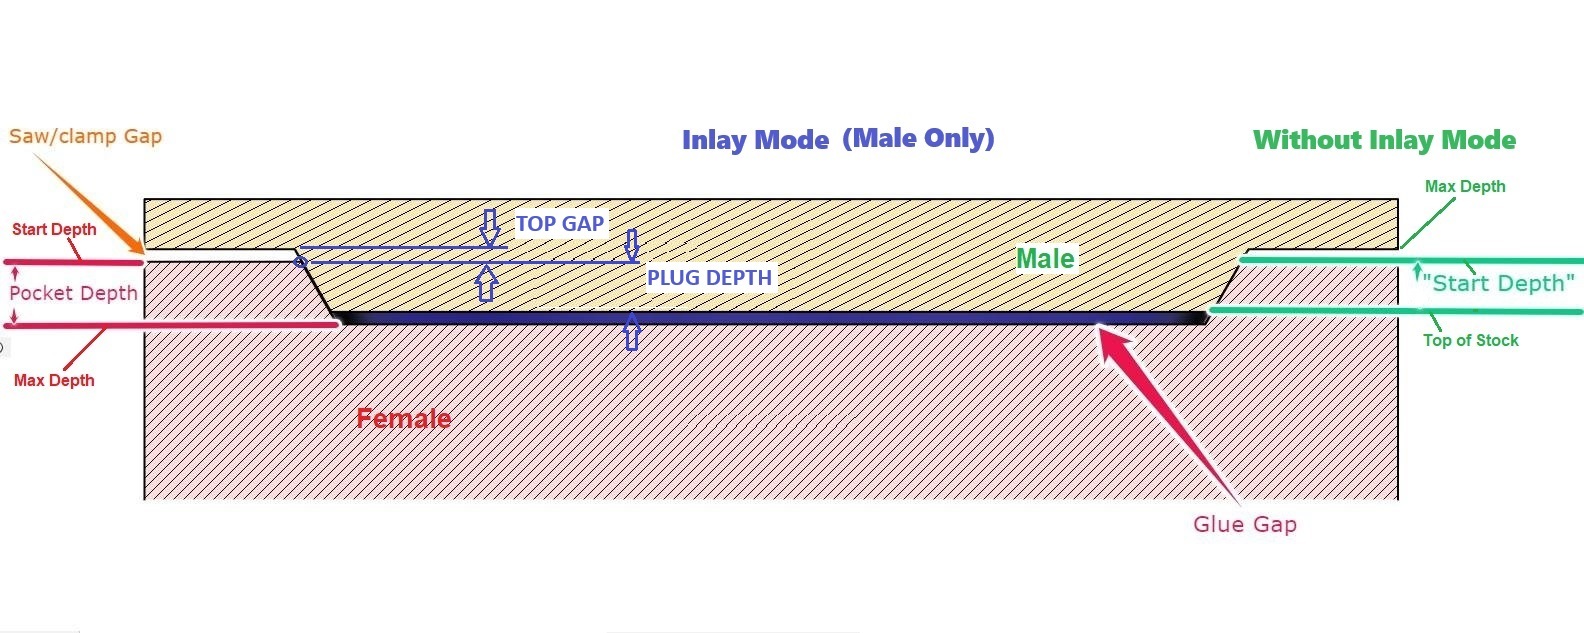
If you’re not using the Inlay Mode, the start depth should be the desired Plug Depth, or just a bit less to allow for compression or slop, deflection, runout. Start depth will be the level where the vector gets traced.
If you’re using Inlay Mode, there is no Start Depth, only Plug Depth and Top Gap. Plug depth will be the level where the vector gets traced.
Female - Start Depth 0.000, Max Depth 0.120 (Plug depth + Glue Gap)
No Inlay Mode (old way)
Male - Start Depth 0.100, Max Depth 0.160 (Plug Depth + Top/Saw gap)
Inlay Mode
Male - Plug Depth 0.100, Top Gap 0.060
4 Likes
This topic was automatically closed after 30 days. New replies are no longer allowed.