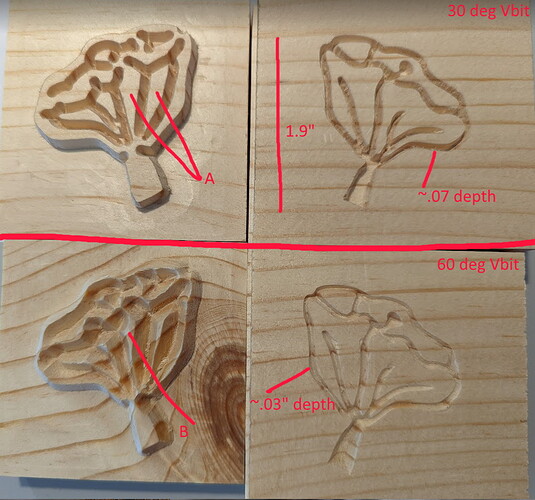
Attempt at creating an inlay with some testing. Parts not fitting up. Included some images of the results and the Carbide Create files for the 2 parts. Used the same process with the 30 and 60 degree bits.
Using pine for testing
Shapeoko 4
Carbide Create
30 degree bit - Amana Engraving 0.005 Tip Width
60 degree bit - Whiteside 1550 1/4"SH, 1/2"CD, 7/16"PL
Went through posts on the topic and videos, primarily basing effort off these 2 videos for some testing to get this process working
- The VCarve Inlay Technique - The VCarve Inlay Technique - YouTube
- Deep inlays VCarving detailed tutorial with Vectric VCarve - Deep inlays VCarving detailed tutorial with Vectric VCarve - YouTube
Used some of the standard depths from the videos
- female part 0.15" on the Vbit depth
- insert part a pass from 0 to 0.1 then another pass from 0.1 to 0.2 on the artwork
I have included an image of the results from both a 30 degree vbit and a 60 degree vbit
- 30 degree - female part much deeper than the 60 degree bit (makes sense) but male insert part is too thick in most places
- 60 degree - male insert part seems much sharper, but there are still some areas that are not curved/formed to artwork. Female part is too shallow for an insert even if the insert part was formed correctly
Label A in image - sharp edges, not smooth curves and much too thick (depth issue? but still not smooth curves)
Label B in image - from 60 degree bit, also sharp edges instead of smooth curves
Most examples out there use VCarve, is this something carbide create should be able to do ?
thanks for any insight !
Inlay - pine insert test 60.c2d (136 KB)
Inlay - pine board test 60.c2d (72 KB)
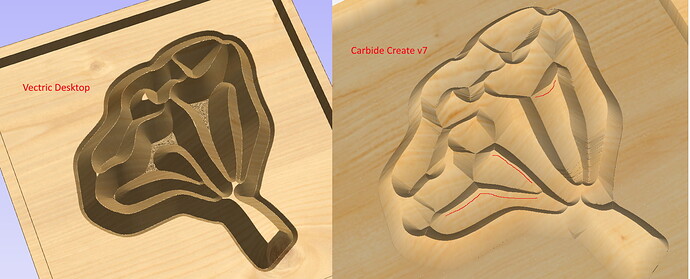
I went and tried a trial version of Vectric Desktop and compared the generated simulated from Vectric to CC v7. The actual carve shown in the picture above has the same features shown in the CC v7 simulation (these straight angled ridge lines marked with red lines in the image instead of curves in the male insert piece). The actual carve using CC reflects these features from the simulation) The Vectric simulation shows curved ridges as I would expect). image below for this comparison. is this an issue with CC or some settings ?


