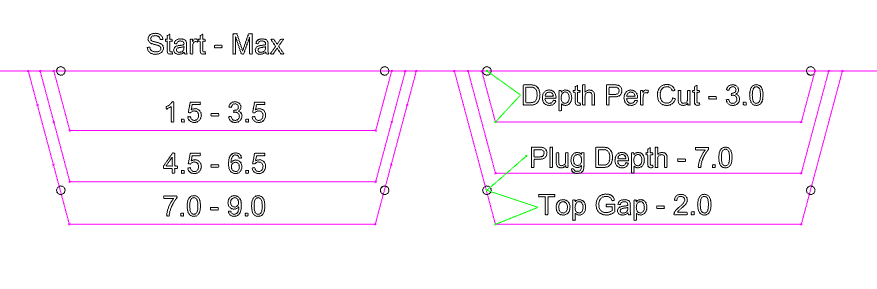
This is the difference between the old method using Start & Max depth, and the new method using Plug Depth & Top Gap. The small circles are the vectors on the top surface, and the vectors projected to the start depth or plug depth. 7.0 in this example.
The old method with multiple paths did allow you to use variable depth of cut, 3.5, 3.0, 2.5.
The Start Depths are effectively 0.0, 3.5 & 6.5, as that’s where the remaining material is.
Although these levels are just a hair wider since the vector gets projected to the start depth.
Point being, these are nearly identical, and result in the same final cut.
Once again, @Tod1d, your knowledge and ability to explain this surpass mine.
@Mseguin, Tod’s one of the reasons I have been successful at making inlays. When I first started, I got pretty much the same results you did. Now, 40-60 hours of trial and error later, I feel confident that I have figured them out.
I did a bunch of test parts, with multiple materials. PVC inlay in Acrylic was the strangest.
I think the biggest realization is that the inlay will clamp into the pocket further than planned.
For most materials if I wanted a 0.010" glue gap I had to program it 0.020" - 0.030".
A couple other things to watch out for:
If the V-bit does any of the clearing, the bottom will not be flat but micro-serrated. This adds material to the bottom of the pocket that the plug can bottom out on.
If there are any areas that don’t cut to the programmed depth because the vectors are closer together, it will result in a sharp ridge. This will need to fit into the opposite side completely with no glue gap, and no room for extra compression. It’s a good idea to knock the sharp ridges off. I use sandpaper for smaller jobs, and a rotary sanding brush for larger ones.
On one of my previous attempts at the Koi fish inlay, I used a clearance tool that was too big, and the V-bit removed a lot of the material. Here’s a visual of the problem you are referring to. Those little strands of wood are nearly impossible to remove. You can see in the lower-right corner where the EM stopped and the V bit began. I am still going to try to glue this one up, but my gut says it’s a fail.