Watching the various inlay threads (@julien and others), and the recent transparent resin combinations lead me to try some. Instead of resin, I went for mixed woods, and the results are very pleasing.
The base stock, again taking earlier good ideas, is a bamboo chopping board - 3 for £15.99 on Amazon, with no ‘rough inner layer’. https://www.amazon.co.uk/gp/product/B088QR69SC/ref=ppx_yo_dt_b_asin_title_o01_s00?ie=UTF8&psc=1
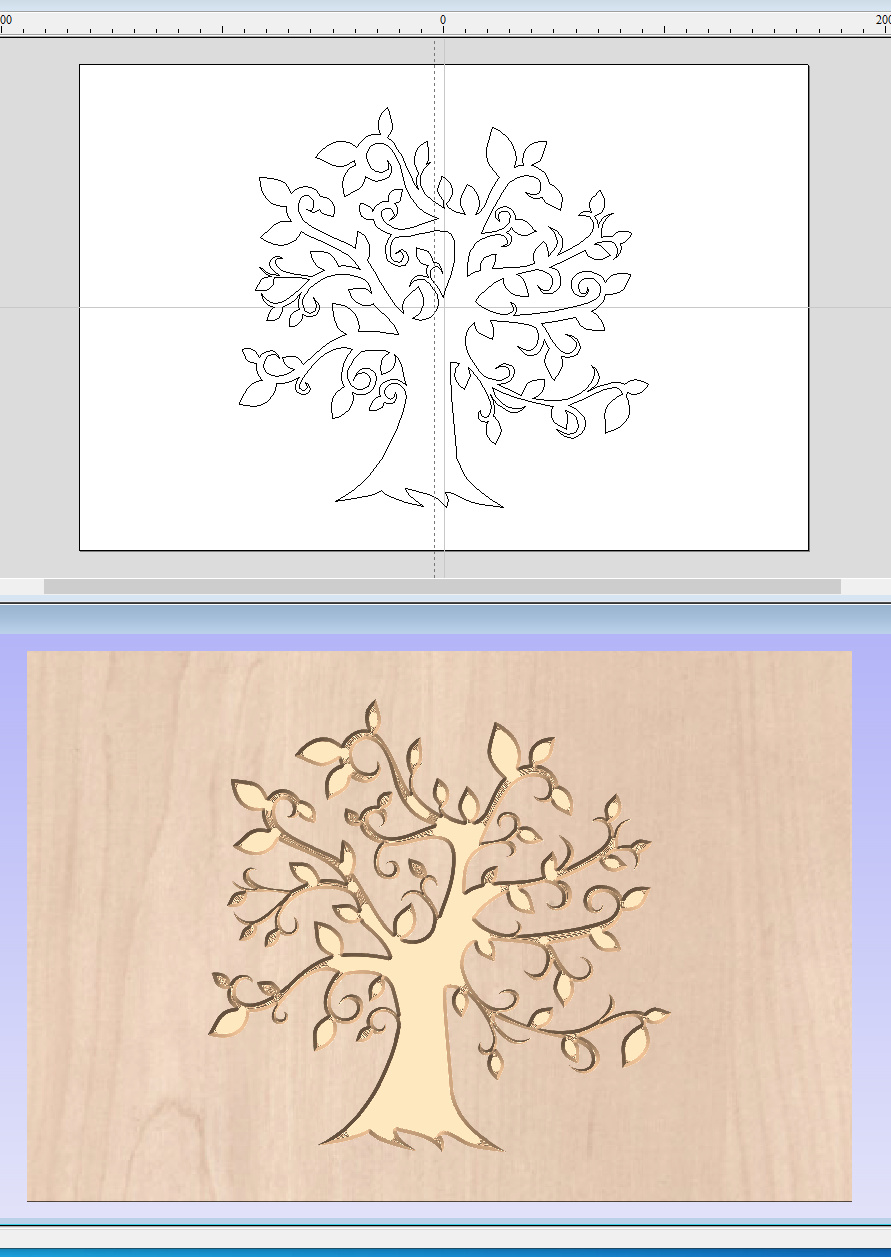
The design is based on the following (royalty free) SVG, with the ambition to have the trunk in one wood colour, the upper leaves in ‘autumnal colours’ and the lower leaves less so.:

I chose the VCarve male/female technique (in Vectric VCarve) over the Inlay tools as it gave me better control over cut depths and roughing paths.
First step, import the SVG and tidy up any odd/stray vectors, placing the centre of the graphic on the stock centre. Chose 2.5mm total cut depth to give 2.0mm of inlay and 0.5mm glue gap beneath (this 2.0mm dimension ‘A’ needs to be noted for later reference). Depth is a balance between enough ‘meat’ on the inlay vs carve time vs cutter geometry (vee depth exceeding the cutter’s max).
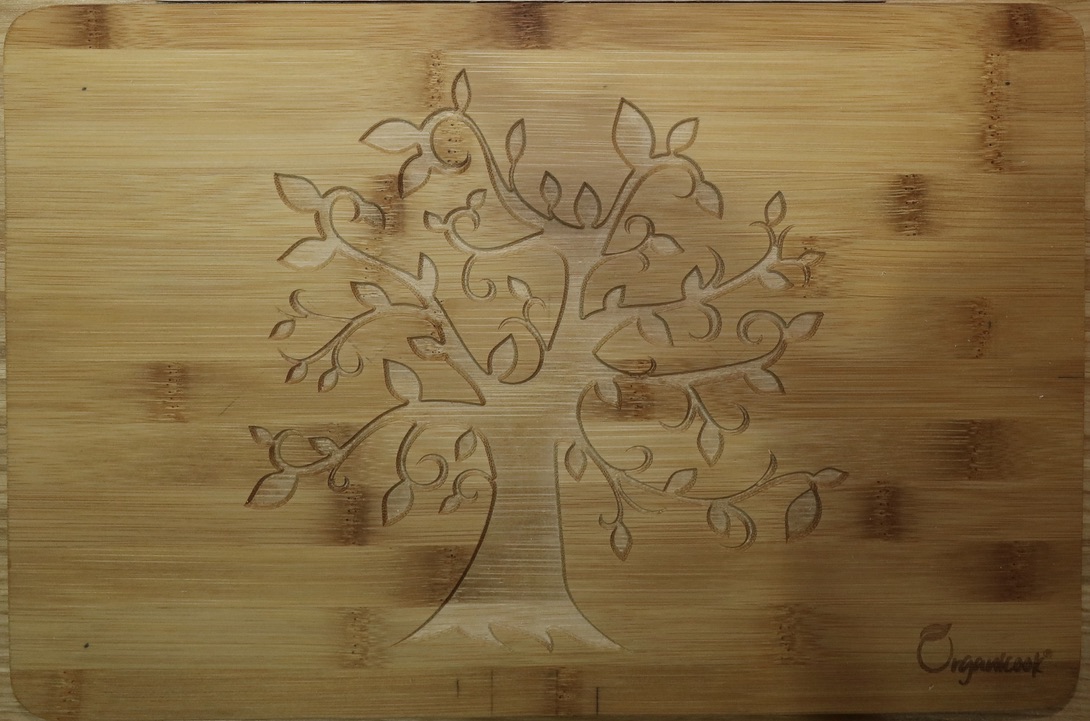
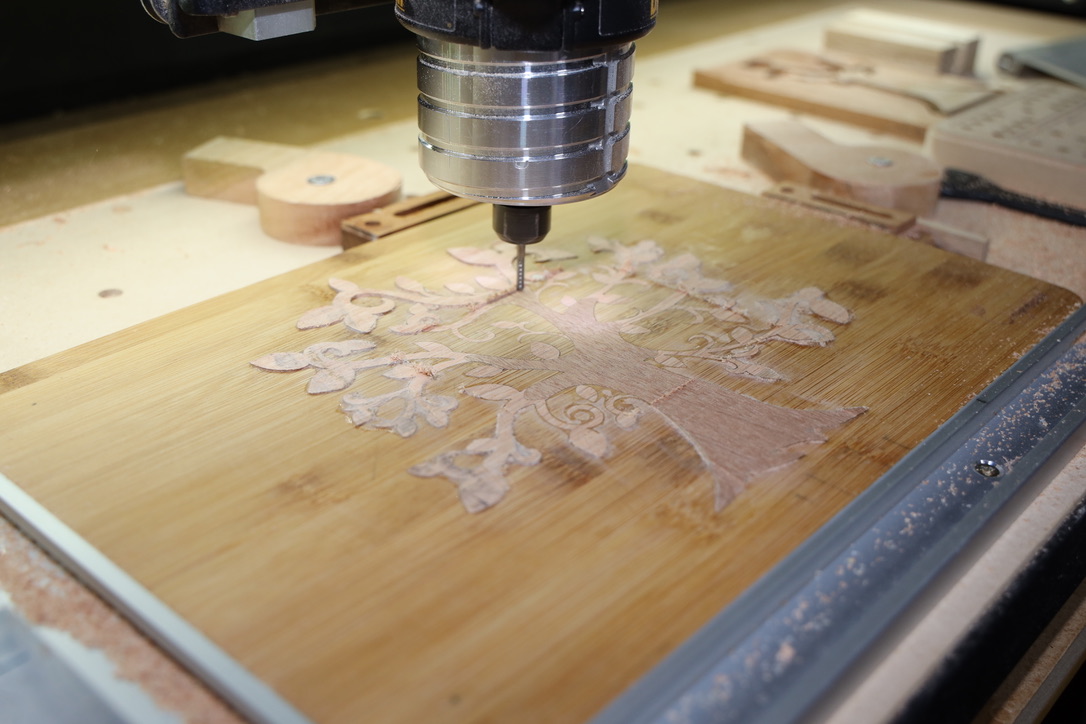
VCarve the inside of the artwork with 60deg cutter and 1/8" Endmill for roughing-out. Very clean and sharp result in the bamboo.
Next, copy the artwork onto a new layer and flip it horizontally about my chosen centre (in this case the stock centre). This step is key as the inlay is flipped over to fit into the bamboo base. Before moving forward, I then isolated the ‘trunk’ of the tree from the rest and created a new layer just for this, and cut this out of a mahogany-like dark wood - a simple profile cut with 1/8" then 1/16" to get the corner details.

I then selected 3 different wood colours, Cherry, Oak and Ash (I think) and trimmed/planed/glued these into a single panel, reddish to the top, paler to the bottom - to give the ‘autumn effect’. With this, I then cut out the shape of the tree trunk with an outside profile cut 1/8" and 1/16" again, and glued the trunk in situ so I now have a rainbow effect piece of wood with a dark trunk incorporated. Marking centres of this exactly as I progress because the trunk has to exactly match the original position of the tree in the bamboo. In fact I partly messed up, because I flattened this board and promptly removed my centre markings!! School boy error, but managed to re-establish centres and was able to continue.
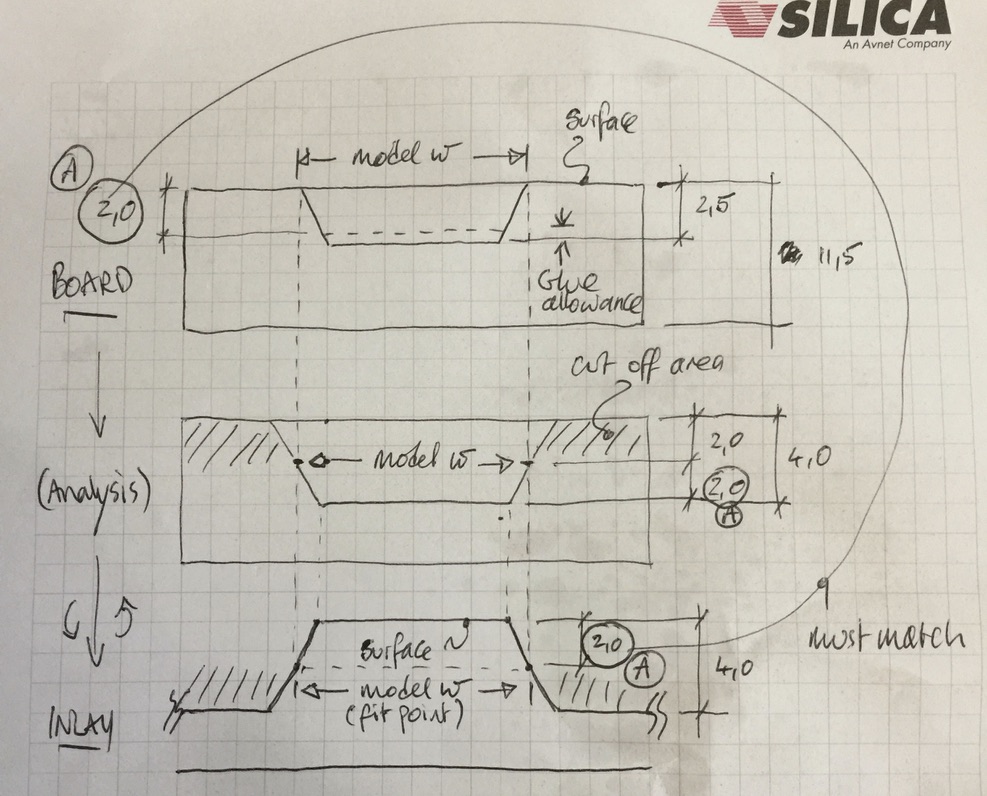
Finally, the inlay tool paths. The depth of cut has to allow for two factors - firstly, the depth chosen as ‘A’ in the bamboo (2.0mm), plus some extra (for me 2.0mm) to allow access for a bandsaw to separate the inlay ‘stock’ once glued in place. The setup of the toolpaths also has to guarantee the same shape and sizes at the joining depth once the inlay is pressed into the bamboo. Because the sides of the bamboo ‘holes’ and the sides of the inlay are at 60deg, they only mate exactly in one position and the whole artwork has to meet this - the VCarve has to be set to ‘start’ 2mm down from top (‘A’ above) to achieve this - and to then cut a further 2mm for my cut-away access.
Hopefully the following diagram explains this rather better;
Use the offset tool to create a new vector outside the original flipped tree vector, thus creating a pair of vectors between which the VCarve will remove material, leaving the tree shape proud. I again used V60 with a 1/8" roughing pass to achieve this. Finally I added a rectangle 10mm beyond the VCarve vectors and created a Toolpaths to cut this away to 4mm, leaving the inlay completely proud of the stock.

Very clean cuts, and almost no clean-up needed on the inlay;
Glue, flip and clamp together, being careful not to warp the bamboo with the pressure as the presence of the glue might make any warping permanent…
If I had a bandsaw, then I would slice away the ‘stock’ of the inlay to reveal the bamboo complete with yet unfinished inlay. But I don’t, so it’s lucky I can hand saw dead straight!!
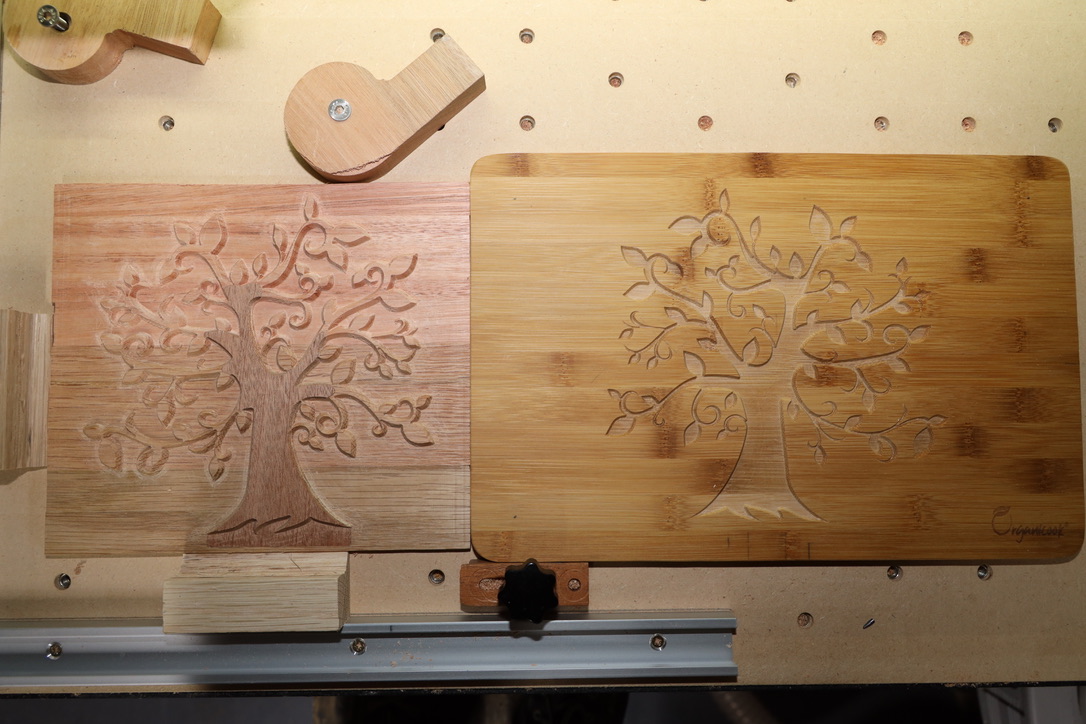
On the machine for trimming down to flush;
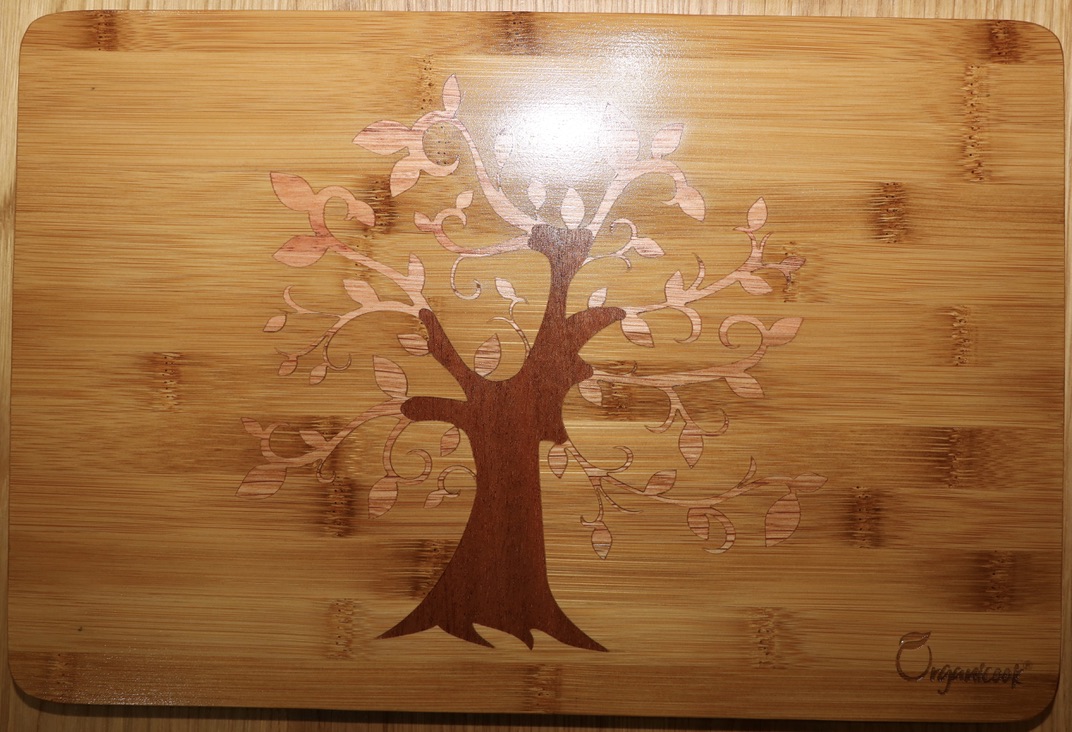
A final, very light sanding and wipe-over with olive oil (it will be used for food prep). Very happy with this result.
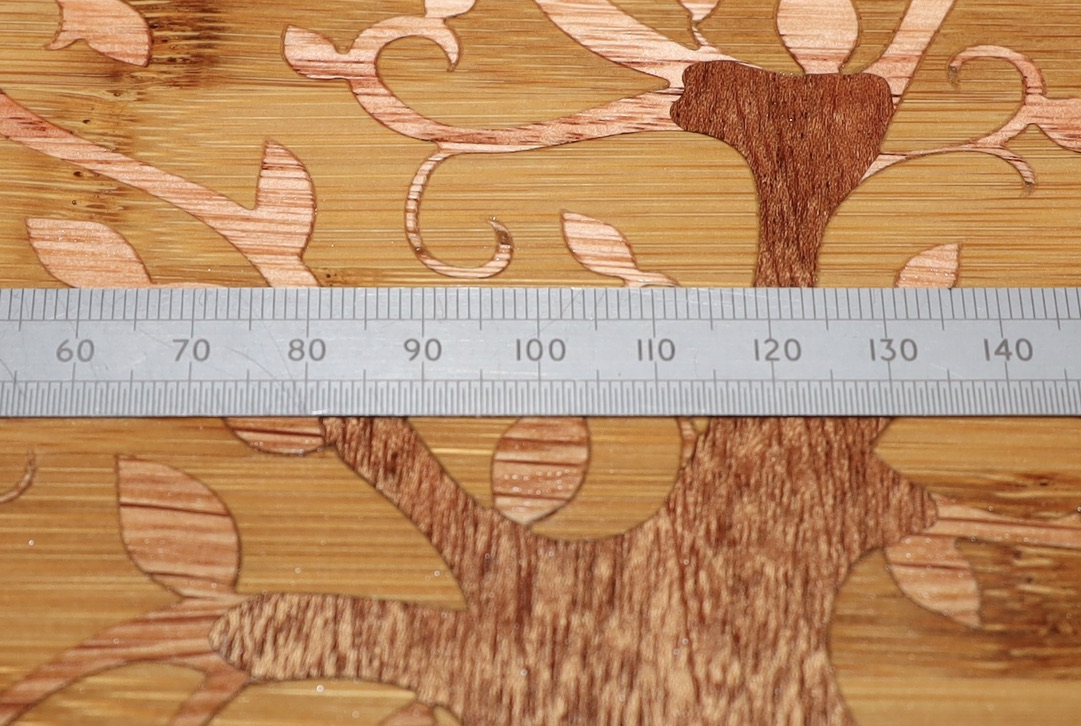
One thing interested me in all this - just how fine can the inlay be and still work? sub 1mm easily.
This one joins the family of earlier projects;

A bit of educational fun. Hope there’s something in there of interest or use.
Vectric VCarve file if interested:
Chop Board BDark Weave 330x220.crv.zip (2.3 MB)
tree-4555354.svg.zip (11.3 KB)