iPhone Case – Fourth Project, Flat and Sticky

First a disclaimer: I have no CNC or CAD experience, my kid is taking Engineering classes in high school and does have some basic CAD training, but for the most part we are flying blind. These posts are probably meaningless to those that have experience. However for those that are new to this maybe these posts will help you.

Now for our 4th project, so much to cover as we have learned a lot. If you have teenage kids you know their mobile phone is VERY important to them, Dallas decided the 4th project is to make an iPhone case from wood. Dallas has been working on this project for a couple weeks. So far 7 different iPhone cases have been made and we’ve learned something new with each case.

Prototypes #1 and #2 turned out ok, but they had an odd problem in that they were not flat/level.

This turned into another discussion that suggested our waste board was not level. Using Carbide Motion we measured the Z axis at 16 different places on our waste board and found that there was a 1.88mm difference between the lowest point and the highest point. This was almost the exact variance we measured in the thickness of the top of the iPhone case vs the thickness of the bottom of the iPhone case.

What Dallas did to fix this was to mill off 2mm from the top of the surface. To do this the Carbide Motion was zeroed to the lower left X and Y axis (as per usual), but the Z axis was set to the highest measured value. The Nomad then milled down 2mm, which left us with a flat surface.

So for those new to CNC, CAD or Nomad. I would suggest that THIS be the first project, delay making the wrench for your second project because that project will work better if you start with a level surface. And you will want to go through this same process every time to change the waste board.

Prototype #3 turned out really well, but not perfect. The back-plate was level due to the level surface. The problem we were running into next was the tape, towards the end of the CNC process the tape would start to let go which was causing problems.

We had been using the carpet tape that came with Nomad, which works well but it has a weakness. If the bit ever touches the tape (so at the end of the project), it doesn’t cut the tape but rather it pulls and tears the tape which causes the tape to let go. So if you are going to use this tape you need to know where the bit could mill all the way through your material and AVOID having tape in that area.

I had been applying the tape to the edges along the back side of our 3.5” by 5.5” blocks of wood. But this was where the bit was actually milling all the way through (to effectively cut out the iPhone case). When I applied tape to the center (avoiding the camera cutout) the tape held through the entire project.

We tried Scotch/3M Two-Sided Outdoor Mounting tape . This tape held VERY well but it had a problem as it was just too strong. We broke Prototype #4 trying to get it unstuck from the waste board. Be aware that there are three kinds of this tape. The link above is to the 20lbs version, which is amazingly strong and would be good if you were working with thick wood or metal. This tape is also thicker, so there is more of a gap between your material and the waste board. I liked the bigger gap as we could cut all the way through our material without cutting into the waste board.

There is also a 10lbs version which worked better for us, but still a little too strong. There is also a 5lbs version which we have not tried, not sure if this has any advantages over the carpet tape. So we now have a Goldilocs and the Three Bears solution, and use different tape depending on what we are doing.

This project isn’t over, Dallas is going to try different kinds of wood. The (cheaper) pine we have been using is pretty light. After four days of use a corner broke. There was also one day that the wood appeared to contract a little and the phone would slide out of the case, but the next day it was fine again. Friends (and the Engineering teacher) have asked Dallas to make them iPhone cases, but it needs to get a little better first. So there could be updates to this story in the future.
4 Likes

Interesting. 1.88mm is a huge variation. My wasteboard was flat. At least I think so.

Interesting thanks.
1.88 mm is huge.
I check my wasteboard itself and found max 0.1 mm. difference between measurement on each corner and at the center hole.

First- amazing project. Did you do that with an image file instead of a CAD drawing?

We use standard MDF for the wasteboards and I would be shocked to see that much variation if they have remained dry. MDF will warp and absorb water like a sponge so I wonder if that may have happened- either in shipping or in your shop. Either way, we’ll add another QA test to make sure they’re never off by that much when leaving here.

In the semi-near future, we’ll probably add a “surface wasteboard” feature in Carbide Motion to automate that function.

Finally, here’s a tip for wood finishing. Apollo and I have been testing a technique from pen turners- using super glue to give wood a really hard finish. You can see some knife handles he did at:

https://instagram.com/p/znvTarLSlk/?modal=true

He’ll be posing a video in the next week or two but the quick outline is that we used water-thin super glue we got on Amazon to flood into the wood and then left it to harden for a few hours. Then we leveled the brass inlay with a file and sanded it with 180, 220, and 400 grit before moving to a buffing wheel to polish it. The images don’t do it justice- it’s beautiful in real life.

Again, great project. We don’t get to use our machines nearly enough so posts like this are really motivating for us.

-Rob

2 Likes

Everything that can automate the process is good +1

2 Likes

Regarding your question if it was designed in CAD vs an image. Dallas made a (better) design in CAD, and that is the one that the prototypes were made from. I did manage to make a nearly-as-good design in photoshop. The screen shot from MeshCAM was from my image/photoshop design.

The knife handle is Great!

Were both the wood and brass cut on a Nomad 883?

What CAD tool was used for the design?

Would love to see things like this in the tutorials/examples.

@3dsteve - both were cut on the Nomad. Apollo uses Rhino for CAD work. You can look forward to a video and some shared CAD files in the next week or two. I only posted it now to share the “super glue” trick for finishing wood (not trying to steal the attention from the iPhone case, which we love).

-Rob

I would suggest considering using hot-glue to mount with instead of the tape, as it removes easily with rubbing-alcohol. Also check the threads on fixturing wax—I’ve yet to try it myself, but I’m going to give it a go here soon.

do you hot glue to the wasteboard or directly to the table?

Sorry for not replying sooner—the answer is “either” (at least so far in my experience) but if you are gluing to the waste board make sure it’s good & clean before you do, so that it gets a good hold.

Obviously if you’re gluing to the underlying metal table you want to be very careful in your setup that you don’t accidentally plunge into it, or into the glue itself.

robgrz

what is the link to the video posted for the knife handle project?

It’s been awhile since we first posted, wanted to show an update on how far Dallas has advanced this project.

This is a stack of iPhone 5 cases, milled from Bamboo
http://static1.squarespace.com/static/55593b8ce4b02d69c9acfe34/555fa049e4b0c424d162a963/55762e5be4b047bb201fd652/1433808550163/IMG_9409.JPG?format=750w

And here is the back of one of the cases as a logo is getting added.

And here is the final result with inserts made using brushed copper and an old circuit board from a broken printer.
http://static1.squarespace.com/static/55593b8ce4b02d69c9acfe34/555fa049e4b0c424d162a963/55762d0ce4b0b131dad9e07c/1433808419440/IMG_9414.JPG?format=750w

I am completely floored at how well the Nomad 883 performs and how easy it is to use. If anyone is on the fence regarding purchasing a Nomad 883 just look at what a 17yr old has accomplished in less than six months.

6 Likes

This is a great project. Fantastic work!

I notice you guys have done something to your spoil board, I assume to make it easier to create multiple copies of the cases. Can you please describe how that system works? It looks really cool!

Thanks again for sharing your awesome project.

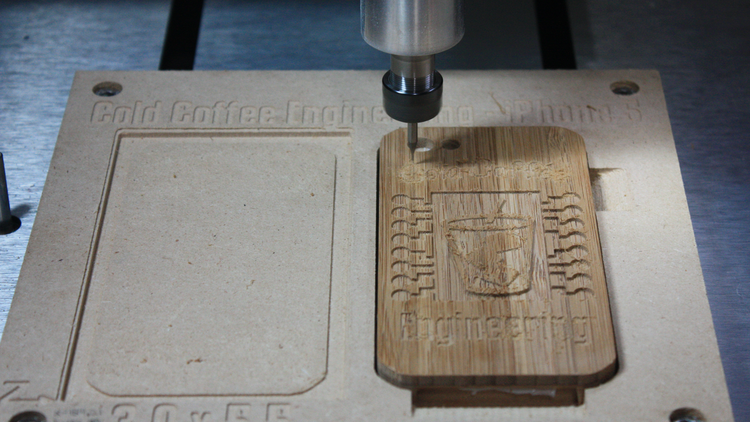
The left side is where we start, we put a block of wood there and the recessed area helps hold it in place. However we still use strong 3M tape. There is a raised area within that cutout that shows us where we can safely put tape without worrying about the bit tearing through the tape. The cutout also gives us a common zero position for the X and Y axis and just gets us into a routine. When I say “us”, Dallas (my 17yr old kid) is the engineer in charge, I play the role of the “apprentice”, so this allows the “apprentice” to work the machine without screwing anything up. (Anyone with a teenage kid will understand that relationship).

The right side has a deep groove that holds the phone case as we mill logos or text into the back side. We still use the thin carpet tape here, but that might not actually be needed. There are ramps on the bottom and side of the case that helps in removing the case after it has been milled, which sometimes is harder than you would think. Oh and over on this side we zero the X and Y to the center of the case, ensuring the logo gets centered. You can’t see it in the photo but Dallas has written the X and Y positions in pencil on the spoil board.

It would be easier to just mill the logo side first, eliminating the need for the right side. But this order allows us to create un-logoed cases and then later add logos if then are needed.

2 Likes

I cannot do more than one “like this post” clicks per-post, sadly. That’s a fun project!

1 Like

@3dsteve You’re looking for this link I think.

Can you please tell me where you get bamboo plywood? I’m trying to source some myself and am having a bit of trouble.

Warning: Expensive, especially after shipping…

http://www.calibamboo.com/bambooplywood.html

Thanks! I have found a supplier of a product called “Plyboo,” but it’s a bit dark on the inside, I think. I’ll see if I can get a sample of yours.

And for what it’s worth I can’t find any bamboo plywood that’s anything less than wildly expensive…