Hi, I’m read a bunch of messages about the jtech laser add-on and I’m afraid most of it sounded Greek to me. I’m trying to find out if a dedicated laser can do anything more than the jtech. What are the differences?
1 Like
I have the jtech 44 its very frustrating going back and forth from laser and cnc It kinda screws up the sequence of the machine at times. Im still trying to figure it all out. If you have the room for a dedicated machine I would recommend it. It will save tons of frustration. If i had a choice now which i dont I would get a stand alone.
2 Likes
I was in the same boat as you last year and after weighing the pros and cons, i ended up getting a dedicated laser. The xtool s1 specifically. Its kinda pricey for what you get but i like that its a fully enclosed unit, which i belive was a first for diode lasers. I think creality has a enclosed diode as well now. My shapeoko is in the basement and couldn’t come up with a way to vent the smoke efficiently so that was my deciding factor.
1 Like
on sale on their website
xTool S1: Enclosed Diode Laser Cutter
117 reviews
US $819.99 US $1,199.99
- $380.00
If you’re just going to be engraving, the 10w is fine but if you plan on cutting as well, id spend the extra for the 20w to add a little more versatility to the machine. I have the 20w and i find its a nice sweet spot. The 40w in my opinion is over kill as you’re spending a premium to be able to cut thicker material when we already have a cnc that can do the job.
For me the two things to consider when deciding between a stand alone or an add on to the cnc are 1) are you going to be making projects that require you to use both the cnc and the laser on the same material. It’s way easier to accomplish that if it’s in the same position on the cnc bed. 2) how big will the largest projects going to be. Most stand alones will have a very limit work area, where as the add on will be limited only to the size of your cnc machine.
4 Likes
I have the JTech laser and I love it. I don’t feel that the changeover is onerous, frankly. I’ve never found it to be frustrating at all…but that’s me. YMMV.
You put all of your setting changes into a macro that you run before you start using the laser - and another to set them back to CNC mode before you do more cutting with the CNC. I have a little sign that says “RUN CNC” that I put on the bed of the CNC when I run the laser - so I don’t forget to go back.
Hooking up the laser is easy, I think it’s really straight forward.
As for cutting with the laser vs. the CNC…there is something really nice about not having to worry about work holding. The laser doesn’t require it.
3 Likes
Dedicated stand alone lasers are versatile within their size limited work envelope, which is often much smaller than a CNC machine’s work envelope. Frequently, the stand alone laser will be able to run a fourth axis for engraving cylindrical objects. 3 axis CNC machines can be adapted (not easily) to run a fourth axis.
Stand alone lasers are not limited to the 8bit GRBL controller which is commonly found on 3 axis CNC machines. They frequently use a 32 bit controller and its circuitry can already cope with the addition of the stacked diode laser as well as an interchangeable infra red fibre head.
The CNC machine that I use can and does handle a blue diode add-on laser using an additional control box plumbed into the PWM circuitry, with the limitations detailed. The GRBL 1.1f control circuitry means that it would possibly struggle to handle a fibre laser head using my current setup.
I like the ability to swap immediately between the laser head and the CNC machine and the movements of both are the same because the control is identical to the movement of the CNC machine. I could not use a CO2, Fibre or Galvo laser with my CNC machine. The standalone machines give you more choice about laser type and power output. Many stand alone lasers are fully enclosed and they usually make life easier with air assist and fume extraction.
You would ideally look at the sort of thing you want to engrave with a laser. I have successfully engraved wood, card, leather, aluminium, glass and slate with my 4.2Watt add-on laser, despite its low optical power output. If you are considering some sort of regular production, then the stand alone lasers of today are probably a far better purchase.
I put a Laser tree K20 on my 3xxl everything to make it work was under $300 from ebay just had to do my own mounting bracket, I do have a dedicated 40w CO2 but wanted the diode for the Shapeoko for bigger engravings my CO2 is 12" x 20"
There is some good advise above. The thing to consider is do you want a rotary option. On the Shapeoko that is hard to do. Many of the dedicated lasers have a rotary axis that is available. If you are only going to do flat work then the add on to the Shapeoko may be the way to go. However with a dedicated laser you can run 2 jobs at once but it also takes up more shop space.
So the bottom line is what do you want to do. Decide that first and then look at options.
![]() Ummm what does this mean? I’m assuming a GRBL controller is the box that turns lightburns output into gcode? 8bit vs 32 bit?? If this is not an easy answer don’t sweat it I’ll take your comment as advice to research GRBLs.
Ummm what does this mean? I’m assuming a GRBL controller is the box that turns lightburns output into gcode? 8bit vs 32 bit?? If this is not an easy answer don’t sweat it I’ll take your comment as advice to research GRBLs. ![]()
I’m with Gary…I have a Jtech and no issues going back and forth between laser and CNC.
1 Like
GRBL references the G-code Reference Block Library which is an open source and free to use motion control system. It is associated with the use of an Arduino control board. I may be wrong here but I think my SO3 runs an Arduino Uno. The controller board is an open source electronics control board which in my case has 14 digital input/output pins and 6 analogue i/o pins. G-Code is the ‘language’ by which all the required forms of machine part movement instructions can be sent to the CNC machine and interpreted by the controller for X, Y and Z movements using the stepper motors.
My JTech laser has its own laser specific instruction set for controlling beam intensity, laser head positioning and movement. The laser control board is additional to my CNC control board and it attaches via the PWM signals. (pulse width modulation) The laser G-Code instruction set includes how the image to be engraved/cut is ‘seen’ and interpreted into laser activity. e.g. LightBurn laser software… which ‘understands’ that if the beam is switched off exactly at the image edge, the image edges will get burnt more as the laser head slows down to meet the image edge and then reverse direction.
LightBurn permits the laser to stay on while it traverses the image edge until it passes it (typically the value is an additional 2½%) and it switches the beam on just before the laser comes back on another pass. This means that the laser beam is at the selected strength as it passes back across the image threshold.
The JTech laser controller has all of the software onboard to control movement, on/off/beam and beam strength plus image interpretation patterns and it attaches to the Carbide Arduino motion control board via the PWM signals. The 8bit controller can access 256 registers in memory (2^8=256) while the 32bit controller can access a much larger number of memory registers (2^32=4,294,967,296) The implication of more memory registers is that larger blocks of code can be stored and processed. It can move the laser faster and improve the image quality.
The crucial questions for you will not be resolved until you decide on what you need to engrave, process or image. With my 4.2Watt JTech laser I can manage to cut 3mm plywood with two passes. More power will permit deeper cuts in a single pass. I have attached a few images that show what careful work with a low powered laser will provide. The method to getting good results is to understand the software limitations imposed by the controller and the laser software.

4 Likes
… and another thing! ![]() In a production CNC cutout project (e.g. 40 items in an array), I use my add-on JTech 7W laser to add a customer’s logo, text or serial number to each item with just another toolpath.
In a production CNC cutout project (e.g. 40 items in an array), I use my add-on JTech 7W laser to add a customer’s logo, text or serial number to each item with just another toolpath.
Its as simple as changing bits; or even simpler.
PS. I’ve learned through testing that my 7W laser is not good for cutting much more than inlay materials, but it can do that much better than the router toolpaths.
1 Like
Hey Jeff…not for nothin’ but that’s beautiful stuff ![]() I’d love to pick your brain on your settings to get that kind of resolution from images. My results are mixed.
I’d love to pick your brain on your settings to get that kind of resolution from images. My results are mixed.
I appreciate your kind comment, Gary. Picking my brain is a lost cause these days. ![]() How and ever…
How and ever…
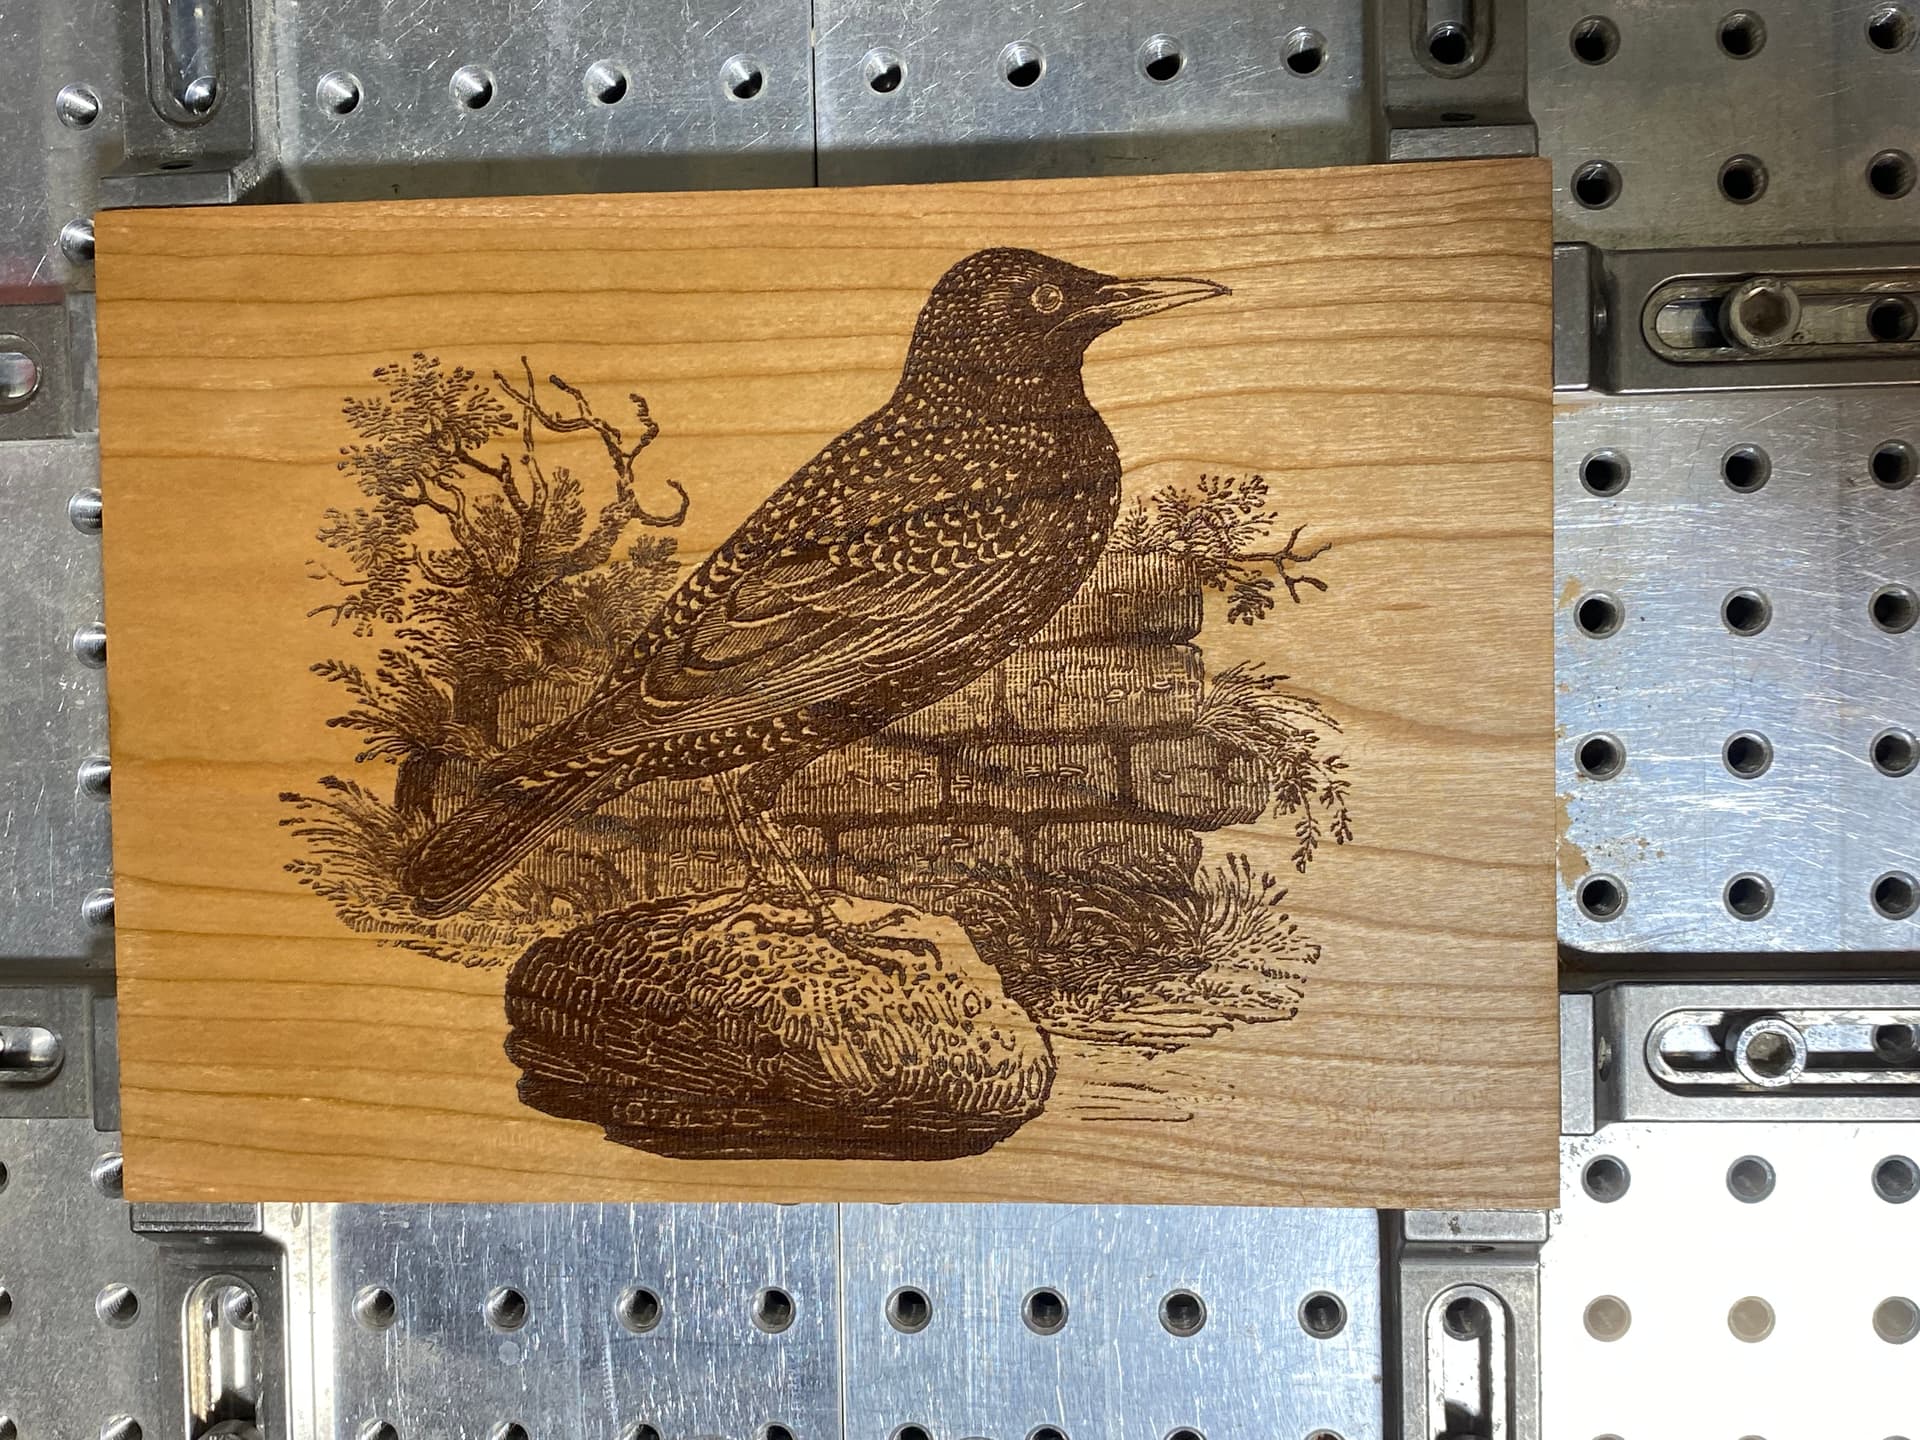
When I first got the laser, I wanted to see where its use boundaries were and I tested a lot of different materials. The one thing I noticed with hard wood is that if the laser beam was held in position for too long, the wood was marked but the edges of the burn were indistinct (not quite as sharp as wood engraved for the perfect time). It may seem like this should be obvious but I was more concerned with speed and contrast of the image. I had fallen into burning with faster speeds and upping the laser power then sanding the surface to remove a lot of the edge charring. The heavily burnt images on wood just did not look very sharp right at the edges. Of course, I was using the laser as if it required maximum power possible for each job.
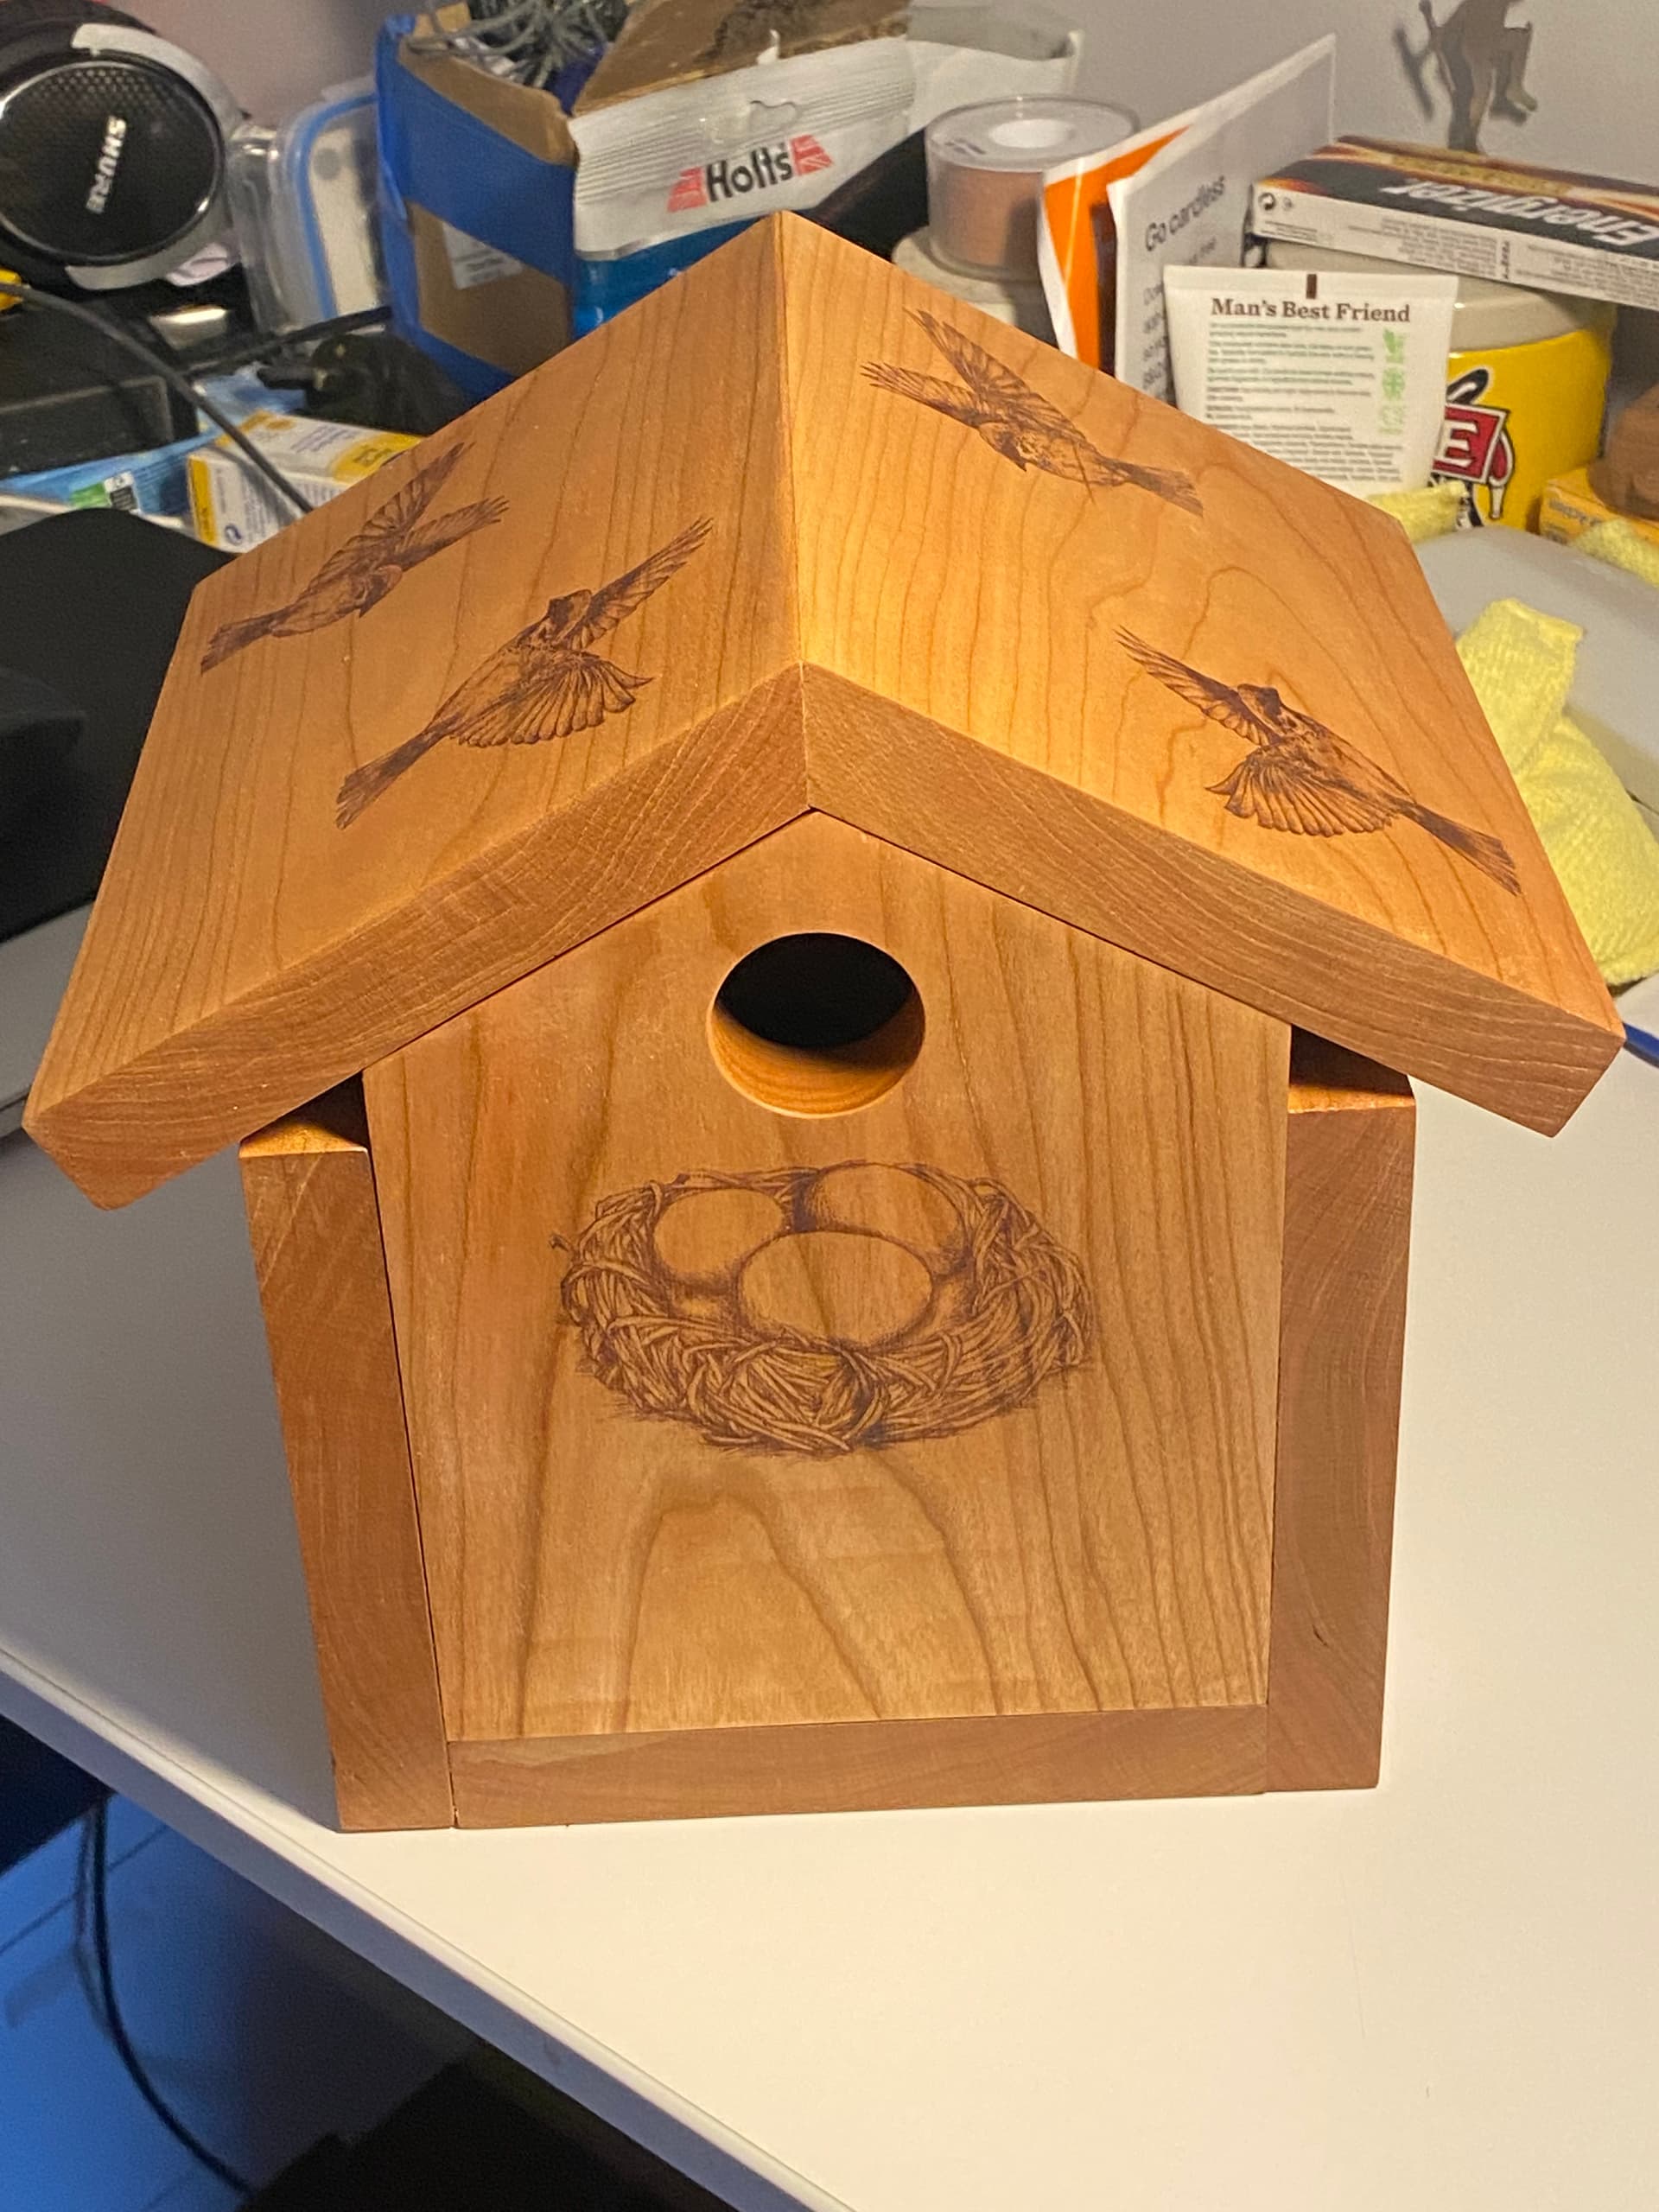
Better results came when I started to look at delicate detail and how I could hold it in the engraving. You wont be surprised to find that the bird feathers (this was an isolated test engraving that caused me to create the birds nesting box) were carved at 500mm/min and a power setting of 15%. The power was just enough to make a mark on the wood if the laser was not moving too quickly.
If you could look closely at the image of the feathers, you will not see charred edges to the image. That piece of wood has had no sanding but that is just how it came off the laser. This is evidenced by the slight machining marks from inaccurately set tramming and the marks are visible to the right of the feathers and the left of the two knots.
Testing materials is useful when you want to do any particular job and I buy a little more than the job requires so I have some material to test. My initial mistake when I was very inexperienced was to mark the wood deeply and quickly. The feathers had me trying for the point at which I could not mark it with the laser and then I found lowering the traversal speed and upping the power setting until the surface just received and held the mark. I created quite a few patch tests to assess power and traversal speed but they don’t serve every purpose well. The feathers was an image that I had decided needed the lightest of touches. I hope that is useful information.
2 Likes
I have had a JTech 7W, have a JTech 24W, have a Ortur low wattage engraver, and a 130W CO2 laser at work.
Jtech: On my S5Pro 4x4, I have a HUGE area. 4x4 is expensive for any laser if available. It only takes up the space of one machine. The 24W can actually do some cutting. If you’re a hobbyist in a smaller shop, they’re awesome and I love mine. But if time is of the essence, they you’re tying up the machine for one process at a time. Can’t cut clear acrylic. It lives in my shop which gets well below freezing here in Utah as well as into the 100’s. So temperature isn’t much of an issue.
Dedicated Engraver: The newer ones have some decent power. You have to buy a separate computer to run it. But you can run both at the same time and that may have value to you. Also can’t cut clear acrylic.
CO2: Ours at work is a beast and we use the crap out of it. It cuts tons of clear/white/black acrylic for us. But it was ~$9k-ish by the time it was delivered and running. It takes up a ton of space, which isn’t an issue at work. It can’t get below freezing due to being water cooled, so it needs a more climate controlled space. If you live in San Deigo, you’re cool. If you live in Alaska, time for a heated shop. ![]()
That’s really nice work.
1 Like
Thank your for the kind comment.
Nice work. I have the 44 watt jtech it does take tons of testing on whatever your medium is going to be.
I do have issue with it being mounted on the right of the machine as it’s impossible to home the machine with the laser mounted.
I’m still trying to figure out all the nuances of going back and forth. I use macros in lightburn but still having trouble. I find I have to reinstall everything quite often as CM doesn’t recognize my machine .
1 Like