Hey everyone, I am finishing a moderately large art piece (about 30” x 22”) and am looking for some advice for installing my frame.
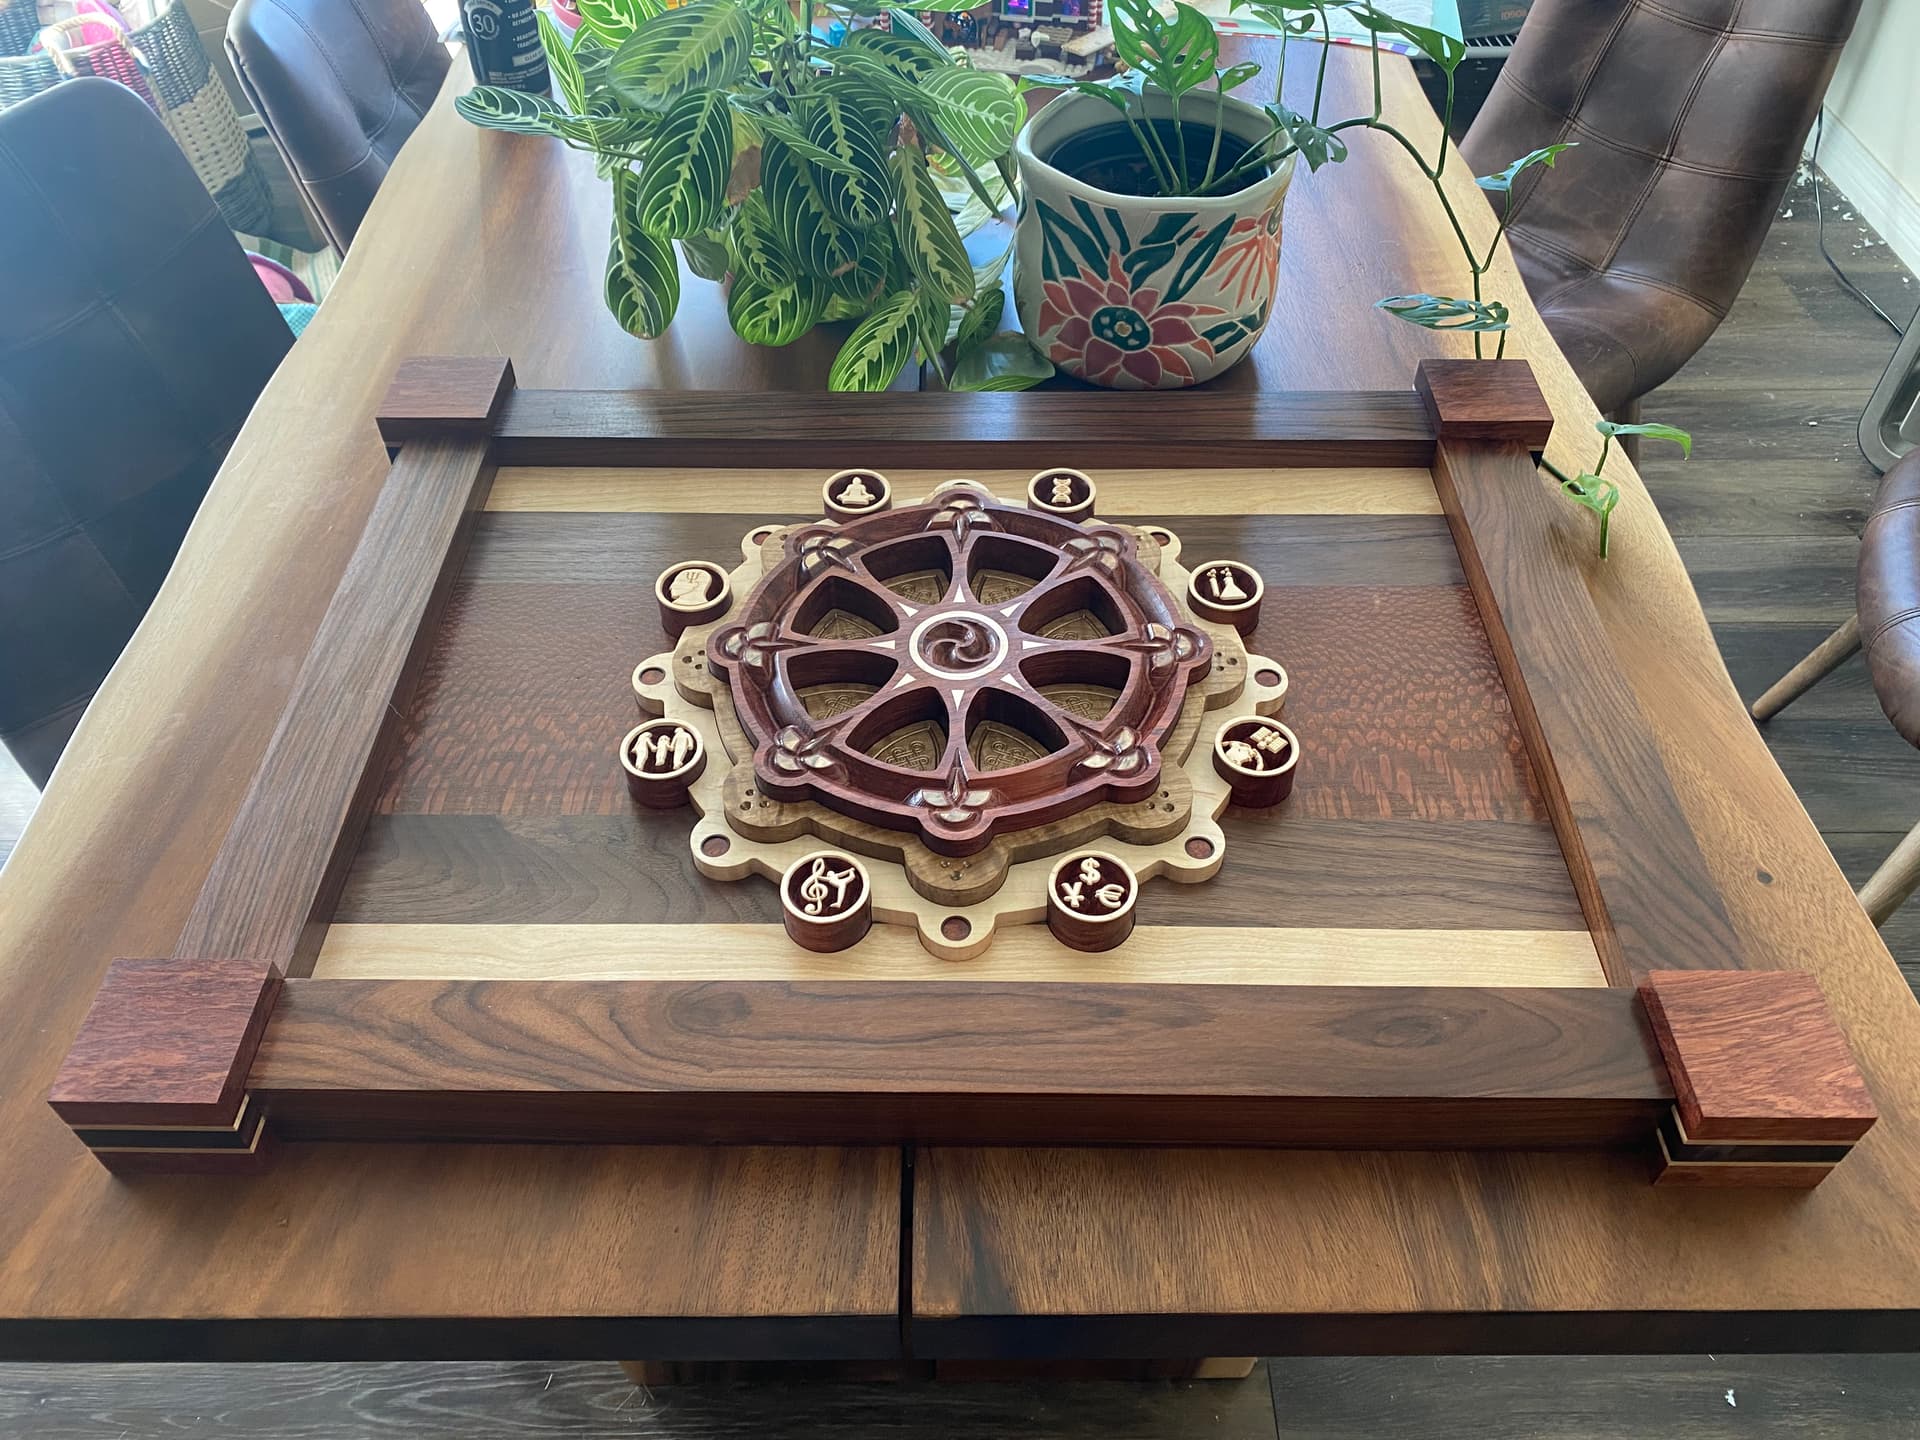
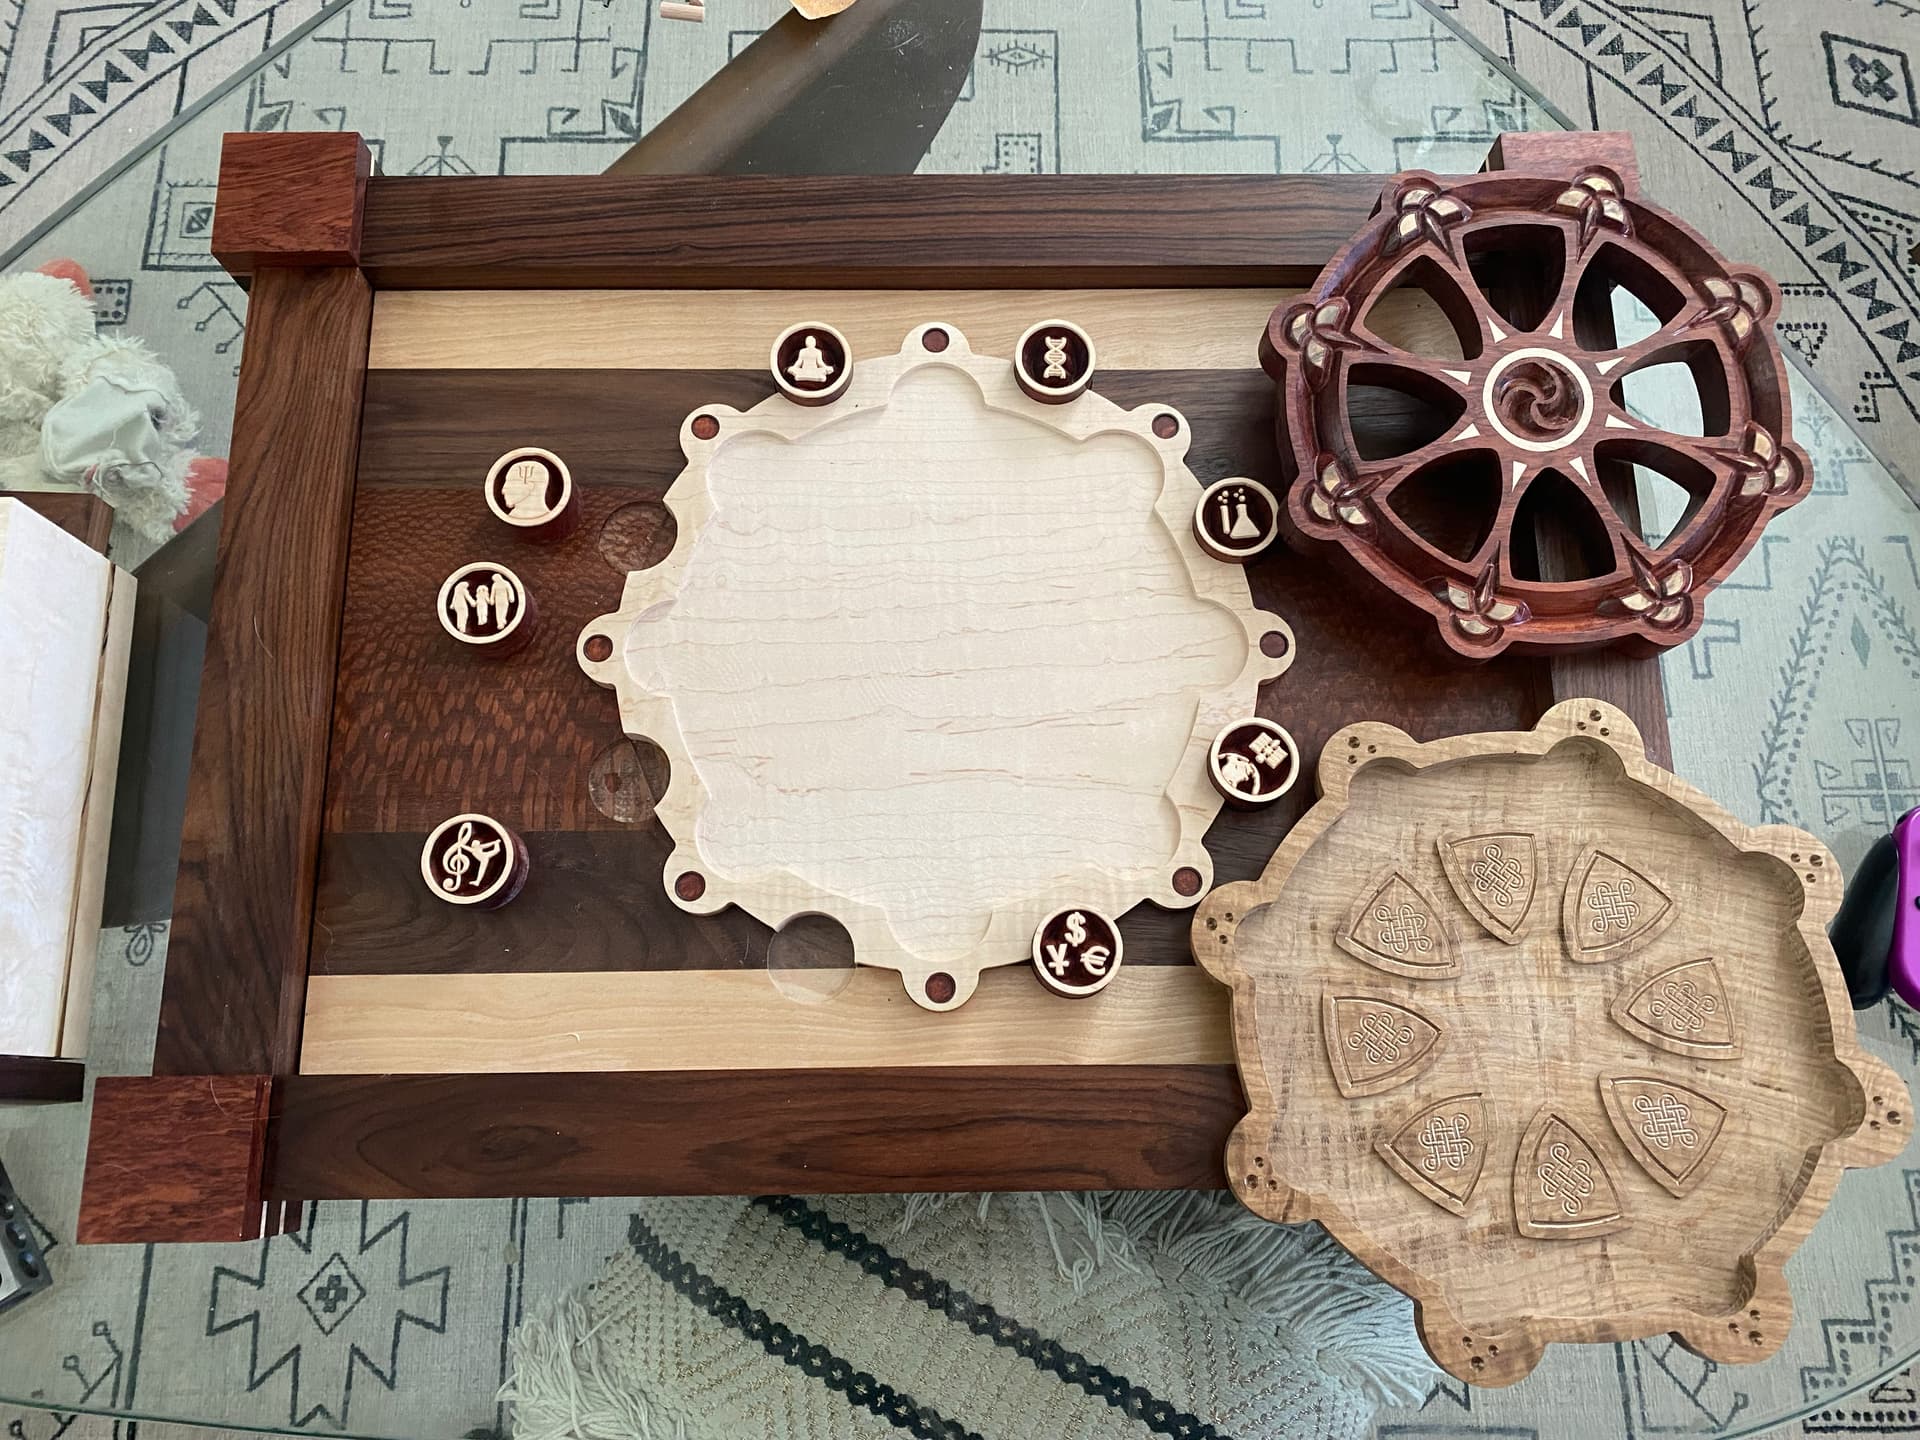
Here’s a pic of the piece, which I shared in the gallery a few weeks ago. Finally getting around to fully assembling it, after a bit of procrastination
Currently the frame is assembled via dowels, but now I am trying to figure out the best way to secure the main piece to the frame.
My initial idea was to simply use some biscuits, two on the top and bottom and one on each side, and just glue the whole thing together.
But as I consider the size of the piece, and possible expansion/contraction in the future, I’m wondering if it might be better to add some sort of backing material to each corner on the back of the piece — maybe strips of stainless steel? — drill some threaded inserts into the frame and main piece, and use bolts or screws to secure it all together. However, if I do that the piece will not be flush against the wall, which isn’t ideal (I could manually rout some pockets for the backing material, but this will be difficult because the piece won’t lay flat if I place it upside down).
I’m sure there is a better option here, so I figure I would ask you guys what it might be! Any suggestions would be appreciated. Thanks!
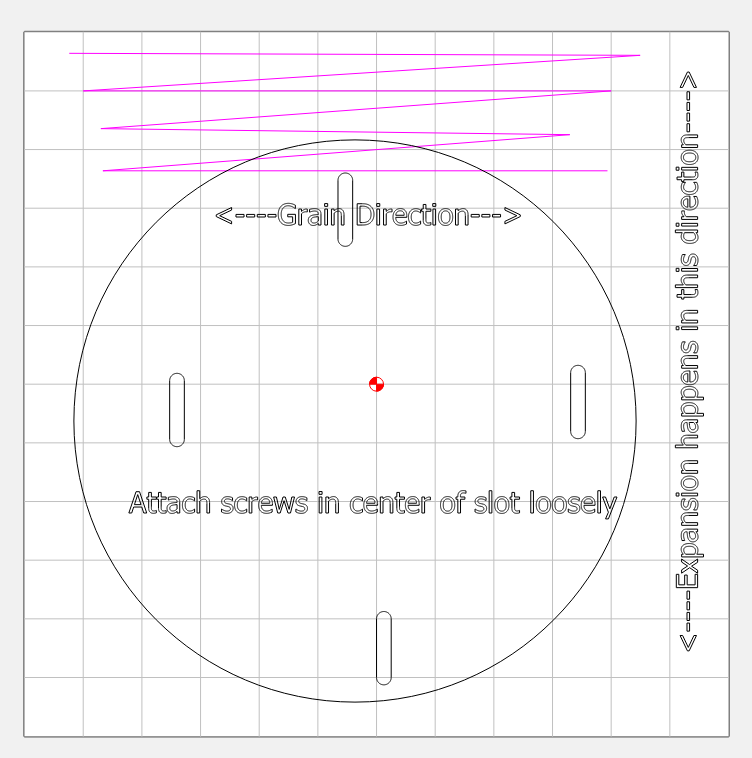
You could cut some elongated slots in the frame and secure the piece via screws that are not tightened too tightly with some washers on the heads of the screws. Wood only expands across the grain. The frame would need the slots cut perpendicular to the frame grain. That would allow your piece to expand and contract without fear of it splitting. The wood only expands with the grain minute amounts so the expansion happens across the grain. So the elongated slots would be from top to bottom for the frame pictured.
Fascinating topic because I struggle with this as well. I have been known to clamp my piece upside down and shim it level. I then plunge rout a key hole into the piece by hand. By His grace I have never destroyed a piece (and your’s is gorgeous!) It’s definitely risky, but the piece is free to expand and contract as it just floats. With 20/20 hindsight I would do a two sided carve with the keyhole side first but I know that isn’t helpful now. Following this to learn more. Always appreciate Guy’s insight as well.
Here’s a wild (/silly) idea to potentially ruin a fantastic project :
what if you machined a shallow pocket in the center of the frame, the size of the dharma wheel, possibly slightly oversized: then it would look like the dharma wheel really belongs there rather than laying flat on the frame backing? (not that it does not look great, it does)
and then the surprise: install magnets recessed on the bottom of the pocket, and on the back of the wheel. And finally machine a small cavity in the center of the frame, or engrave something profound there: it would be like a secret, only folks who know that the wheel can come off would know about what is behind it.
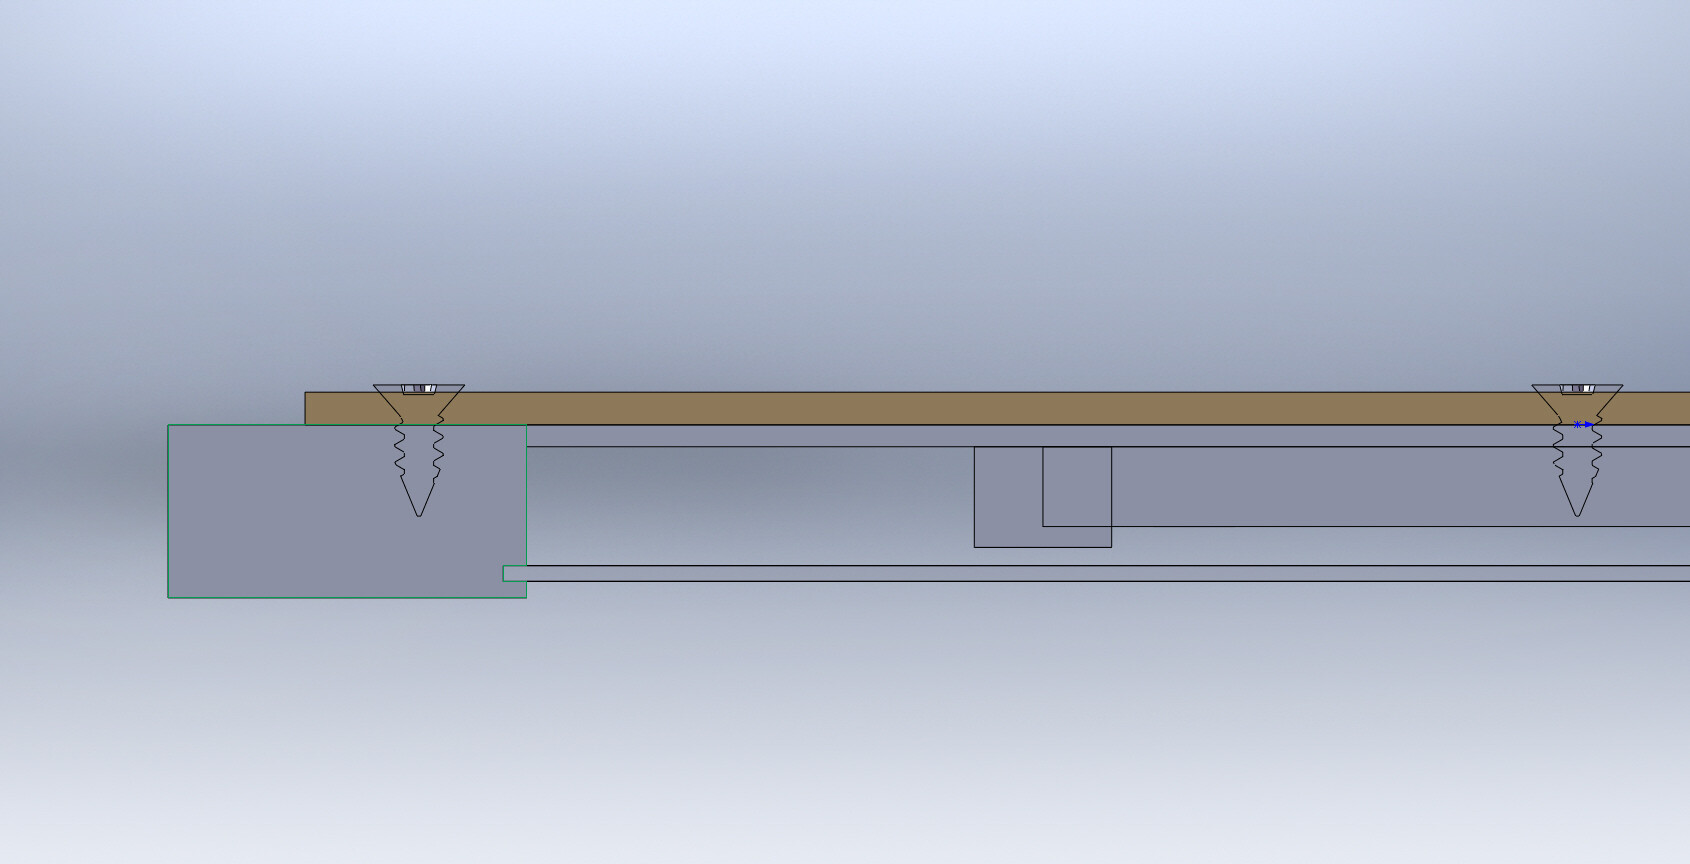
If I understand… The rectangle piece in the center, edged with maple, is just sitting in the opening of the frame??? How thick is the frame & the inserted rectangle? Could you move the center forward just a bit to leave a small gap in the back? Small angled screws through the back into the frame?? Glazier’s points? Even some tiny gussets glued to both the center & the frame??
So currently, the dharma wheel is in fact inlayed into a pocket on the main base, though I know it’s hard to tell from the pic. I actually have the outermost circle (the maple wheel) glued in already, and still need to glue in the two inner wheels, as well as the “icon towers” that circumscribe the piece.
So the wheel is already being mounted to the base, and that’s all and well. The issue I am trying to solve, is actually mounting the base to the frame itself, without needing rabbits or tongue/grooves that will reduce the final size of the piece. Yes, I should have thought of this earlier, but here I am
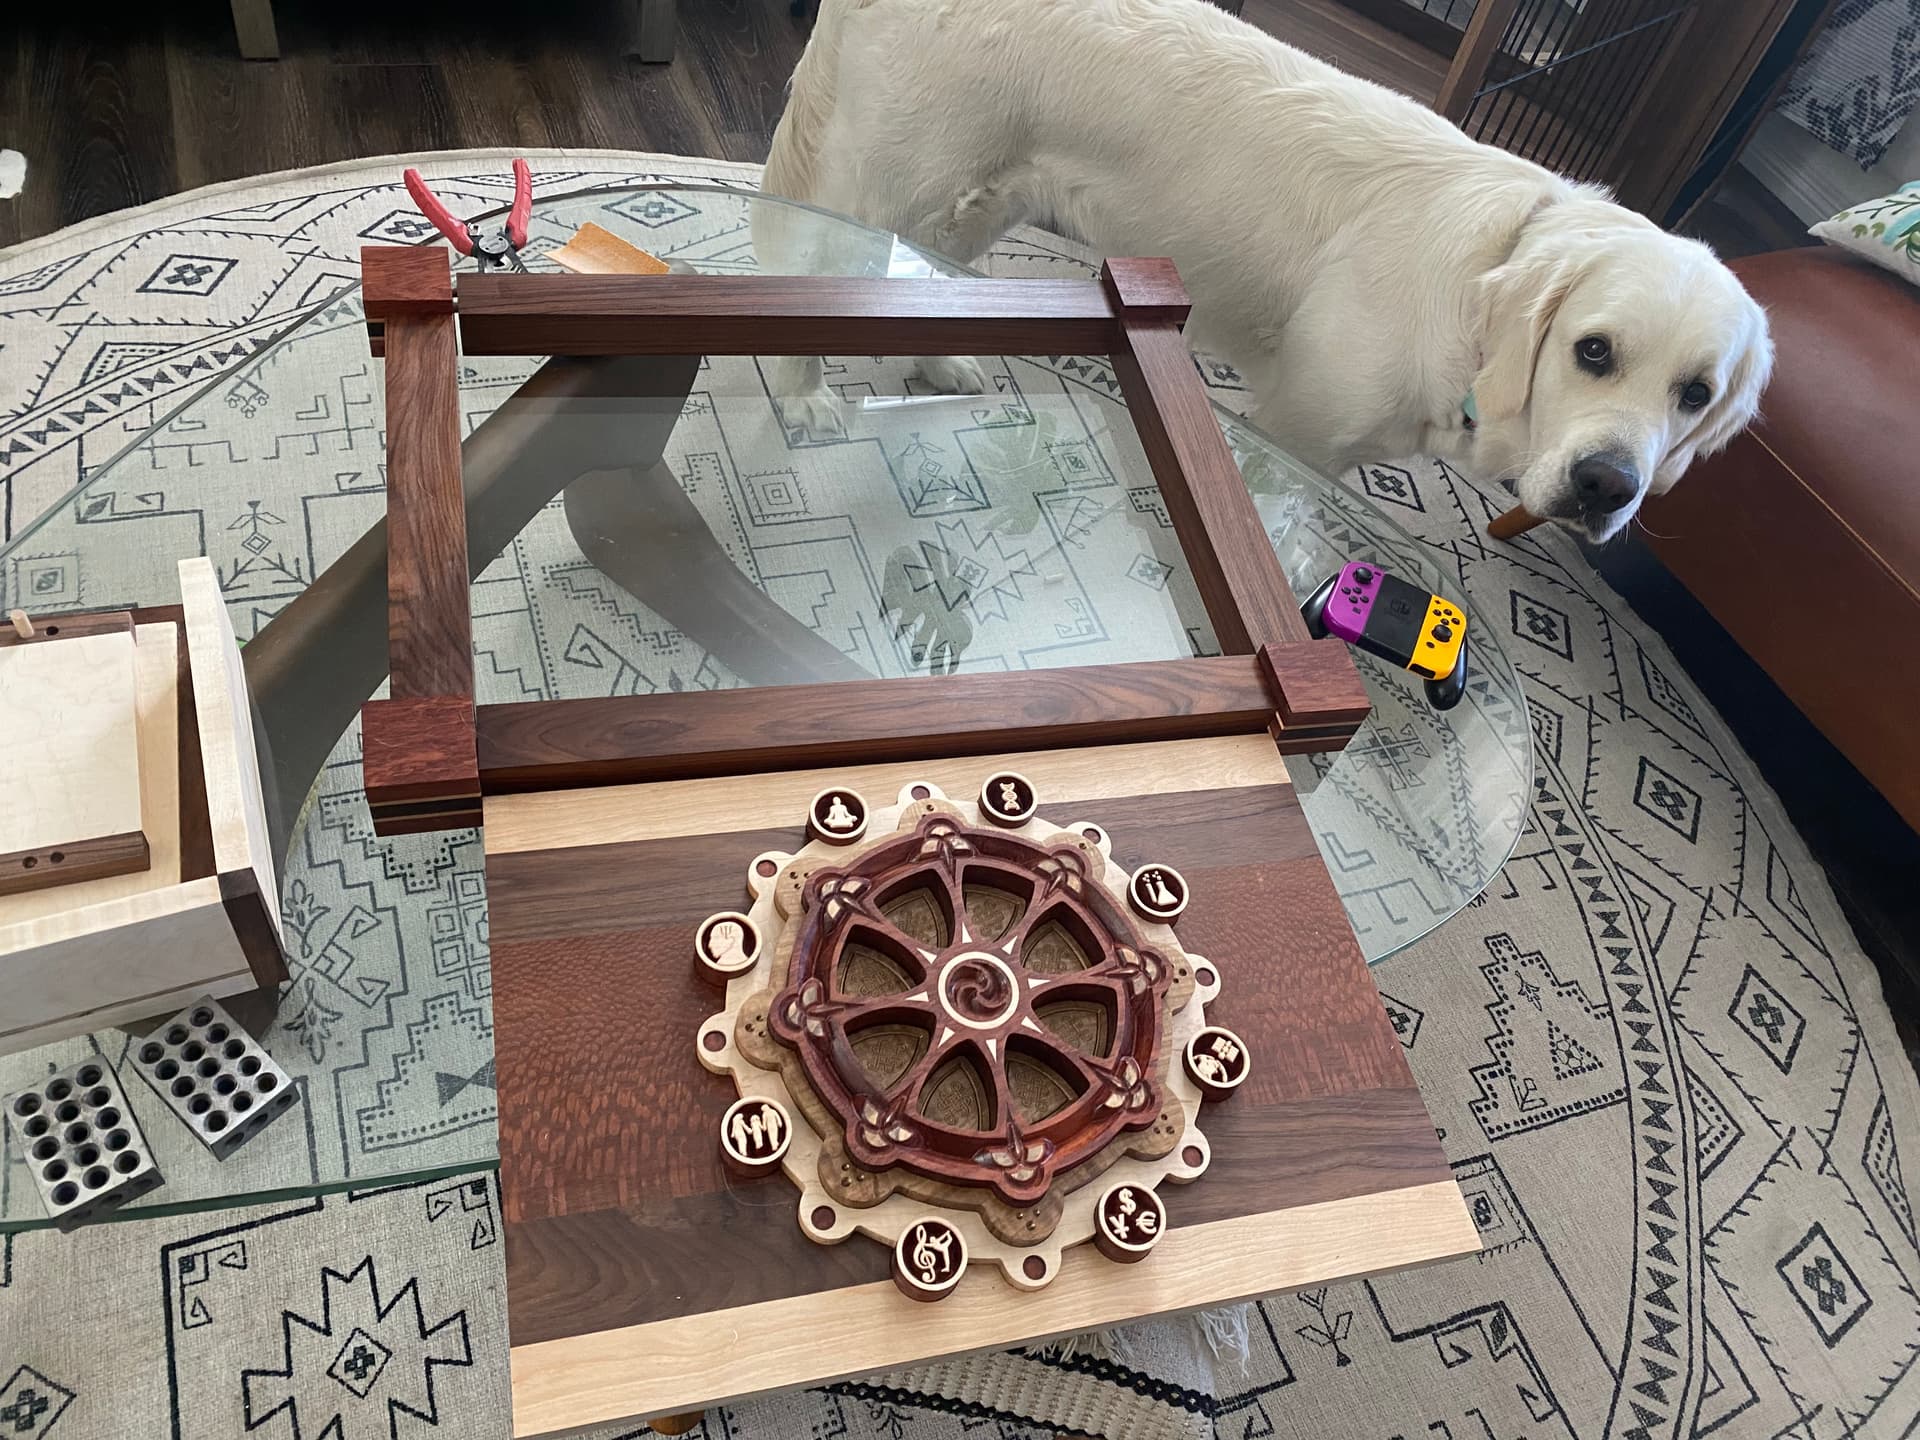
So perhaps this is the pic I should have shared, which better shows the current state of the piece. Golden retriever for scale. (Ignore the box on the left, it’s for another project).
I am trying to visualize this solution, but having a hard time for some reasons. Words are hard sometimes LOL
It sounds like you may be saying, to cut some vertical grooves up and down the backside of the left/right pieces of the frame, which I could then use to insert some loosely-tightened screws/bolts sideways into the base (maybe three on each side, to give it stability). That way it’s secured to the base horizontally, but not vertically, which gives the base a bit of room to expand/contract. Perhaps I could add some paper backing to the piece, to avoid light coming through the gaps between the base and the frame, while still giving the base enough room to “breathe”.
Am I understanding that right?
If so, my only concern there would be cutting those grooves wide enough to be able to insert the bolts, since they need to be long enough to secure into the base. I imagine it will be tough to get them in, perpendicular to the frame sides. But it’s something to consider!
What I like about this solution is that if the frame ever gets damaged, I would be able to easily detach it from the main piece, build a new one, and replace it. Not that I plan on damaging it
I drew up an example quickly in cc and here is the picture. The circle represents your wheel. So dependent on the environmental extremes where the piece is sitting I would not expect at the most for the wood to move 1/8" so my slots are exaggerated but you get the idea that the wheel cold float in the slots independent of the underlying wood.
Most parts of the country people run the air conditioner in the summer and heater in the winter so they have conditioned air year round. Some may live in a climate where they do not use air conditioning in the summer but heat in the winter. So if unairconditioned you would have more expansion and contraction than someone that lives in Texas and has either the air conditioner or the heater on and seldom has the windows opens. If you live in northern Washington state you might not have an air conditioner so you are more at the mercy of the relative humidity of the surrounding air and not making artificial humidity levels inside your house. So air conditioning drys the wood and it shrinks. The heater also drys the air and shrinks the wood. Higher humidity levels make the wood swell from moisture content. Even if you are air conditioned the power goes out or the air conditioner breaks so the house will fill up with humidity unless you live in Las Vegas which they often have humidifiers to get some moisture back into their house.
Wood is always moving and changing. All attempts to stop it will fail so go with the flow and allow for wood movement and in the long run the piece will stay stable.
Oh got you! This might be a really good idea when I permanently attach the wheel to the base, without needing glue. Each smaller wheel is already pocketed into the larger wheel, which I planned to glue together. Again, I love the idea of being able to disassemble the piece if I need to, if something gets damaged.
Here’s what it looks like, all disassembled, so you can more clearly see how the wheels are designed to inlay each other.
But since I am actually trying to figure out how to attach the base+wheel to the frame (see my picture above), your suggestion (or rather my misreading of your suggestion) made me think about this poorly-sketched solution. On the left is a basic bracket solution, using screws to attach the base and frame in each corner, and on the right is another possible solution, where the bolts are actually going through the sides of the piece.
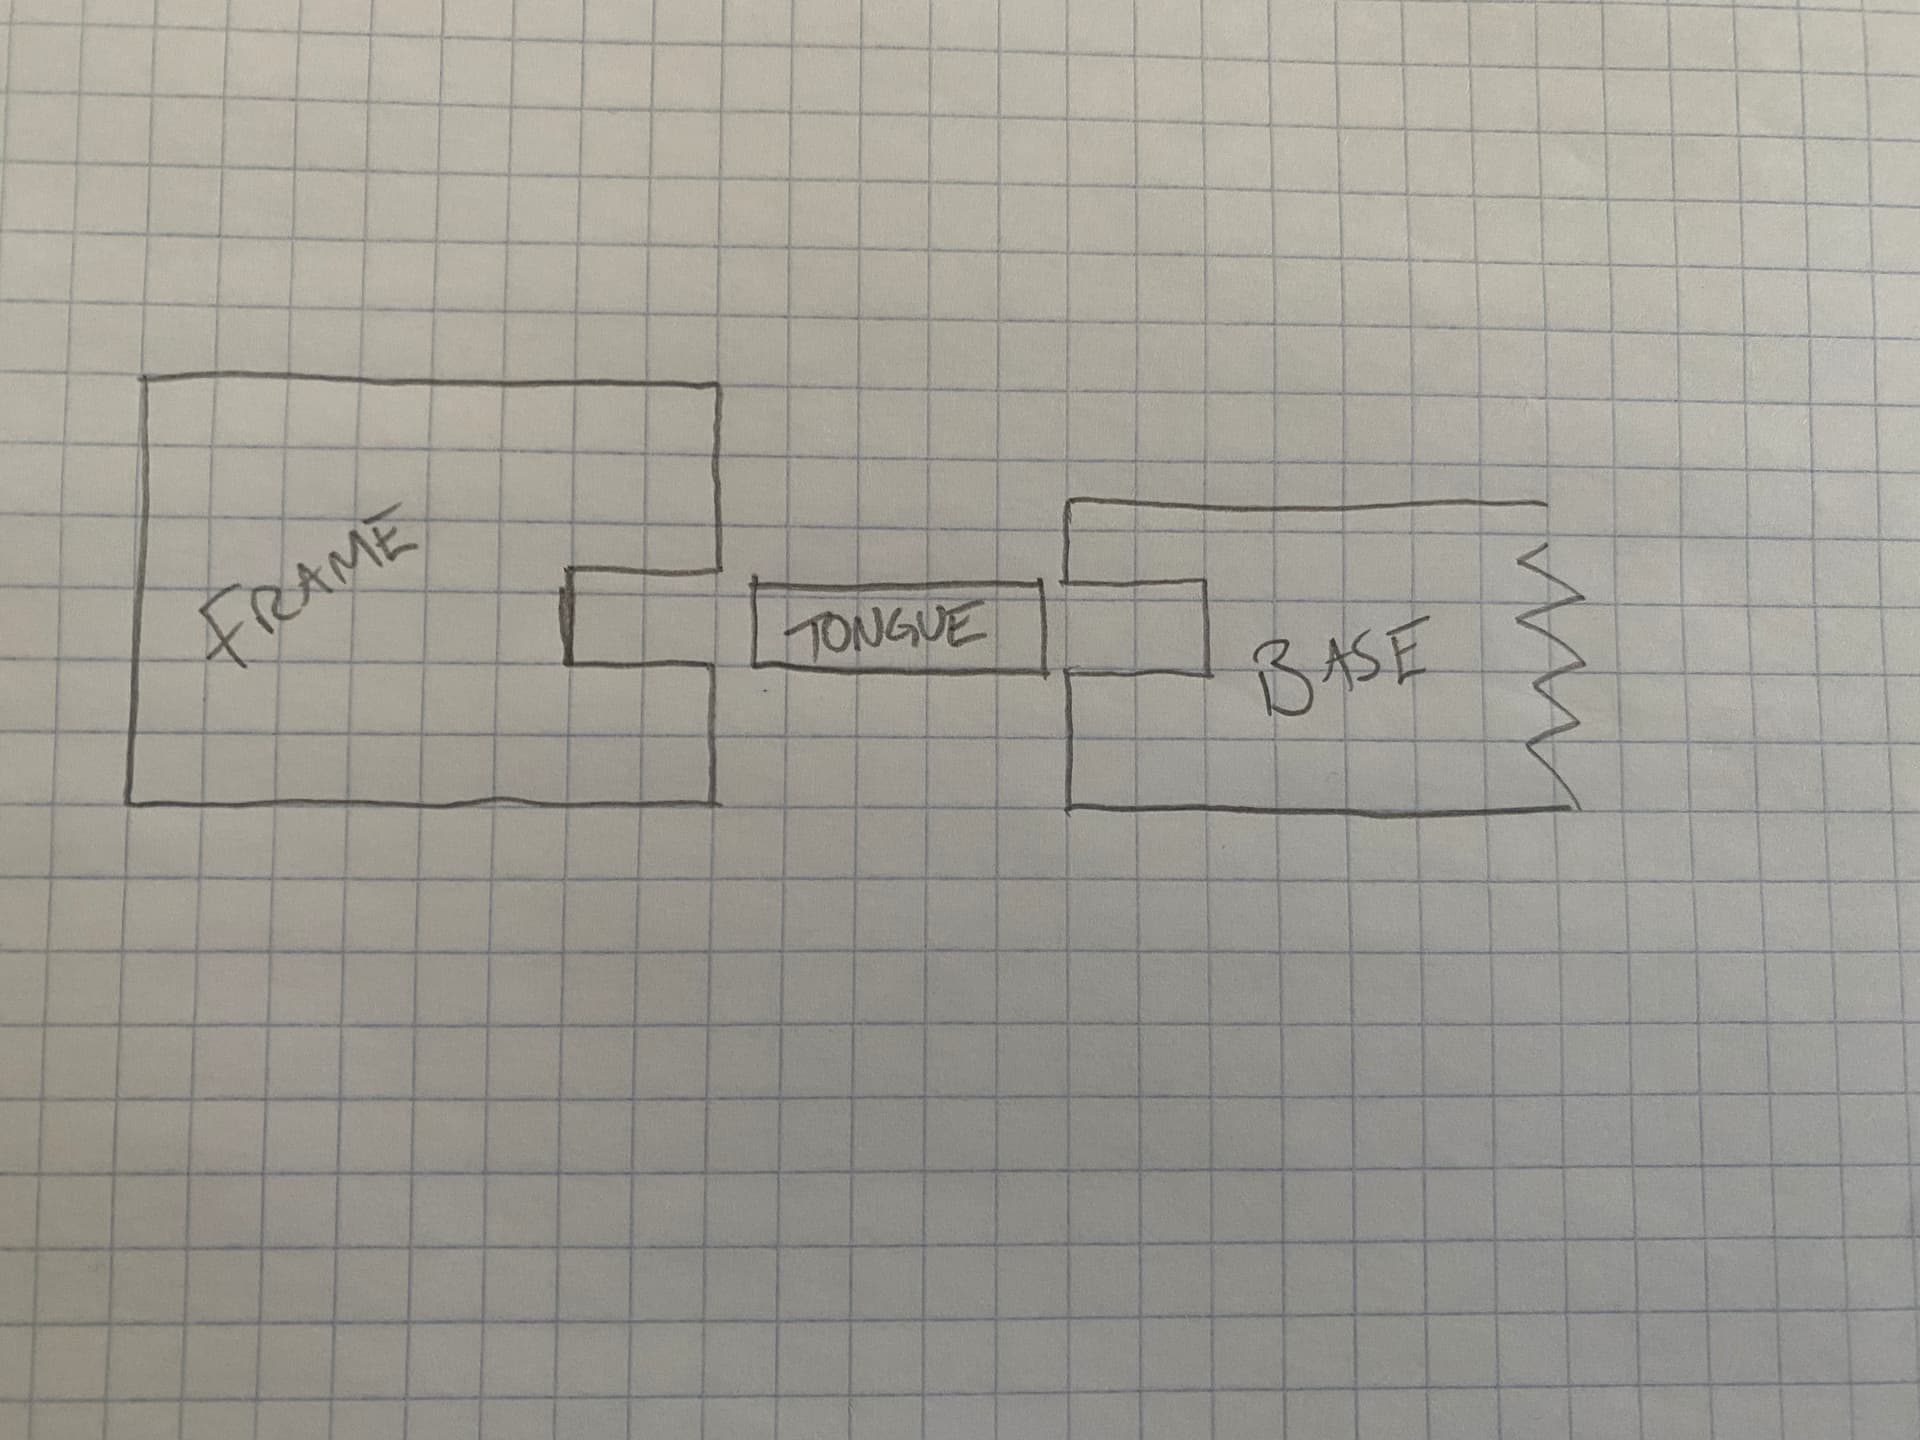
And now I am thinking of yet another (probably much more simple) option — simply cutting grooves into the outer sides of the base, and the inner sides of the frame, and then cutting a separate “tongue” that goes into both. Then I can glue up the frame (which is also held together with dowels) while leaving the base “loose” so it has room to breathe.
I’d be just a bit concerned getting that groove cut perfect and square on all sides, using my cheap little router table, but seems doable.
It’s true, I could probably just put some dowels on all sides, maybe 3 per side (12 total), and leave them unglued so the wood has room to move. Probably even more simple and straightforward than my tongue/groove solution above.
I was originally thinking biscuits, but it felt like an odd solution if I won’t actually be gluing those biscuits into place.
To mount your base to the frame you could use some 1/4 round trim or a machined from scrap trim attached to the frame. Position the base in the frame where you want it and then secure the base with the correct size screws. Have enough width on the trim to be able to set the screws to the base. You could glue and pin nail the trim to the frame. It can be released if you need to do anything to the project. Stain it the same color as the frame and any expansion will only show dark shadows.
Frames usually have an inset to place the artwork into and secure. Then framers’ points are used to hold the artwork in place. These may not be as strong as needed for the weight. You could look at the idea and see if there is any part of the traditional method that may help.
My thought: Use a piece of 1/8-1/4 ply height/width to the midpoint of the outer frame rails (1/2 rail shy in all dims), then screw from behind into wheel mount, then lay into back of frame and screw to frame from behind; hidden, thin, removable and flush to both assy’s from behind.
I didn’t have time to read through every post so I apologize if this has already been said. Do not glue your center panel to the outside frame. Expansion and contraction of the center panel will cause all sorts of issues. The center panel needs to be floating similar to how a traditional 5 piece panel is made. Your tongue idea would work as long as there is a little space between the base and frame, the tongue does not fill the whole slot and you don’t use any glue on the tongue in either the frame or base.

 they work great on nearly any project.