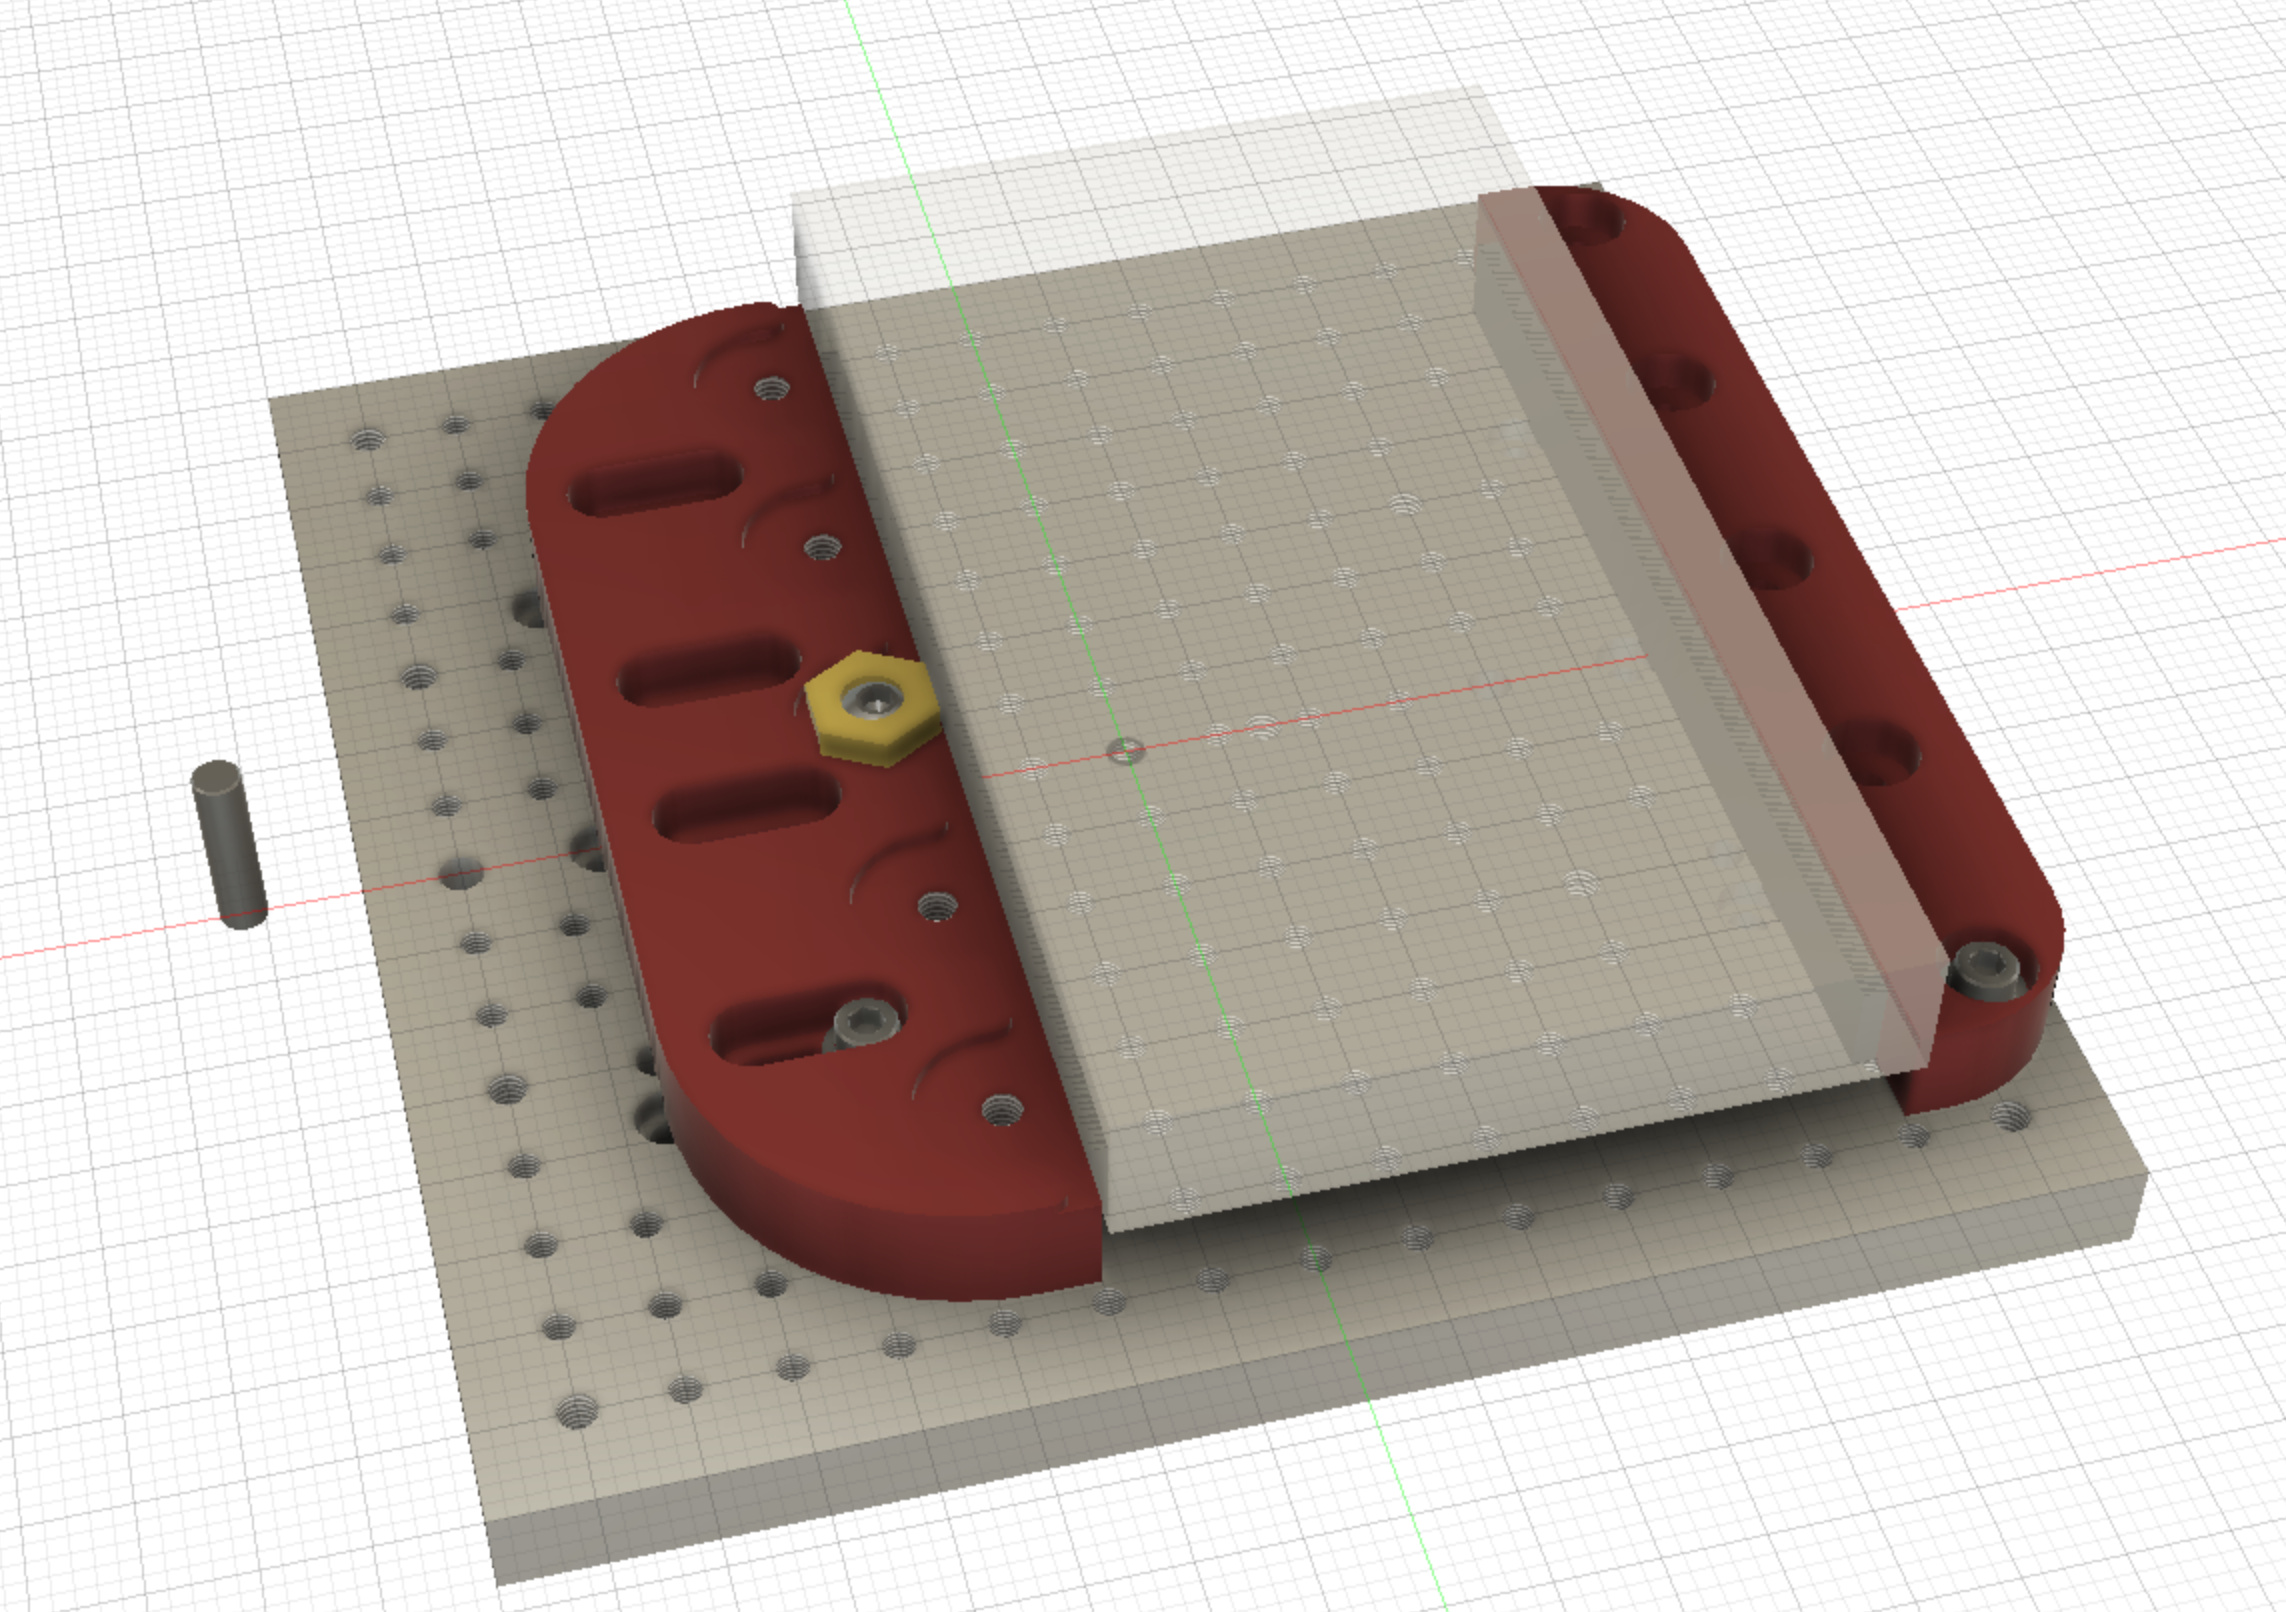
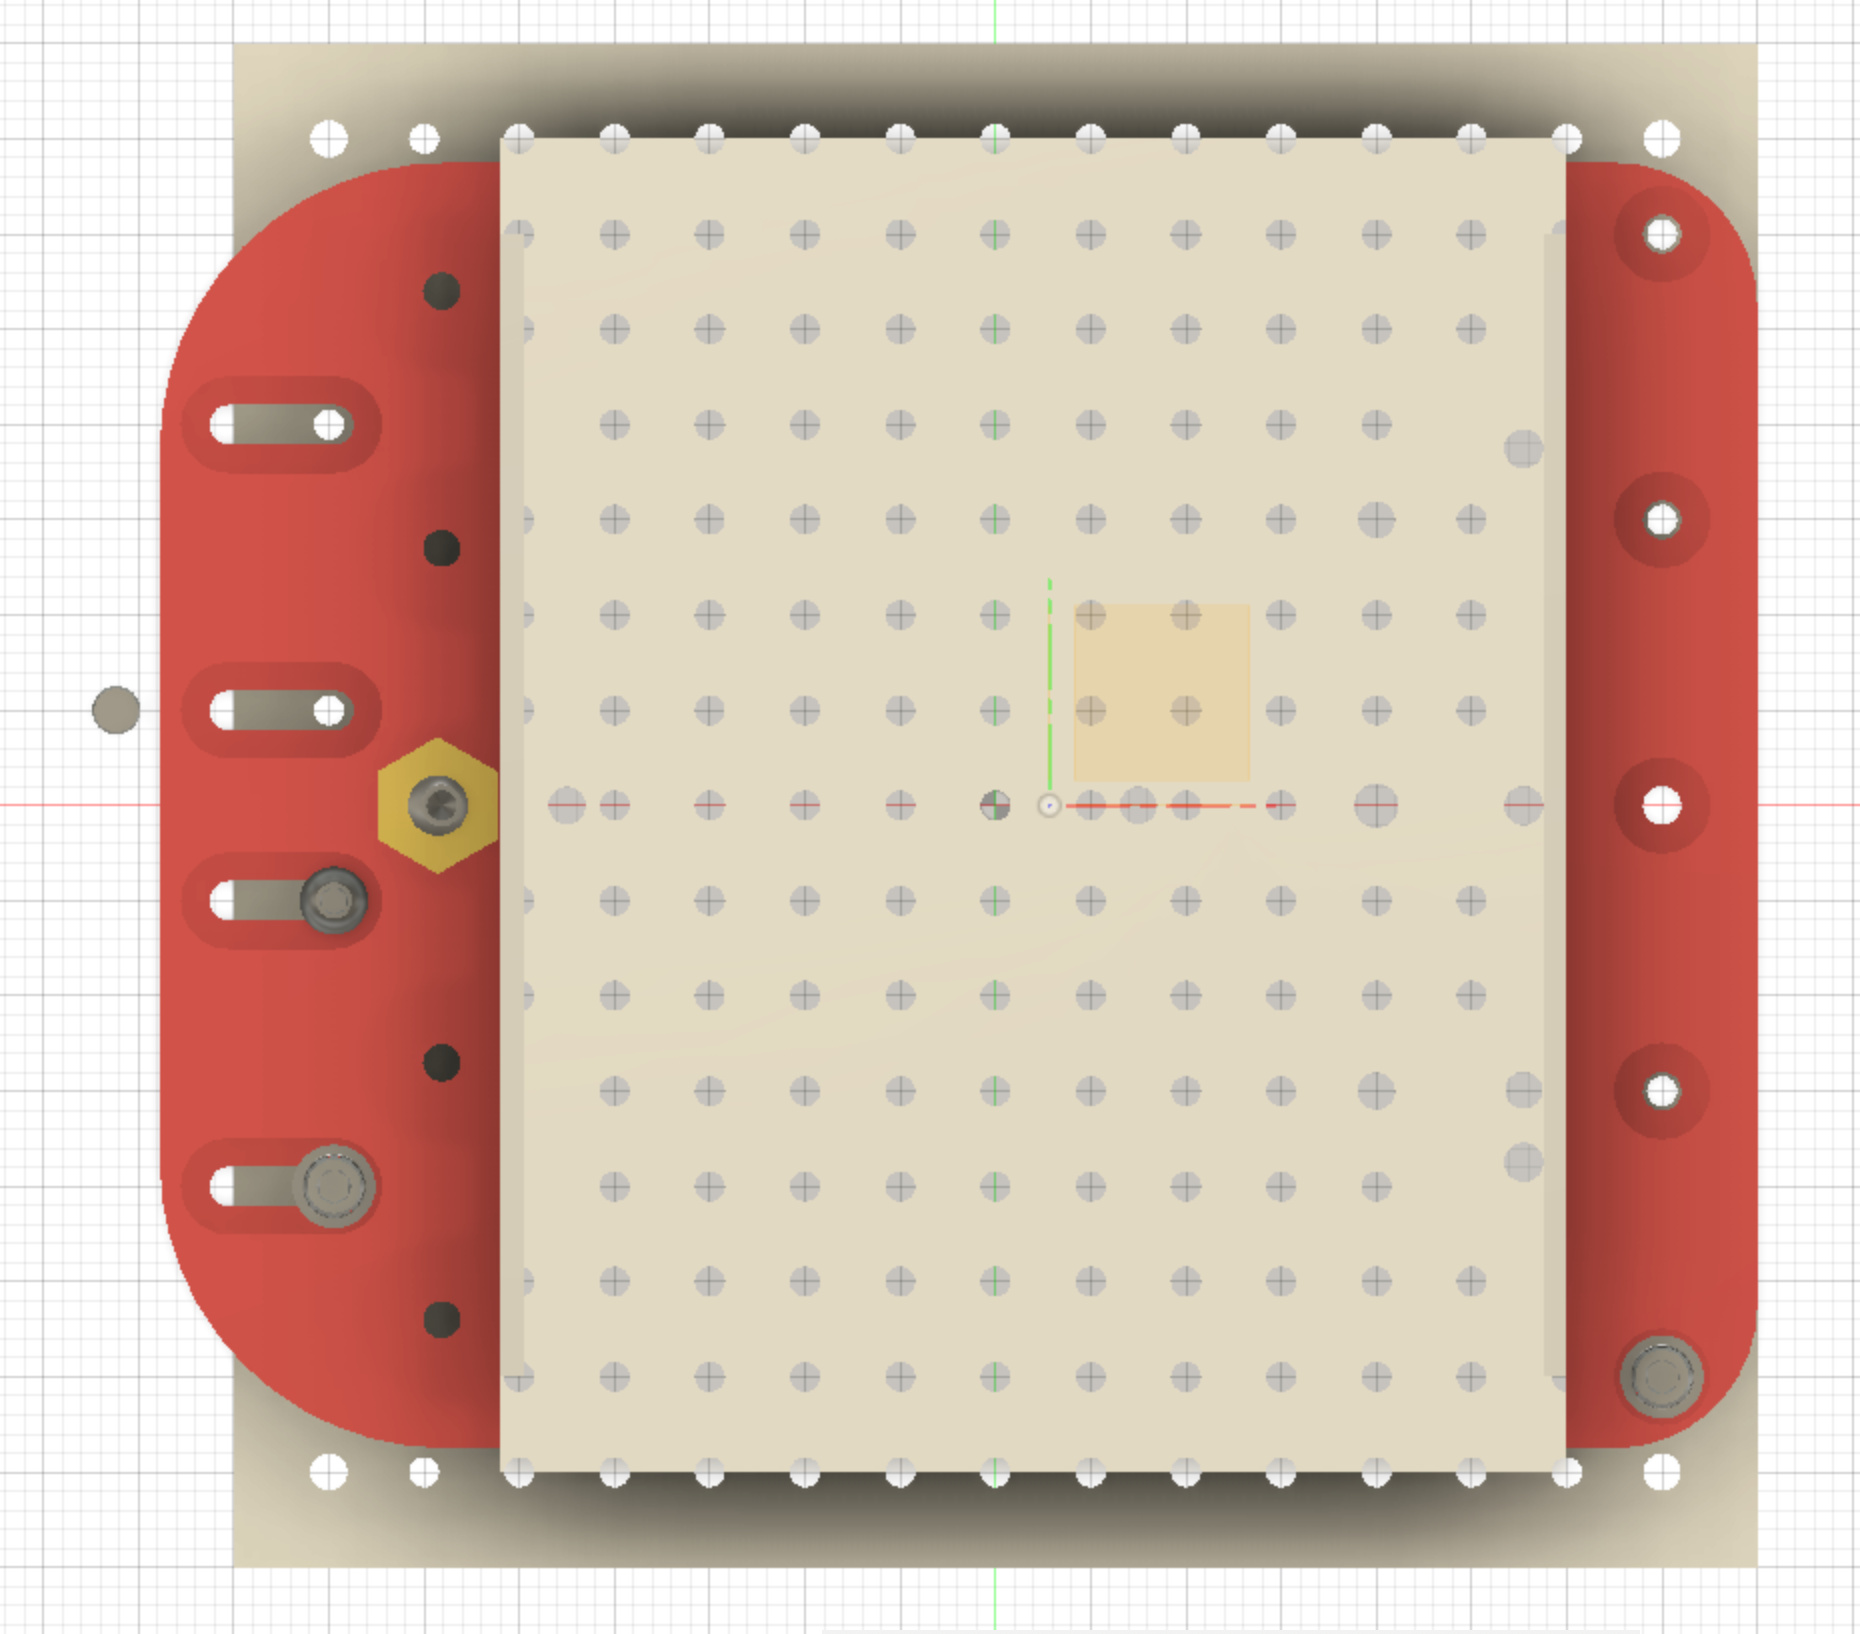
Hello all!. Hope everyone is healthy and in good company. For a while now I have been thinking of making my own low profile vise specifically to work with my Nomad. One that would minimize the height used. Now that I have a lot of time to think about it, wanted to share my thoughts with you to see if there is room for improvement. Because I wanted it to be as square as possible, I’ve designed it around placing the stock over two parallels of 1/2" height. Parallels are easy to get and precise.
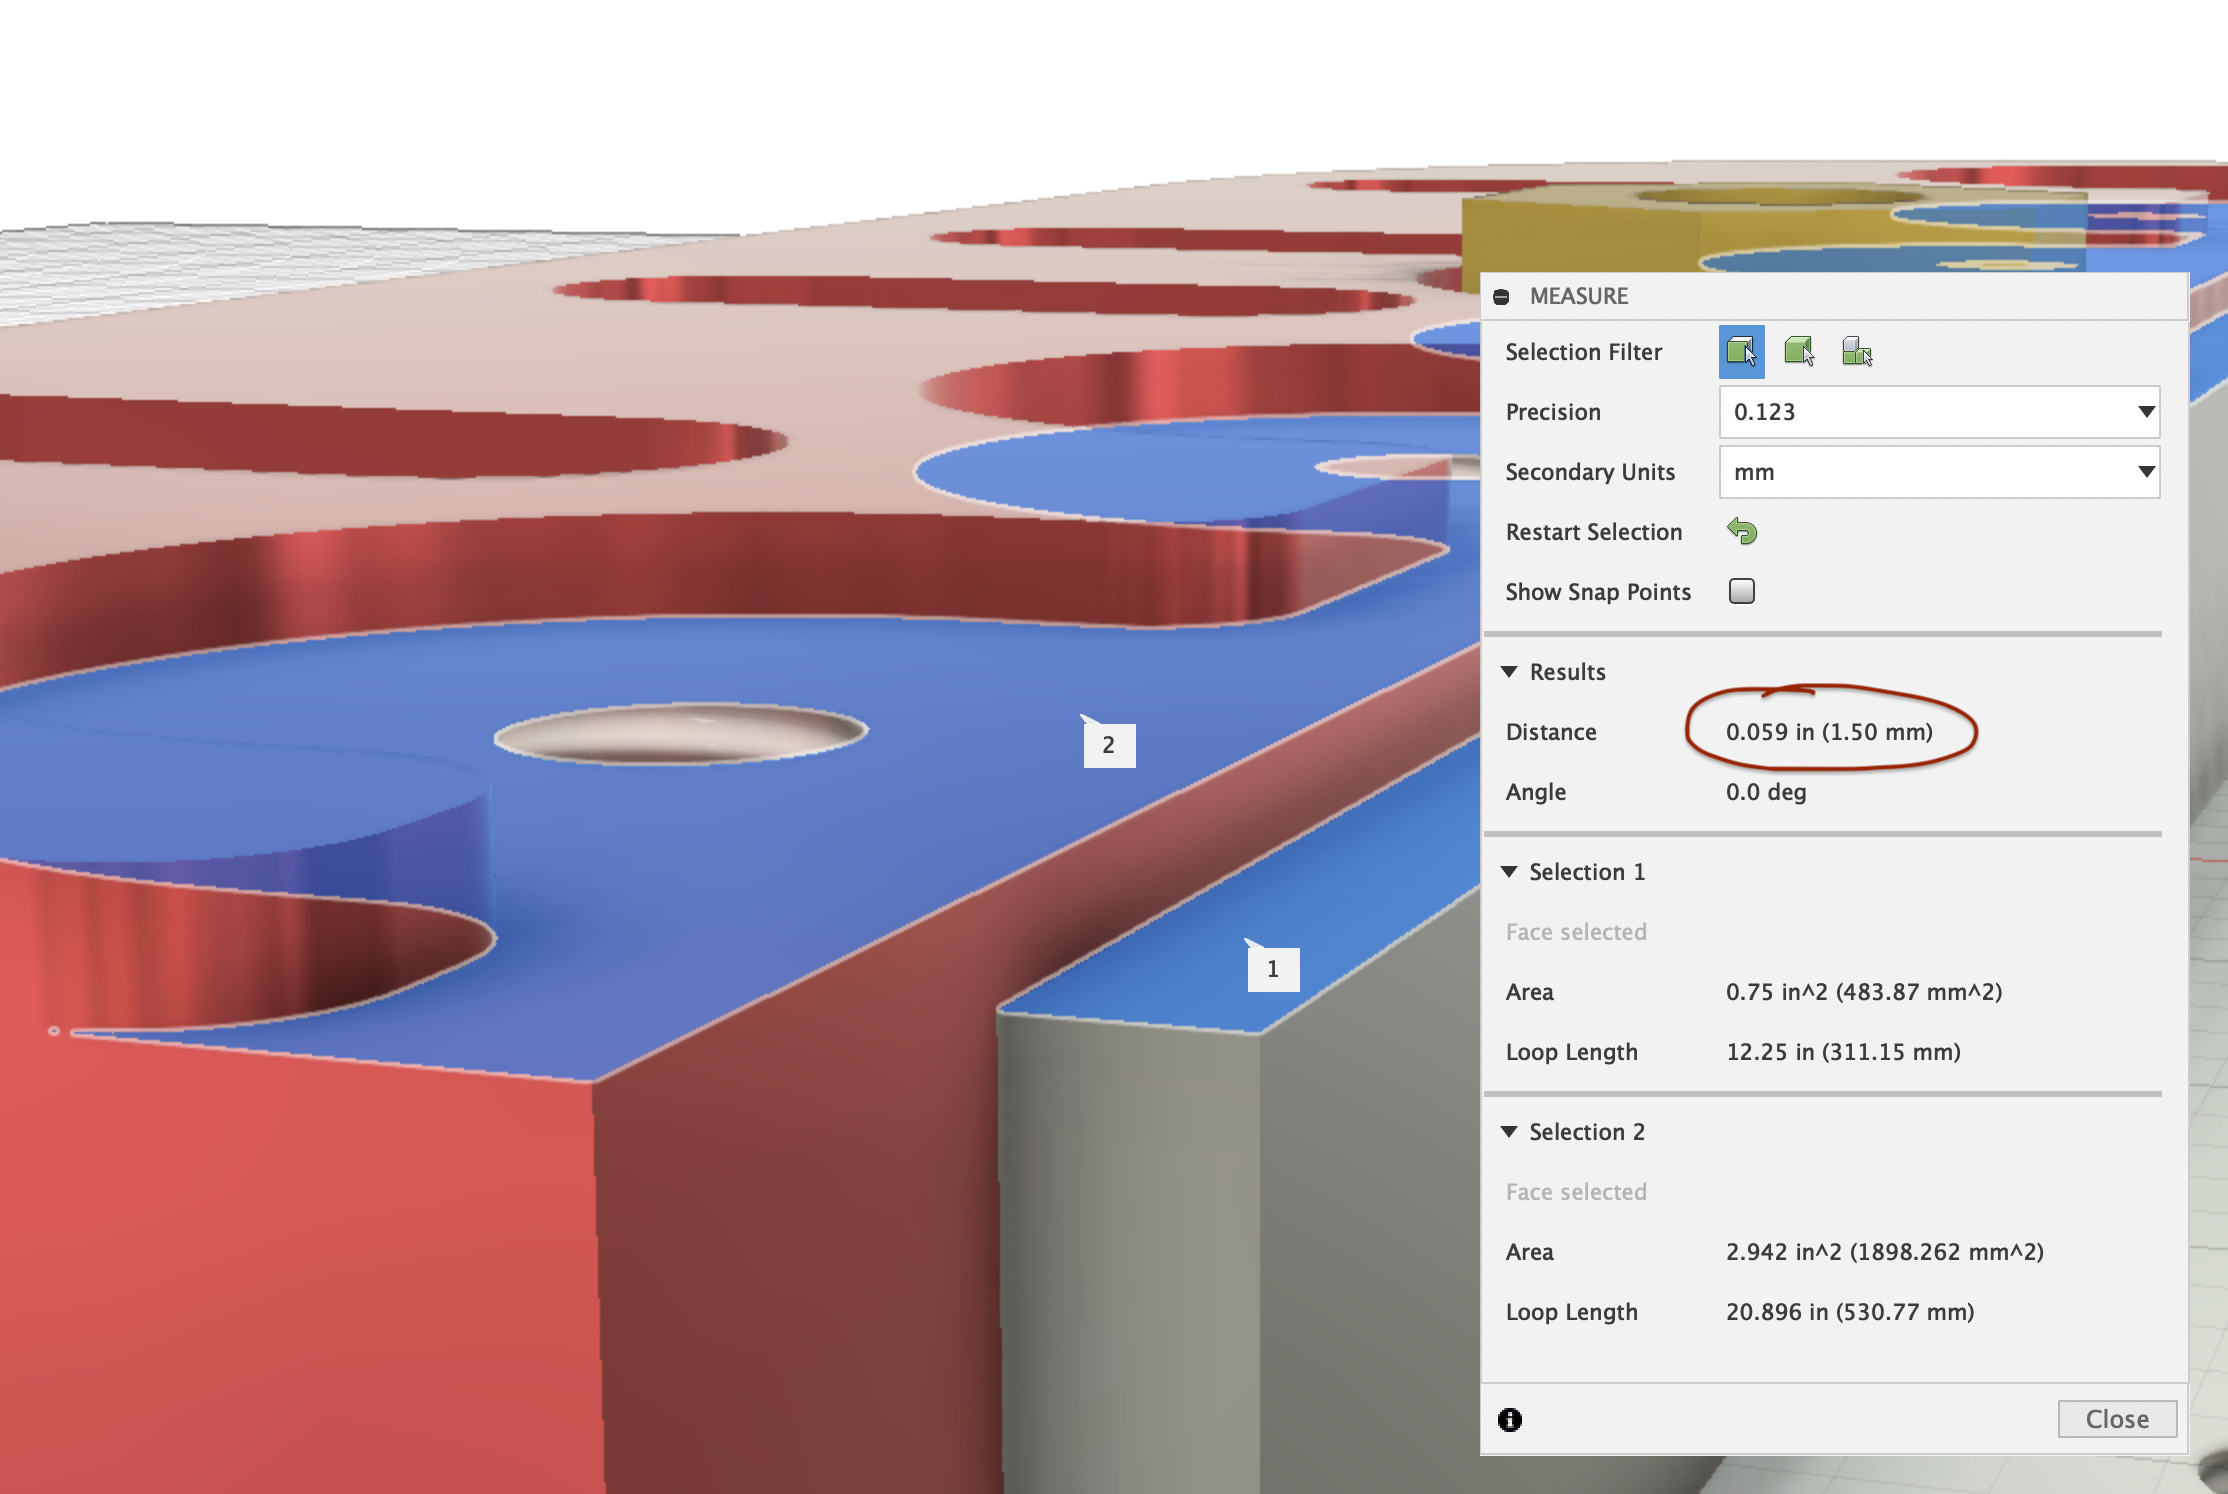
It is parametrically built so I just tell Fusion the size of the stock and it fits it in the middle of the vise (want to play around with collision detection). I have a question. Right now the “grip” distance above the parallels is 1.5mm. Where the vise makes contact with the stock.
Is this enough?. The vise design, so far, only keeps the stock in place by side pressure fixture clamps. Also have these available at home.
Any suggestions?. I had also the idea of adding diagonal screws that bit into the stock sides, like the Carbide3D ones but adding these would make it more difficult for me to machine. Maybe for v2?.
Any comments would be welcome.
I don’t have a Nomad, so I’m not very used to the cutting conditions it sees. With small end mills you don’t see a lot of tool force, so I think 1.5mm would be fine for gripping stock.
One thing you will need to watch out for is thin stock bowing as you clamp it. That can cause it to squeeze out of the vise.
Thank you @CatalystGilles. I know the perfect tool for every job does not exist. This is a general purpose vise that can handle bigger pieces than the Carbide3D one and gain a little height. I could also lower the vise more if I went with 3/8 parallels. Just for one pair of parallels from McMaster is about $70. Wanted to keep this affordable in case there is interest in this.
If you search around I’m sure you could find some cheaper and if you make very many of these, having a shop grind some for you might be a better option.
If it was up to me, I would just mill a step into the vise that acted as a parallel. Might take more time to get right, but saves the cost of parallels. Plus it’s one less spot to trap chips and you don’t have to worry about the parallels falling over when loading parts.
This vise style is all over, I believe Lockwood had a slick staggered option using CarrLane hardware on his insta as well. Might have been inspo for SMW version.
@CatalystGilles Yes, agree about McMaster and prices. I started with the idea of milling the groove in the vise but being aluminum and also using a Nomad Classic, wanted to have something like parallels be a constant.
@The_real_janderson Yes, my design is was inspired by what I saw @TonyDangerCoiro Instagram feed. Also had been wanting to mill Saunders Mod vise so some of that magic dust is sprinkled in there. I have the threaded plate full of 10-32 holes and not compatible with either.
I felt like tackling the project to mill my own to practice accuracy and also polish off some things I’ve been wanting to get a grasp on with Fusion. Parametric design with joints.
Like the design! From personal experience it will probably depend on the material you are gripping. I find plastics are not great for this type of clamping (low friction, easily warped). Have noticed some vise makers actually undercut the jaws by a degree or two to add some bite.
Have also pondered the ‘ultimate Z height’ vise idea. I was thinking of going right back to the original thin Nomad bed and making a tong style vise that screws into the corner mounting holes.
Cool! Agreed with @PaulAlfaro, there are only so many ways to skin the cat on work holding to threaded tables. The material used was 0.75" thick due to the length of the M6 Mitee-Bite fasteners and 1.5" wide stock for my clamps to cover the 1" length between threaded holes in my Nomad table plus have material at the end of the slots.
On the topic of parallels, I just made them into the fixtures for three reasons; cost like you mentioned, it was also super easy and finally, if your table is flat and parallel to the machine, the machine will make as parallel as a surface as it can. Precision parallels don’t gain you anything if the table isn’t parallel to the machine. Make sure the table is flat/parallel and make the feature into the fixture; this will be as good as the machine is. (The Nomad is quite good.)
If I were to do it again, I’d make my design slightly less long. If you look at my machine, I cannot access the last row of holes, since the corners are used to fixture the threaded accessory to stock table. Was a silly oversight on my part. Secondly, I would add another slot on the adjustable side, the Mitee-Bites slide my slotted fixture if you aren’t super careful. Third, go as tight on size and position as possible on the hole on the fixed side, this will limit how out of parallel in XY it can be. (Two schools of thought here, tight as possible and trust the table or go loose and sweep it in every time. I am lazy so I trust the table.)
Anyway, this style fixture rocks on the Nomad, I can put material in there, clamp it down and literally pick up the Nomad with it.
Thank you @TonyDangerCoiro for writing back and thank you for the inspiration. We both arrived at the same dimensions based on the fasteners. I can fit a 8"x5.6" piece of stock and still clear the tool length probe. I resurfaced my bed so it’s as level as it will be. Using parallels gives me the option of lifting the stock or not.
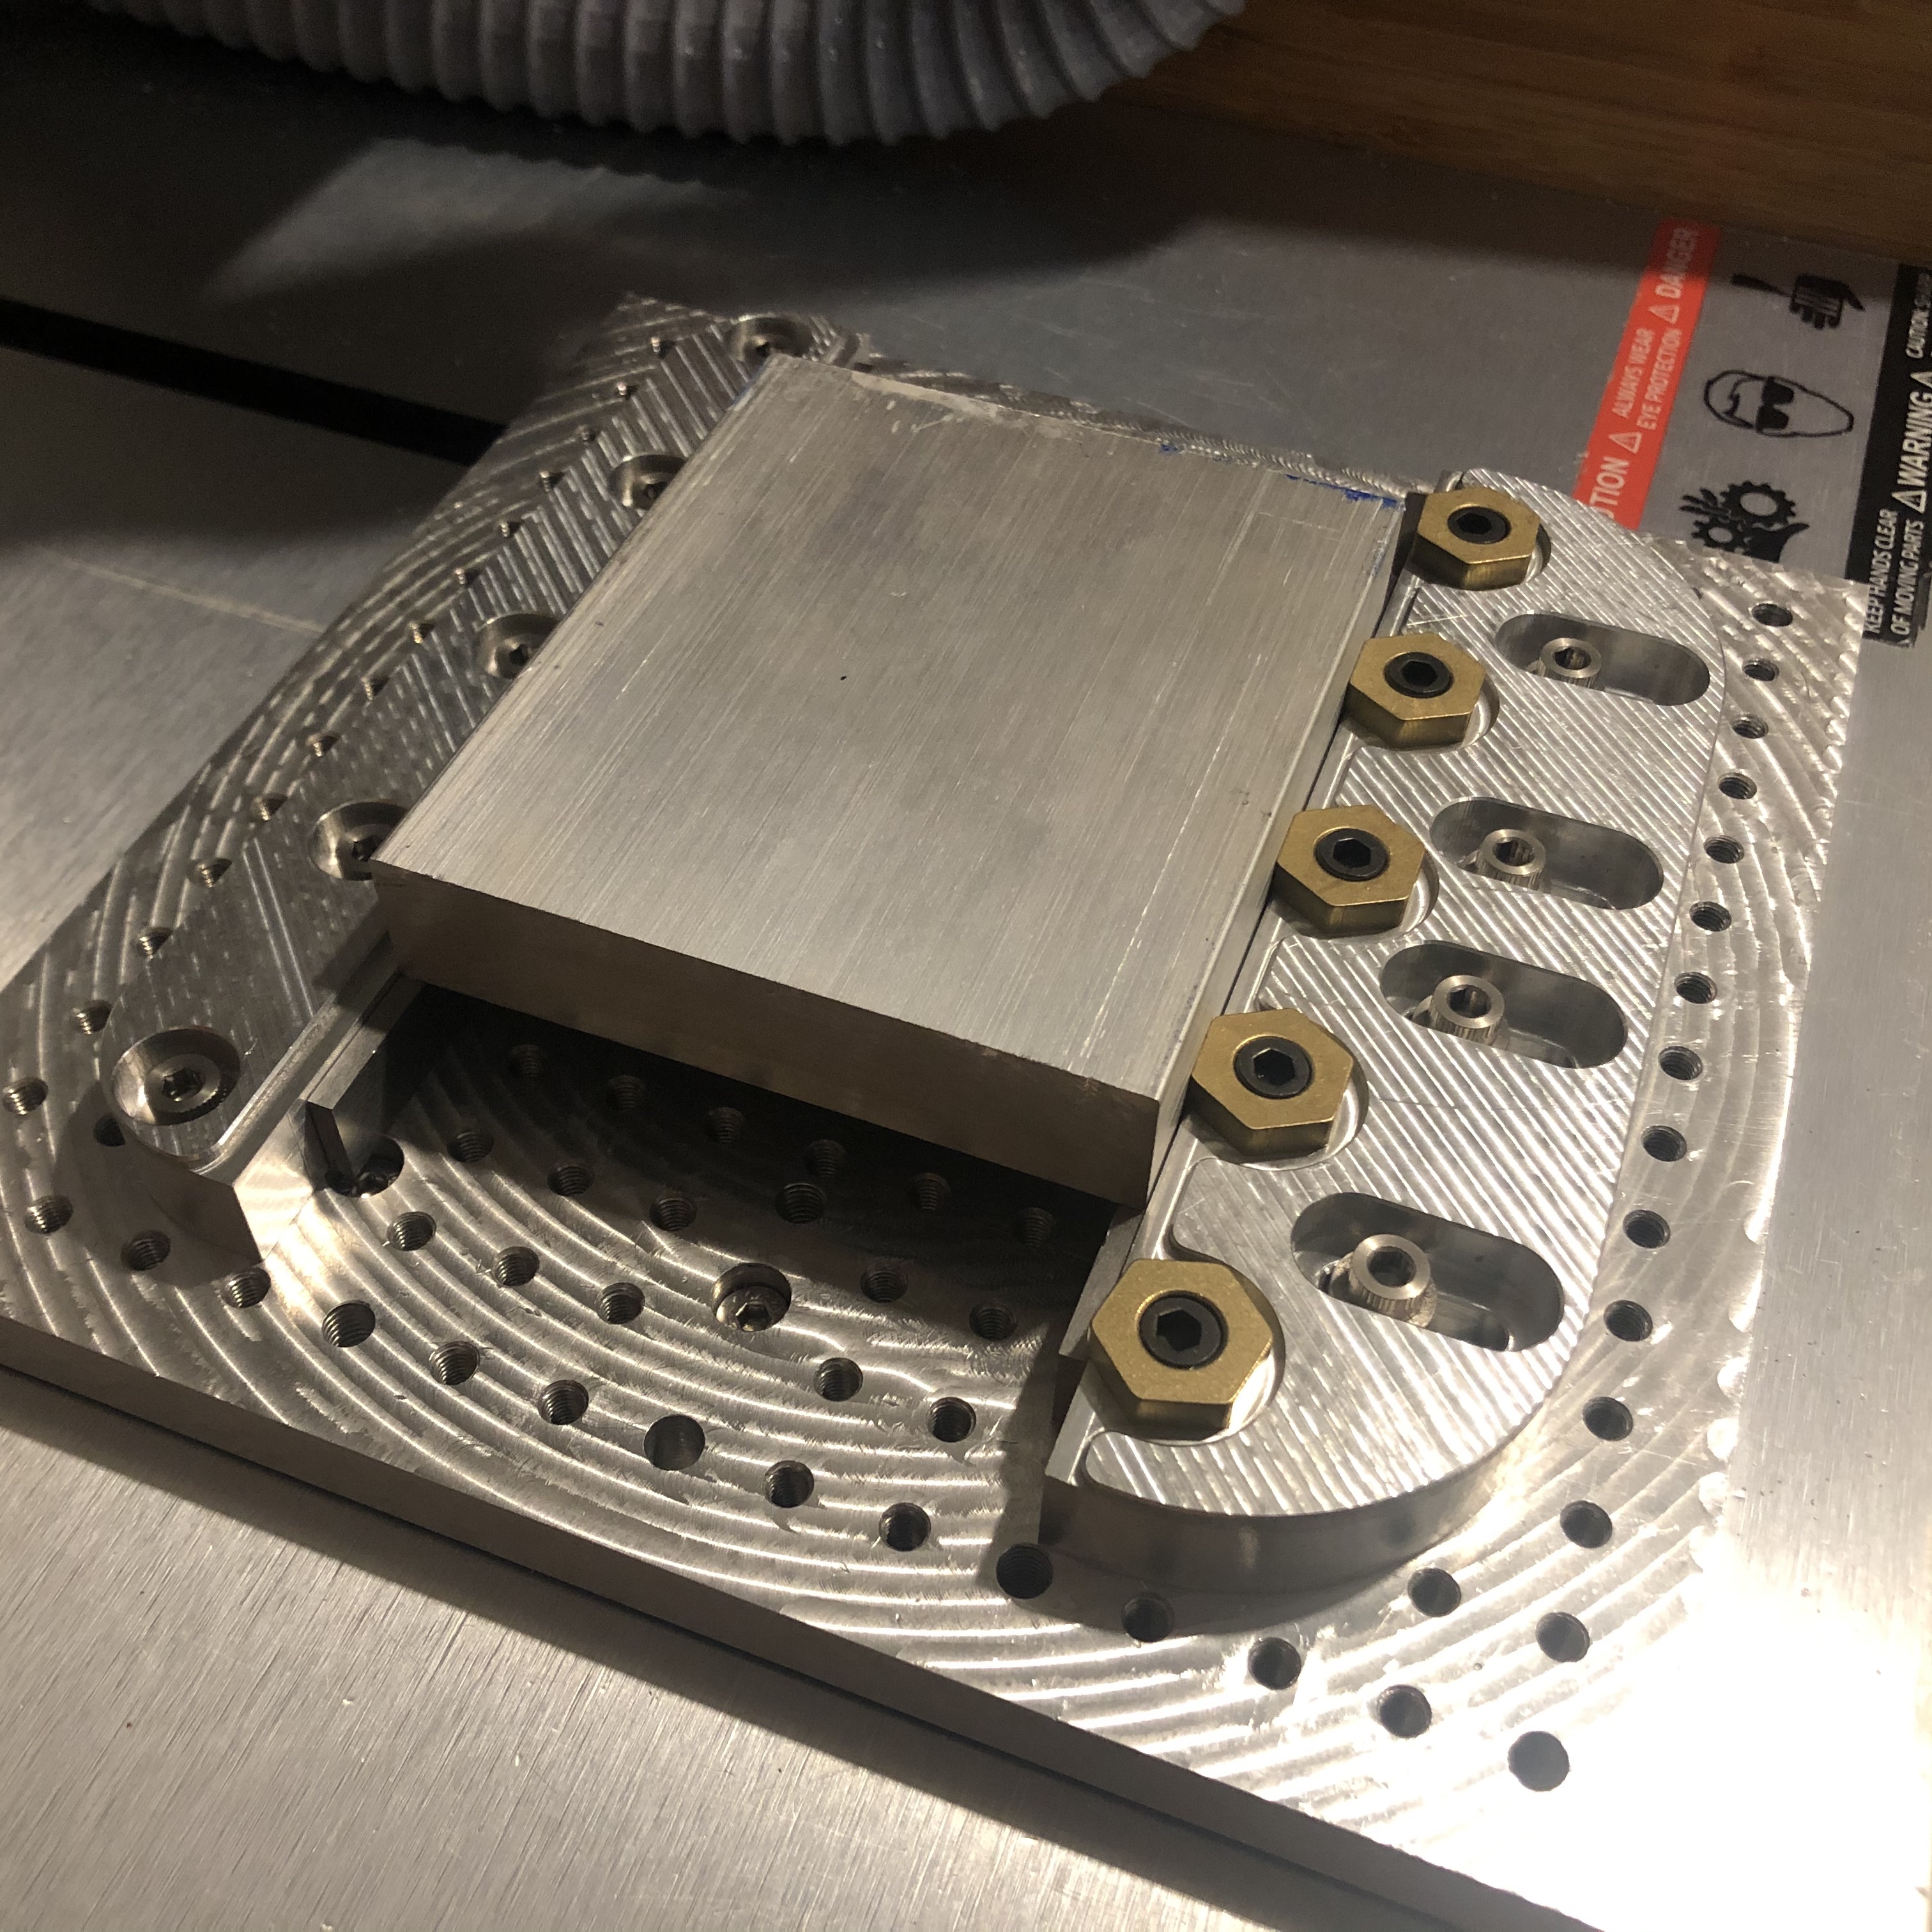
I will mill this version as a learning project. Might make an improved version if necessary in the future. Working on milling strategies now. Planning to use an 1/8" end mill for most of it except for surfacing. It will take me a long time to mill on my Nomad, I think. Working on paths now and will concentrate on tuning feeds and speeds later. Did you mill yours on the Nomad?.
Hey @The_real_janderson. I have always shared my CAD files in the past. I am thinking I might start selling designs. I am not setup to mill and sell finished products because it takes me a long time to mill aluminum. Also I am thinking of alternate ways (to me) to earn a living. I would include my strategies for milling also. It would be like a ready to mill file (almost, because feeds and speeds would need to be adjusted based on machine and stock used). Let me finish with the first one to see if it works as expected. I will keep you posted. Would anyone else be interested in buying ready to mill designs?
Makes sense on parallels! Also, if you flip your setup 180 degrees, you will have much more clearance on the side of the machine that does not have the tool touch probe!
I milled mine on the Nomad, took probably 12-14 hours. First ones took a lot of time because I had to break up tool paths to move top clamps around, however, now I could do them both in one operation…because I can use the fixtures I made to hold the new ones! With my new motor and spindle, probably could crank a set out in 4 hours.
It works as intended. I think. Will mill with it to see how it goes. Mostly happy with the finish but had to change plans as far as strategies because of the stock I had at hand. Had to slot the perimeter resulting in subpar finish. The parts that matter are great and as square as my Nomad will allow.