They are made of bronze. The exact alloy, who knows? Zildjian secret sauce or whatever.
Anyhow, I was wondering if y’all had any advice. I was going to use my Shapeoko 3 with a #201 bit and the brass cutting profile (I read online that brass and bronze were similar in machinability). I’ve only ever done wood on this machine so I’m somewhat nervous…
I dont have any experience at cutting a Cymbal but what I would recommend is when you hold down the Cymbal you may want to pause and move clamps around so that you do not hit the clamps which could let your project move and ruin it. You might want to make the holes in groups in different tool paths so you can predict where you will be cutting to avoid any mishaps with clamps.
Do you have any single flute cutters? preferably coated (e.g. ZrN).
This would stack the odds in your favor when machining “unknown” alloy, by optimising chip evacuation and avoiding recutting, especially since you are going to do profile cuts. #201 is really not ideal for this usecase (but if you take very shallow passes that should still work)
When in doubt, the 0.001" golden chipload target applies. So if you are going to use a three flute, say at 18000RPM, feedrate could be 0.001 x 18000 x 3 = 54ipm.
Depth per pass, as I said you probably need to be very conservative, say 5-7% of the cutter diameter. I did not even check what CC recommends, so this is only my gut feeling/where I would start.
If you had a chance to do test cuts in a “spare” cymbal that would be ideal to adjust feeds and speeds by trial and error.
What I see as the main challenge though is workholding : since the cymbal is cone shaped and designed to vibrate, I would be worried that “just” holding it onto the wasteboard by its edge could lead to strong chatter during the cut. I would maybe try and look at machining a 3D MDF jig, matching the cymbal shape, so that there is something underneath each area to be cut, damping the vibration.
… and the jig wouldn’t have to be solid. It could support that material with a set of radial supports designed to fit between holes (or just cut into them slightly with a short DOC.)
I’d suggest getting a cheap cymbal first and cutting it like that to see if you like the sound afterwards.
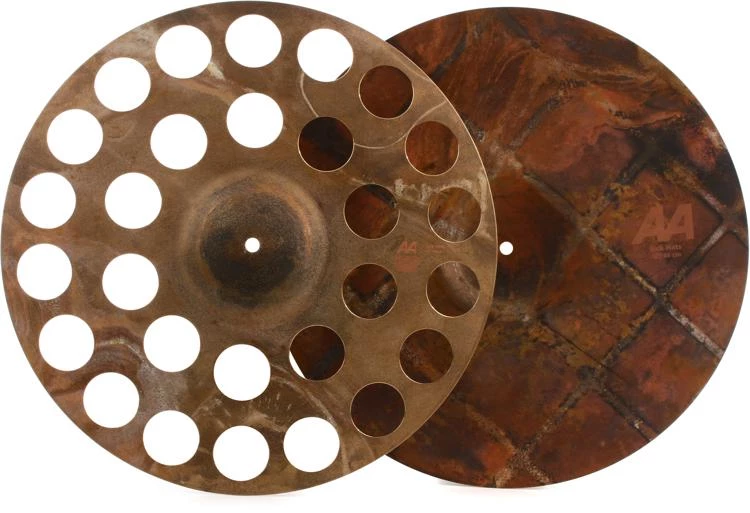
The way the cymbal vibrates and thus the sound it makes is entirely dependent upon the waves travelling through the disc, cutting those big holes will completely disrupt the wave propagation and likely fundamentally change the sound of the cymbal.
I know what it’s like wanting to use the shapeoko to do something, even if it’s not the easiest way.
That said, I did just what you are talking about with an electricians die punch years ago. Sabian shipped me a crash that got damaged in transit. It turned into a great China/ozone cymbal.
Thanks for all the replies! Especially @Julien. That was exactly the info I was looking for. I just went ahead and pulled the trigger on a #278Z bit (single flute, ZrN) from Carbide.
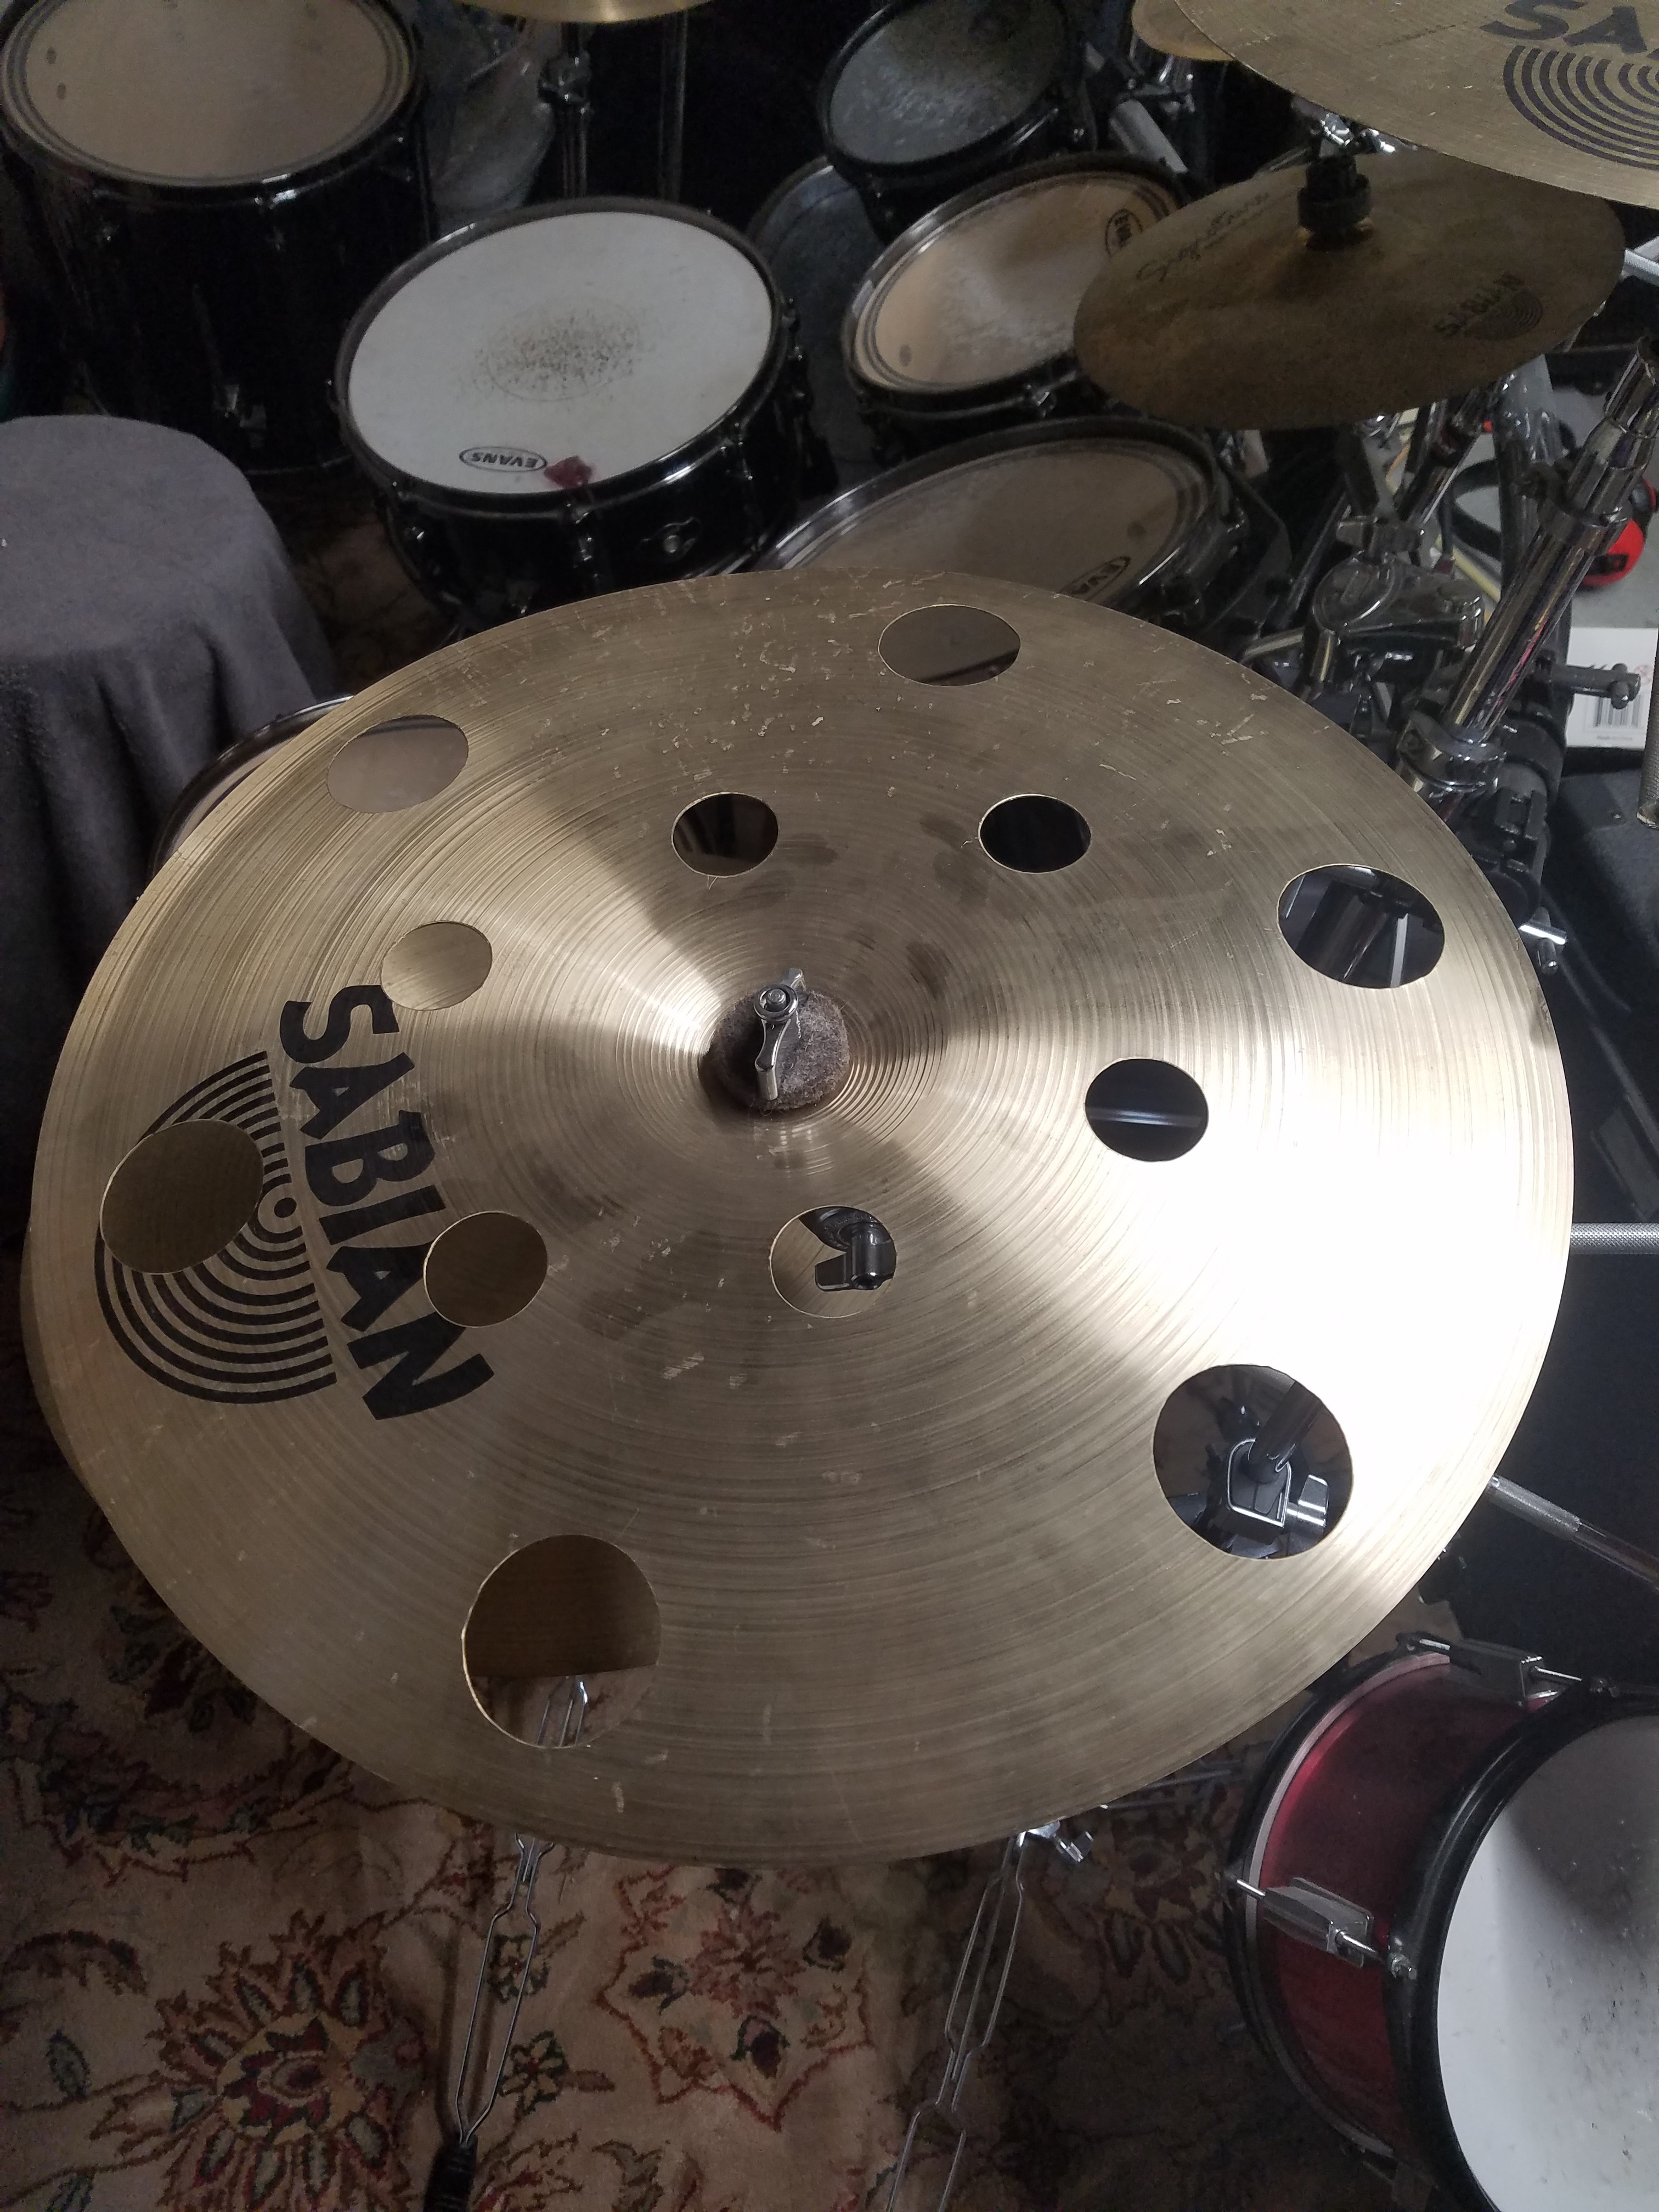
I am going to be holding the piece in place by using my threaded wasteboard and the center hole in the cymbal. See here:
I cranked down that bolt and everything feels pretty solid…
I’ll be sure to post here with the results after that bit comes in a few days! In the mean time, I have some spare MDF so I’ll try machining some kind of “brace” that will go under the empty space of the cymbal and support the plunge.
What will prevent the cymbal from rotating? If I may, I suggest drilling a small hole in the cymbal where you will eventually put a larger hole and make sure it will align to one of the other wasteboard holes…then you can use two bolts to hold it down and assure there is no rotation. Then come back and run a separate path to finish up that last hole.
Nothing sounds like a Zildjian because of it’s secret sauce and thickness and proportion…are you confident in the hole placement? Is it mirroring something you’ve seen before?
That 278Z is a great tool to have anyway if you are going to cut metal. Note that if you intend to follow the feeds and speeds recommendation from my post or CC’s database, you’ll have to adjust them to take into account the lower number of flutes. The values I mentioned were for a 3flute; with a 278Z single flute, you will need to reduce the feedrate by a factor of three (so 18ipm). The other parameters should remain tje same.
That center bolt will hold the cymbal in place but there is still a lot of ways the metal can resonate during the cut, so I think your time spent working on some kind of jig/brace under the cymbal will go a long way in increasing your chances of success. Another challenge will be to figure out how to do the toolpaths on that curved surface… what CAM software will you be using ?
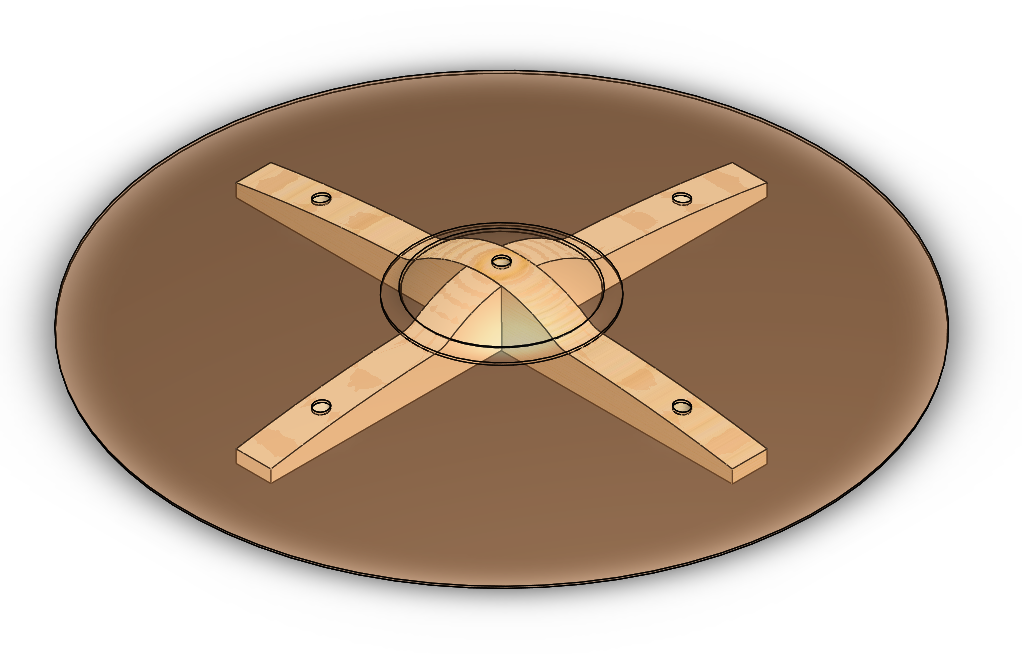
Here is what I cooked up in Solidworks for the bracing/support. Two pieces of MDF that are notched together. The outer holes will prevent rotation and thread into the wasteboard. (I haven’t added the main hole pattern for sound damping yet)
@Julien I plan on using Carbide Create Pro. I have access to the Solid Works CAM suite but I have never used it with my Shapeoko… What would be the best approach for the toolpaths with a curved surface?
I could just set the zero at the highest point on the cymbal and set the cut depth at the wasteboard surface… Probably wouldn’t be the most time-efficient method…
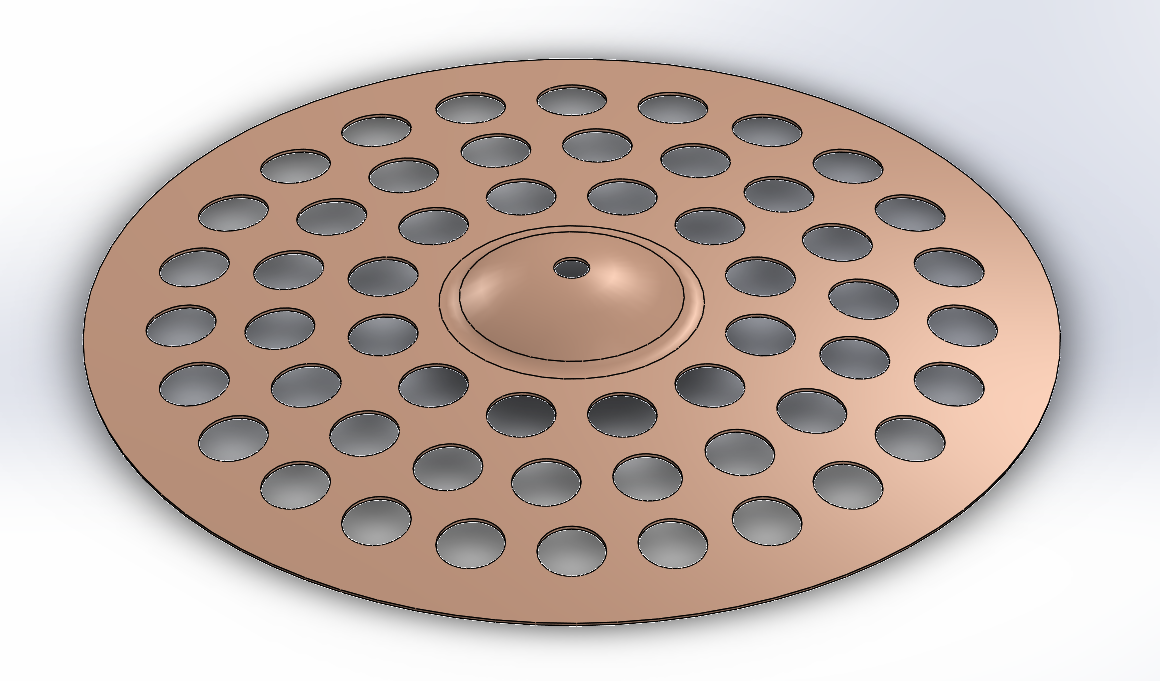
You only have two “rings” of holes. Each ring has a starting depth and a depth-of-cut. Position the holes so they minimize contact with your radial support structure. There will be some “air cutting”, but you haven’t said if this is a production deal where you would try to minimize wasted cuts or a one-off.
Nice!
For this specific case with those two notched pieces, I would not bother doing 3D toolpaths, they can be cut as two independent 2D profile cuts, either from within SolidWorks CAM or by exporting a 2D outline of the pieces and importing that in CC. And then drill the holes manually, and assemble one piece onto the other, done.
If you really wanted to cut them as a single 3D piece milled “from the top” just as an opportunity to learn CC Pro, and assuming you could find MDF thick enough to match the height at the center, an easy way to do this would be to export your 3D model as an STL file, then generate a grayscale heightmap from that STL using @fenrus’s nifty online tool, then use that heightmap in CC Pro to generate the 3D toolpaths. But milling away 90% of the stock would indeed not be efficient.
If you still get ringing and movement with these supports (which is quite possible) you could consider the plastic-bag and expanding foam trick to fill the gaps under the cymbal and give it a semi-rigid support across the whole surface to assist in damping. A little foam goes a long way…
Foam sounds like a very good idea. I suppose you could also put an adhesive membrane on the cymbal as well and cut through it. The vibrations would be dampened, and I’d imagine any rough-out would be contained as well. You might get cleaner edges.
That online tool you linked was super useful for getting the part into CC Pro but I’m still struggling to set up the toolpaths. I tried to pull in the heatmap and the DXF for the holes and then use 3D rough but it that didn’t seem to work…
Once again thanks everyone for the advice! I like the foam idea @LiamN@GJM .I put some window weatherstripping on the brace.
Hi @Lazerkill,
The suggestion to use CCPro/heatmap feature was for milling the MDF braces “in place”. For those holes in the cymbal itself, I don’t think you would want to go with a 3D toolpath, especially since we don’t want to touch the surface of the cymbal where there are no holes. Once the braces part is done, couldn’t you just use a set of regular pocketing toolpaths for those holes ?
In CC Pro it’s a little tricky at first to get the hang of “stacking” multiple 3D operations while getting the parameters right to have the desired effect. If you want to share the c2d file (and associated DXF for holes & STL model of the symbal) we could take a collective look at those toolpaths and make suggestions.
Actually, an “electricians” die punch starts cutting, at least, at a single point and will deform (to some degree) beginning at that point (there may be two points depending on size.) How much deformation depends on the hardness of the metal.
He would still have to have pilot holes for the punch.