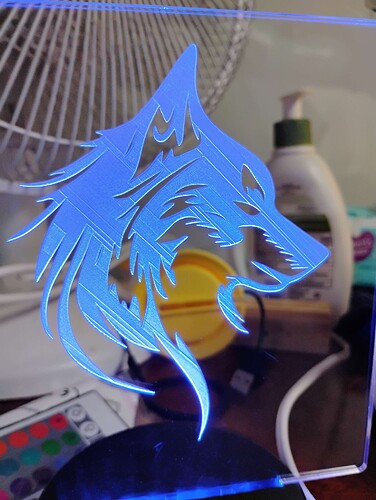
Hey, all. So, I was working on some back-lit acrylic. And was wondering if anyone has any tips for getting rid of the harder lines? As you can see, some of these are pretty harsh when under the lights. .01 DoC, one pass, .002 Stepover, 45d Linear fill, 90d MC Etcher. Any tips would be appreciated.
I would guess that the diamond loaded up causing those lines???
Poly and Acrylic can be heated with a heat gun or torch to soften scratches they get, I would be leary of trying this as the good lines would also be affected
Increasing stepover and decreasing DOC might make it less pronounced. Try on scrap.
I dont know if it is a cause of what you are seeing but as MC Etchers wear from use, the barrel holding the diamond’s shaft develops play and straight lines start to become less straight. I expect this play to vary depending on the position of the shaft in the barrel. The diamond will also become dull and require a deeper DOC to maintain depth of engraving over time. Just some things to be aware of.
I don’t know. I had the dust collector going, and it’s odd to me how they all seem to be just perfectly straight, single lines. There’s not a “splotch” or anything that I’d expect. It’s just odd, to me.
The Etcher is brand new, but I’ll keep all that in mind. The odd thing is, this was the first part after running several tests in scrap. The scrap with those settings come out crystal clear, and so I went to run a “real” piece and got this. shrug. Tomorrow I’m gonna try with the 120d, but I’m still open to ideas.
Sorry, I have not used that tool. I use an “O” bit when I do Poly. The indication of a single line or pair of lines would lead me to assume that is is dragging debris, or pressure is varying during the cut… Mechanical to the bit…
Acrylic is stupid expensive. I hate to waste it. Also try slowing down the feedrate.
Minimize the retract height and crank up the plunge rate so you are not there all day ![]()
Honestly, looking at the simulations, I’m 90% sure that each of these hard lines is the first “cut” after each rapid…
Yeah, I hate wasting it too, especially at that quality. I was actually thinking about actually doing 2 crosshatched passes, each half the depth of the original DoC, so maybe the second pass might clean up or hide those marks. Cause if they are immediately following every rapid, that means each of those sharp lines is a cut into fresh surface, when there’s no stepover to soften anything…
The only edge lit acrylic I did was better with the 90 and no crosshatch.
MC Etcher is cool in almost everything. Aluminum and brass my favorites. Stainless and glass are too but wear down the diamond. You can make some great quilting rulers/patterns in acrylic.
All of the issues are at the sharp profile direction changes.
It looks like you used a contour for the outside first, then the fill.
If you used the McEtcher for the contour, I would guess you left debris at the sharp corner, then the Fill pass picked it up the debris
I do the fill first with the McEtcher, then a #501 engraving bit to clean the edges of the file and provide an edge. The McEtcher doesn’t change directions well. There is slop in the assembly.
How many turns into the spring are you using ?
I use 2 turns for a medium groove, down to 3/4 or less for a whisper.
The program did indeed contour first, but I used the default “Engrave” path from CC, so I didn’t specify any order. As for turns, I’m not exactly sure. I’ve got about 3 full threads exposed, if that means anything, lulz. I didn’t back it all the way out for a more specific measurement, I just tested for pressure.
Looking at CC right now, I’m not aware of any method to fill first, and set a contour after
I use a Pocket for the McEtcher fill. This will follow the outside profile towards the middle.
It works for me, but the pattern would be very visual, versus the 45 angle.
Try in on the simulator.
Then use the engraving bit for in a Contour.
You must be using CCpro because I don’t have that option.
Is there a switch to turn off the Contour ?
I am using pro, and I don’t see any option to disable the contours. I suppose I could contour first, with my 30d engraving bit, and then let the engrave pattern do its thing. Doing a first contour might help with the debris issue you’re thinking of.
In fact, it’s the fill I can disable, lol. Using the Engrave to just do the outline.
You could use the Texture option for the fill paths and the Contour for the edges.
Switch to the engraving bit for the Contour
Make one toolpath engrave but disable fill. This will contour only.
Make a second engrave toolpath, and enable fill. This will fill and contour.
They will engrave in the order they show in the toolpath list. But the problem of contour first still exists ![]() So my post is meaningless. LOL
So my post is meaningless. LOL
This could be interesting to try, at double the machine time, lulz. Might try on some smaller scrap, for sure
That’s probably the best bet. Just not sure if I should contour with an engraving V bit, or stick with the Etcher.
I am not sure why the machine time would double if you set the Texture to be the same as engrave.
This is a 2D object, correct ?
Well, it did, lol. Went from 49 minutes to 101
