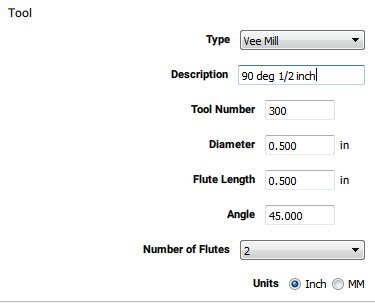
I’ve yet to successfully vcarve without terrible results.
Could someone explain why my end result is not the same as what I see in the preview? Have I entered the tool dimensions incorrectly?
PREVIEW
RESULT
TOOL INFO

I’ve yet to successfully vcarve without terrible results.
Could someone explain why my end result is not the same as what I see in the preview? Have I entered the tool dimensions incorrectly?
PREVIEW
RESULT
TOOL INFO

why do you have 45 in the angle section of it?
Hi @jeffersin,
edit sorry I misunderstood the question… incorrect info removed
On a side note, your “flute length” should only be set to the length of the V, not the full length of the cutter. I know it can cut that deep, but it will cause problems in future if you’re making cuts deeper than the depth of the V.
Hope you can sort it!
pretty sure the 45 is correct
Hi Chad. I watched the video below on using Carbide Create and it said to enter half the value. Info is at 3:05.
http://carbide3d.com/carbidecreate/video/vcarving/
Mark is correct, in carbide create it is half.
I would look more at loose wheels. How low in the holder is your router?
Hi Stuart! THANKS for answering another question of mine regarding the flute length measurement… I was not 100% sure, but now I know.
However… not knowing this at the time, I tried that as a potential solution and the text appeared the same way. In fact, the RESULT picture shows both attempts. The upper one was done when Carbide Create was using a flute length of .5" and the lower was one was when I edited the tool’s flute length to .25".
Oh well that’s why, I don’t use carbide create. Vcarve would have you put 90 in since it’s a 90 degree bit. Good luck
Ah I apologise, I misread the question and thought you were using the vectric software called v-carve… these guys would have a much better idea then me about carbide create!
Which for V carve is actually incorrect { or should be}, because when you add a new cutter to v carve they want you to draw 1/2 of the bit profile to add into the library. So though it is not this way it should be 45 in v carve also.
now I am going to have to look because its how I have it set I’m pretty sure and have never had a problem. Wouldn’t hurt to change it though I’m sure lol
In V-Carve Pro/Desktop it should be 90 deg. Pix below is from the manual.

correct, which is what I said but it should be 45 if you were to do it like other bits in v carve i.e see your pictures  is all I was saying.
Entering 45 for the taper angle in Carbide Create for a 90 degree endmill is correct.
Comparing the preview to what was actually cut, it looks to me as if the cut is not going as deeply as it ought, but the cuts all seem consistent in the depth which is achieved, so my guess would be that either zeroing, or the # of steps / mm for the Z-axis is not correct.
Suggest cutting a diamond-circle-square test and measuring the thickness of it puzzle that out.
Hi Will and thanks for the suggestions!
Everything measures and looks correct on the diamond circle square test. See results below.
Circle = Outside Right to 0.5"
Square = Pocket to 0.125"
Diamond = Pocket to 0.25"
Any thoughts?
Please calculate out the depth to which the machine should have cut using that taper angle and see how that compares to the actual depth cut.
Alternately, work up a suitable test file which has a pocket which matches up at the halfway width of the Vcarve area and cut the pocket to the depth which the Vcarve ought to reach.
From your pix, it looks like the bit isn’t cutting deep enough. Is you Z 0 set properly?
I’ve noticed this issue with MeshCam/Nomad as well. I have not found a solution yet, but I suspect I may need to use the XY finish pass to clear it up. I usually just use the pencil cleanup.
EDIT:
I think there is a programming issue causing this because no matter what I do, I get the funky little squiggles in my corners.
Totally skipping the finish pass feature corrects the issue for me.