I’ve only been messing with my XXL for a few weeks. I wanted to make a 50 star field for a flag and found several svg/eps/dxf files for sale. I figured if I bought one, it should be good, right?
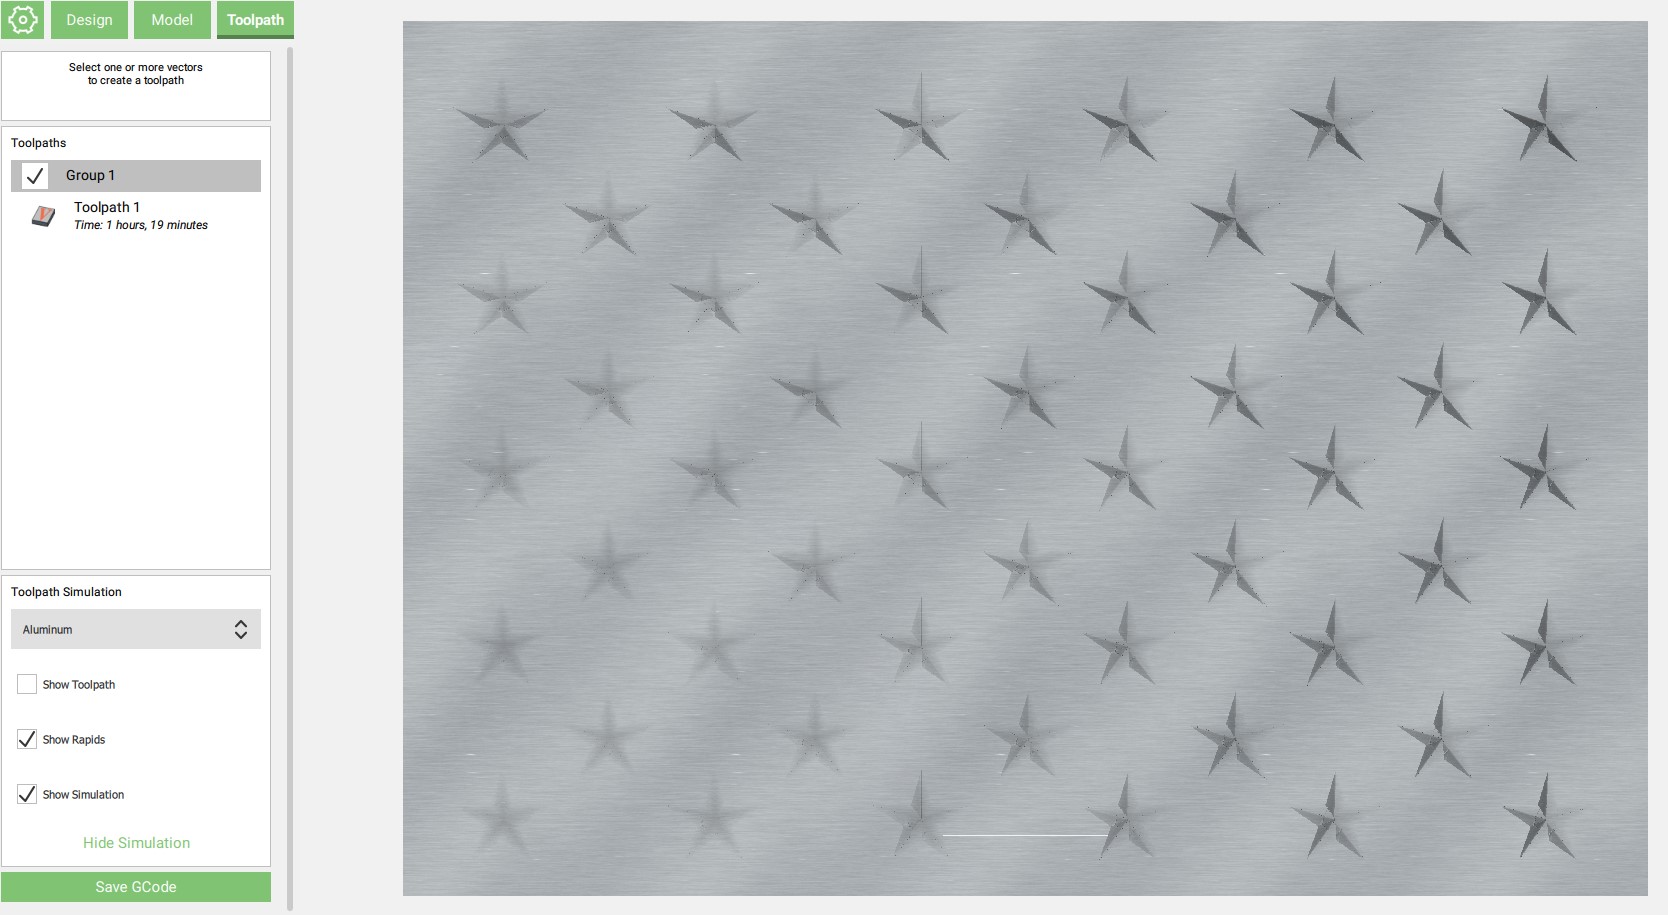
I get everything set up and the simulation shows a image fade where the bottom left corner is shallow and the upper right corner is deep and crisp. I thought it was nothing and ran the job. It did exactly what the simulation did. I cannot find a setting anywhere that will fade a carve, corner to corner, from shallow to heavy .
Any ideas on what I’m missing. I’m sure it is something super stupid. I attached a screenshot of the Carbide Create simulation screen. Any help would be greatly appreciated.
The simulation usually fades based on perspective. Can you manipulate the simulation at different angles to see if that blurriness goes away?
The fact that it’s matching your carve is also concerning, but I’m curious if that’s another issue that perhaps is coincidentally manifesting itself in the same area as your simulation appears. That issue would be tramming, not using flat & parallel stock, or both. There’s a whirlwind of information you can find in this forum dealing with tramming. Winston Moy also has a good video or two talking about it on his YouTube channel.
Aside from double checking to see if your simulation is just manipulated to a weird angle for viewing, try copying one of the stars from the right side and pasting it to the left side. You could also do the same and put a star from the left side on the right side. See if that changes anything. I’m pretty well versed with Carbide Create and I’m nearly positive there is no “fade” option. So it’s either the original vector or the board/machine setup you’re using (that’s the tram part). If it’s the original vector, then moving stars around will help you verify that.
+1 to everything Matt said. One other idea to see what might actually be happening would be to mirror or flip the image (assuming at least one symmetric axis) before re-running the simulation and regenerating gcode.
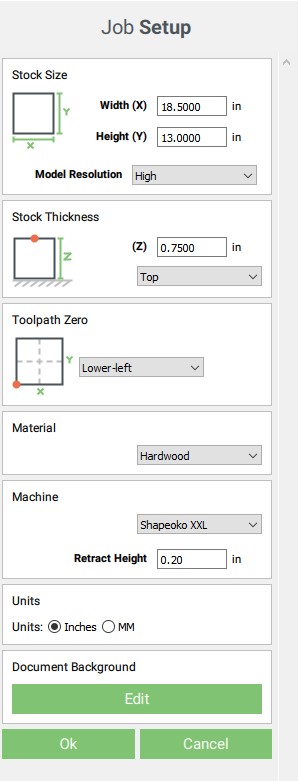
Just just flipped the image both horizontally and vertically and the fade stays the same, lighter on the lower left, and deeper and crisper on the upper right. I created a new file, started with one star and copied them across the space in different places. The same thing occurred. Rotating the image didn’t change the location of the fade. It rotated with the image. This makes me believe it is a global setting, which I have also pasted below.
if you want a second opinion on the simulation, the open source (free) Camotics tool is pretty good (but you need to teach it about your bits) for this
I truly appreciate the troubleshooting tips. I’m a software guy and have rarely found a software problem I couldn’t fix. But this one perplexes me. Especially since the software isn’t extremely complex.
I will take a look at the Camotics tool and see if that will work for me. If you think of anything else, please let me know. I’m pretty much stuck for the moment.
(specifically I worry about the “wave” versus the star. if the slope of the wave is steep, the vcarve of the star is likely to not exactly do what you expect)
Hey Fenrus, Since I was new to doing CAD designs, I just paid for a design (on Etsy I think), opened up the svg file, and expanded it to the size I needed. I added the Advanced VCarve toolpath and through I was ready to roll. My first thought was that it was a jacked up file put up on Etsy as a joke. (Jokes on me).
Here is a picture of the actual carve. Looks like many of my stars need corrective shoes.
actual carve star issues are different from simulation.
the most common source of not quite right stars is material that is not quite level… easy thing to do is use calipers to measure all sides at a few points… if it’s not the same everywhere then v carved stars can come out with “dull points” and “fat arms”
Belt tension (see the relevant step in your instruction manual) Note that the X-axis motor is held in place on standoffs and if those bolts are loose this can cause belt tension issues. Also, belt tension for the Y-axis stepper motors needs to be even/equivalent on each side — a significant difference can cause skipping on one side eventually resulting in lost steps on both.
If the wood is not level you could surface it before starting the carve with your fly cutter, if you have one.
As Will Adams suggested check your machine mechanically before proceeding, v wheels, set screws etc. Additionally you could try calibration by drawing two 6 inch squares side by side and cut them out and make sure they are exactly 6 inches in each direction and are the same dimension on both boxes. If both boxes are the same dimension but not 6 inches you may need to calibrate stepper motors, if the squares are different dimensions it is most likely a mechanical problem. The squares must be the same dimension before proceeding with calibration.
I agree with Will here. It looks like a mechanical problem. My first guess at that would be your eccentric nut adjustments on your Z carriage. It looks like the force of the cut is causing your Z axis to give in to the resistance. If your eccentric nuts and V wheels are adjusted appropriately (just tighter than being able to spin the wheels with your fingers), then your Z axis won’t give into the cutting resistance (within reason). If you grab your router/Z axis and give it a wiggle side to side, does it move, or is it firmly in place?
Also, did you determine if your simulation blurriness was just the perspective?
Lastly, I have a file like this. Here it is below. Feel free to run this as a test. I have a very calibrated machine and this file was created from scratch to have perfect stars. It should be a good way to rule out some software variables and see if it is a machine or stock problem. The tool paths are already created as well if you’d like to use them yourself.
Thanks everyone. I’ll go back through everything and double check level, flatness, and ensure everything is tight. If that doesn’t fix things, I’ll call into Support to get some help while it is under warrantee. I appreciate the speed and detail you all went into troubleshooting this with me.