New Shapeoko Pro Enclosure

I’m a little jealous of the switch box shown in one of your photos. Is it custom made and hardwired for those appliances?

I’ve used a wall-mounted trailing lead with individual switches, but would love to know where I could get something like yours from!

1 Like

Peter, Thank You
The control panel is custom built and wired by me. I installed switched receptacles by each of the appliances (router, shop vac, lights, and cnc machine). I also added a usb/receptacle on the side of the control panel for my tablet which worked out perfectly.

10 Likes

I am looking to start my enclosure build in the next month. Can you please list the dimensions that you used? It would give me a good idea of how large I need to make mine.

John
Here are the dimensions:
59" wide x 48" long x 32" high
Note: This does not include the front door dimension to the overall length of the enclosure. The door adds another 3.25".
Hope this helps.

2 Likes

Thank you very much.

1 Like

Never one to turn down an offer for advice :blush:

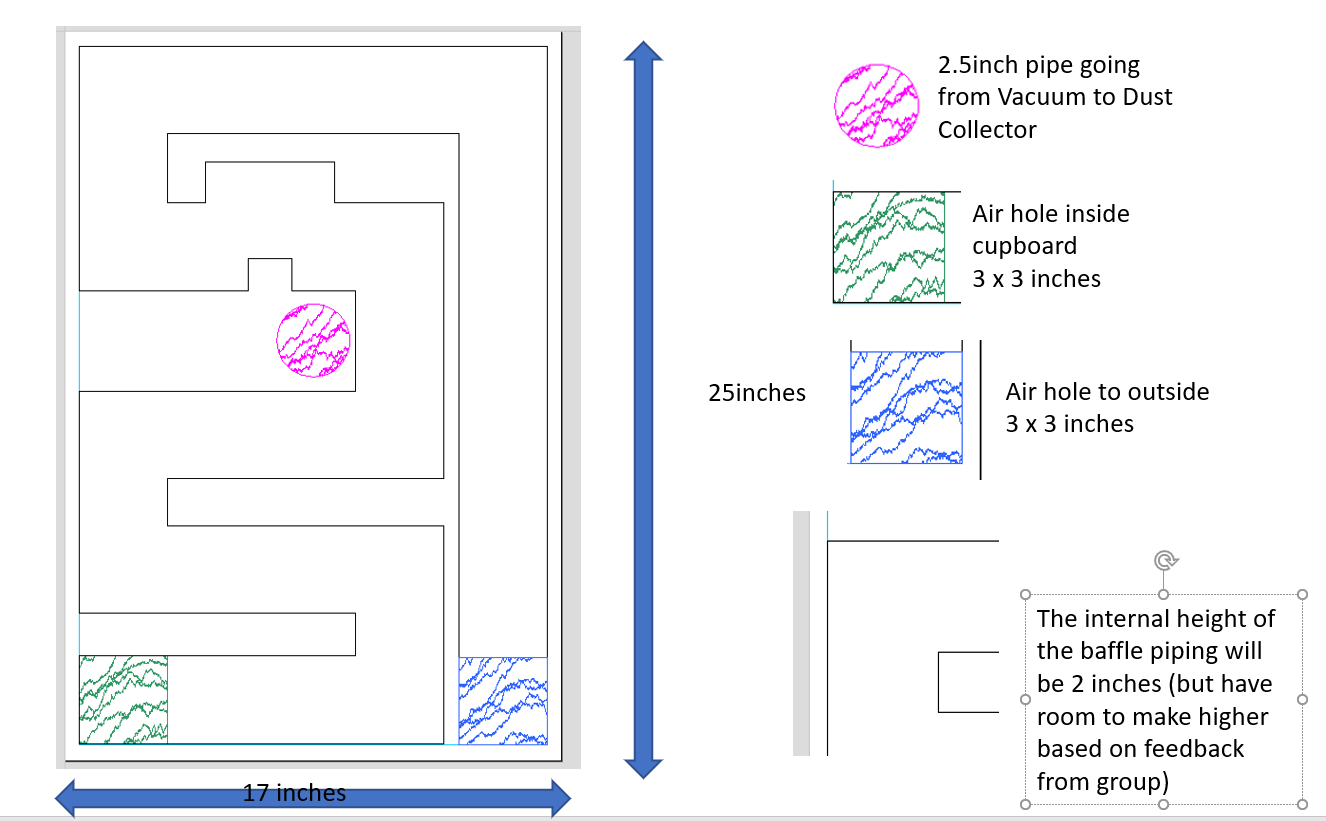
I’ve uploaded the baffle for the vacuum cleaner cupboard. It is going to go against the back wall of the cupboard as I have depth, but not height.

I altered the airflow intake to be a 3inch x 3 inch entry point, and made sure to keep the width of the tunnel 3 inches throughout the maze. In terms of height, I was hoping to get away with just 2 inches, but can make it higher if need be.

I realize it is not the sexist baffle design, but was hoping that with enough turns and length, a lot of the sound would be lost

5 Likes

Based on your design I am going to try and make one with some modifications for vertical clamping in front of the machine so I can do dovetails and other joinery. I think I am going to inlay some extruded aluminum t-track on the vertical front below the CNC so I can use clamps to secure the vertical pieces.

I am using Sketchup to do the design, but I am very new to the software and will have to figure it out as I go. This is what I have so far.

I left part of the inner top uncovered so you can see what I am planning. The “blue” is high density foam insulation. It it will be inside the walls on all six sides. I am also going to install at least four dimmable lights inside so I can video a project being worked on if I want to later.

I also plan to add doors with windows on either side that will allow me to access the machine for maintenance if needed. I do need to figure out the best way to incorporate the dust/chip collection. I have a Shop Fox W1685 1.5-Horsepower 1,280 CFM Dust Collector, just need to figure the best way to use it.

If anyone has some suggestions, I would be more than grateful to hear them. I will upload the Sketchup file once I get it all figured out in case someone else wants to try and build one or improve upon it.

2 Likes

John
This is why I wanted to share my project with the Carbide 3d forum family…to inspire others, share ideas and engage in constructive discussion.
Your plans look very nice and I hope your ideas turn into reality. :+1:
Darren

2 Likes

I did something similar only mine is framed from 80/20 aluminum extrusion with 1/4" polycarbonate walls and top. I am using a ShopFox vac system for dust and chip collection on the ShapeokoXL as well all my other power equipment. An enclosure makes a HUGE difference in dust control.

How much sound reduction did you get using the extruded aluminum with the polycarbonate?

Do you have any pictures?

While that’s a good “old school” dust collector, you need to research more on the filter and cyclone additions you can add to that. Those older style collectors really add fine dust to your shop that escapes through the bag. (No matter what they claim in the literature.)

4 Likes

There is some sound reduction although the ShopFox adds to to it. I will post a couple pics later today. I have the front hinged of course, but I also have a hinge 2/3 of the way back on the top. It makes things much easier for access and no need to duck under a solid ceiling. The polycarbonate also allows the cameras on the ceiling of my garage a better view in case I’m called away for some reason.

1 Like

Exchanging that dust diffuser bag for a canister filter should help in the cleaner air department.

2 Likes

I really like this control panel and it’s given me an idea on how I want to build mine. But I have a question for you. You wired it all 120v and not through some motor control 12v system, correct?

3 Likes

Juan,
Yes, the whole system is wired in standard 120 volt. I also ran two separate circuit so not to draw too much on the switches since there only rated at 11 amps each and taking into account for the router, vacuum cleaner, lighting, cnc machine, and any other miscellaneous equipment I decide to add later on.
Hope this helps.

3 Likes

@Boss302 for starters great job on the enclosure, looks very well built with great vision of what’s going on inside the cabinet which is probably a lot of fun just watching it at work. I’m going to take the leap as well and get my hands on one as soon as I can successfully place an order but in the mean time I decided to start learning/working with Fusion 360 to get the hang of it and put plans together for an enclosure. Somewhere you mentioned the dimensions of the cabinet being

Is this enough space to clear the dust boot when the gantry is all the way up front (work area and bit setter)?

Also I was planning on building a frame allowing to remove the side panels to access the machine if/when needed. With this strategy do you feel like the extra space on the sides can be reduced to make the enclosure more narrow or is that space needed to allow room for the wiring and/or other stuff?

As for the dimensions on their website (Footprint: 50" (X), 42" (Y), 19" (Z) ) can you confirm this includes the space for the drag chains?

1 Like

Thank you for help. I really appreciate it!

1 Like

You can definitely go narrower than 59” if you have access to the sides. I went 54” but in hindsight wish I was min. 56”.

When you think about your x and y dimension, are you subtracting space for the enclosure thickness which could be

  • 3/4 x 2 = sheet of MDF on each side
  • 2.5” x 2 = two sheets of MDF with insulation in between each panel
    *0 = as the enclosure is built around the base (not on top of)
  • some hybrid

Another thought, where will your power outlets be? Do you need table space for these or are you just drilling holes in the sides for the cables to come out?

FYI - I’ve had the machine on my torsion base for a month now and every day redesign my enclosure slightly, so I keep thinking about these things.

happy to answer more questions (also, if you DM I’m happy to set up a zoom session where I can give you a 360 view of the machine on a table to make you better informed).

3 Likes

@Intohouse Good point and for clarification I was thinking of the clearance required around the machine not including the enclosure walls/ceiling. So if the footprint on the website is 50" (X), 42" (Y), 19" (Z) does this include the space needed for the drag chains on the left and right sides and so on. So for example if you would say keep at least 3" clearance on the sides X direction 50" + 3" (left) + 3" (right) = 56" plus what ever is needed for the enclosure wall thickness. Same for the clearance front (dust boot), back and overhead for the dust collection hose to clear the Z axis and not get tangled/wrapped around the machine (thinking of when cutting our large circles/ellipses).

@Boss302 I hope this isn’t considered hijacking your post, it’s just your enclosure looks great and I’d be interested in hearing your thoughts on spacing inside the enclosure as you run a few projects through it and learn from your experience.

1 Like

Yes - the footprint “x” includes the space for drag chains and the control panel which sticks out.

The footprint “y” does not include the additional room for sweepy. I’ll go do some measurements later.

1 Like