Thanks,
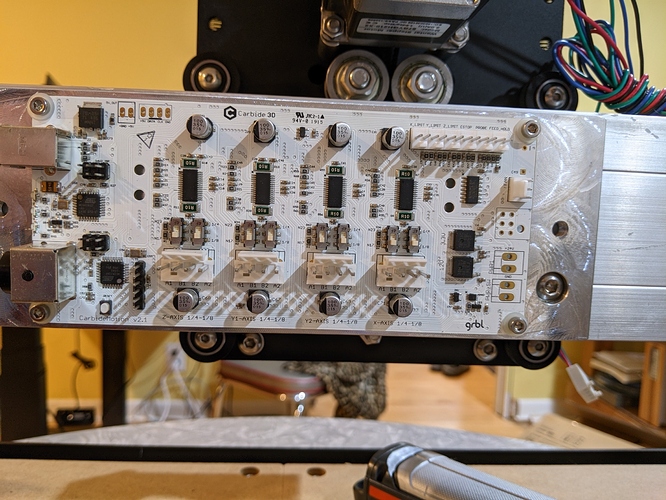
the 1/4 and 1/8 is how many microsteps the stepper motors do.
Old firmware (GRBL 0.9) needs the 1/4th setting. New firmware (1.1) needs the 1/8th setting.
You want to update the firmware to 1.1 before seriously using the machine since all the new software requires that.
Thank you for the information. Would it be worth the cost of buying the new pcb? Looks like a few steps up version wise.
also I don’t; think your version of the system has limit switches, or at least they were optional… check if you have them. If not… There’s a induction upgrade kit that would go great together with a new board (contact the C3D folks at support@ email to order this stuff since you’re clearly a bit of a special case).
@WillAdams knows a heck of a lot more about this generation machine than I do so poking him 
Yes. Especially with the sale. You’ll struggle and end up upgrading later. EMI issues were prevalent in those old boards.
I have some old directions somewhere… I’ll look for them.
Edit: too big to upload, but I bet @WillAdams is coming in with a link.
Edit #2: Here you go.
Please write in to support — we should have a PDF of the original assembly instructions.
As noted, the machines originally shipped with Grbl 0.9 and lacked homing switches.
You can use it as is with Carbide Motion 3 which is available at: https://carbide3d.com/downloads/
Set the DIP switches for micro-stepping to 4x to use the default Grbl settings.
If you wish you can power down, set them to 8x and then power up, connect to the machine and then send
$100=40
$101=40
$102=40
and the machine will run a bit smoother and movement will be a bit more precise.
Upgrading to have homing switches as noted will require a new controller since we’re switching over to the inductive homing switches — but write in to support@carbide3d.com there’s a minor aspect of the old machines which requires special treatment which we are still working out the details of. We can also send you the purchase link for the new controller and enclosure.
I had a controller that was always flakey on the usb. I ordered a new controller from carbide3d that is the current version and it was only $99.00+tax and free shipping. That is an option. As others further up stated the older boards had EMI issues and you cannot easily add the newer accessories, though they are not impossible to install.
This topic was automatically closed 30 days after the last reply. New replies are no longer allowed.
