Nomad 3 jammed on Z axis

Hi there! I have had my Nomad 3 for 3 years now, with no issues other than the door hinge breaking a couple of times. I’m a hobbyist and I don’t really put it to that much use. Making mostly small objects in wood and plastic, inlays in wood and some small components in metal. Everything always has worked out pretty well. And I always vacuum after each operation and apply Super Lube every now and then.

Unfortunately, after machining some Delrin not so long ago for a prototype of a camera cage (that ultimately will be done in aluminum), a chunk of Delrin most likely flew and fell behind the spindle, where the Z axis is. There were lots of Delrin pieces flying everywhere so it must have been that. The machine started doing a loud clacking noise and got stuck. I stopped it before it got worse and immediately put some Super Lube. After re initiating the machine, the noise was almost gone and everything went back to normal. But I could still feel that there was something in there when the spindle would travel between a certain range in the Z axis. But it was minor enough that I did not do anything else.

Unfortunately the noise has been getting worse over the last few weeks and adding Super Lube is not working anymore. Up to a point that today it got completely jammed and I received this error:

HM009: The machine could not find the homing switches.

This could be caused by:

  • Mechanical problems jamming a machine axis
  • A malfunctioning homing switch

This is equivalent to GRBL Alarm 9.

https://qr.carbide3d.com/error/hm009

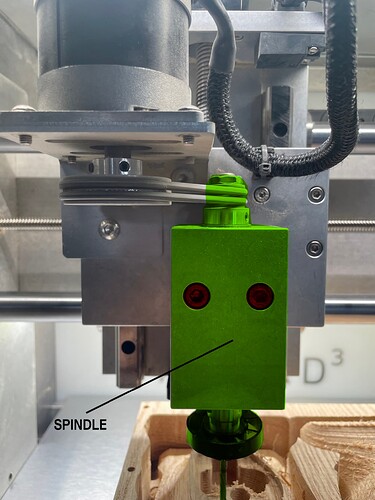
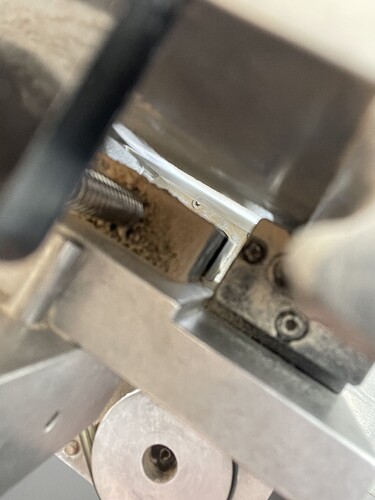
I tried taking a picture of the affected area but it’s really hard to get the phone in there. Regardless, you can still see that there’s some wood and Delrin particles in there:

Before this happened, the machine had been running for a couple of hours doing a 3d adaptive operation for a wood handle. So maybe it built up a lot of stuff in there.

I’m really bummed, I love this CNC and the fact that something got really messed up terrifies me. I’m hopeful in thinking that the construction is so robust that once I clear out whatever is jamming it’ll be as if nothing happened.

Is there a way to safely disassemble some parts of the machine so I can access the Z rail and troubleshoot the area?

Or is there a specific procedure I can try to get it unstuck?

I reached out Carbide3d, but of course this happened on a Friday evening, so I’m not going to get a response until next week.

Any help will be kindly appreciated! Thank you so much!
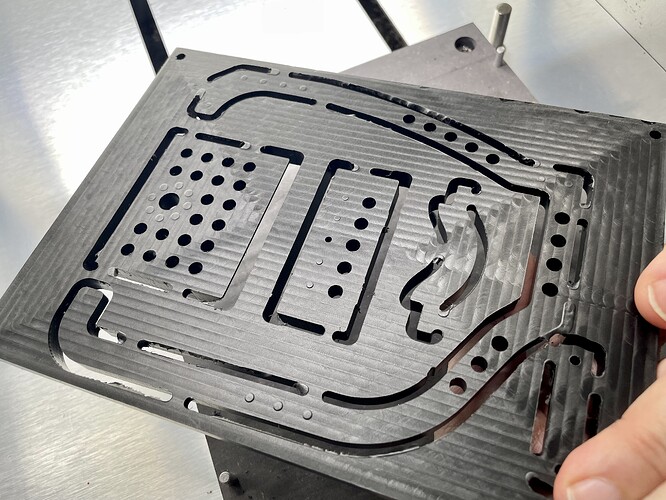
By the way, here are a couple of images of the cage I am building. It’s for an old Super 8 camera. I followed Winston Moy’s feeds and speeds for Acetal/Delrin and it cut it like butter:

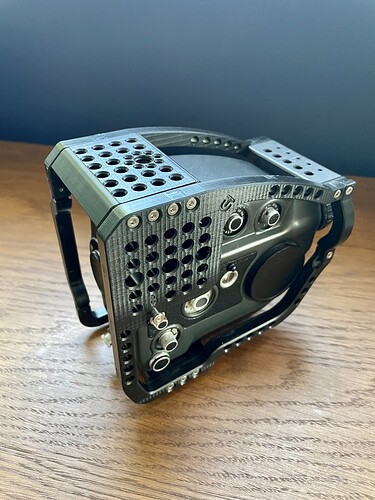
And here is an assembled prototype:

1 Like

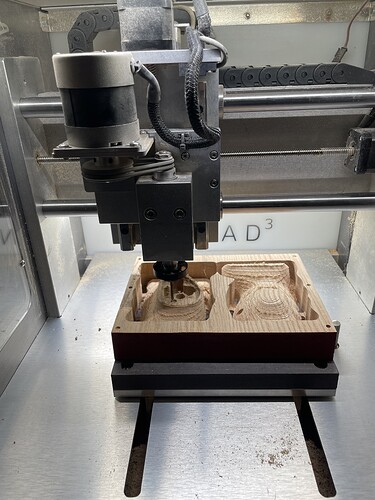
And lastly, and image of the point where it got stuck. As I mentioned, I was cutting a handle in oak for the same camera. The operation had been going on for a couple of hours, so perhaps it collected a lot of gunk in there and made it worse.

Sounds like your Z axis linear bearings need servicing. When they get dirty and stiff the Z axis doesn’t step properly. There is another thread recently where this is discussed and some guidance on how to do it.
Relatedly, I see you don’t have permanent dust collection. I would to that if you’re doing wood and the sawdust really clogs stuff up.

1 Like

Thank you, I appreciate your response. I will look for it.

I just downloaded Winston Moy’s dust boot and ordered 3d prints for all the parts from CraftCloud (I do not have a 3d printer).

I should have done that a while ago, I just felt uneasy about punching a hole on the side of the machine, but I now have no other option.

Thanks again!

With the machine turned off the rail won’t budge. It is completely stuck.

@flynnjs I wasn’t able to find the post you mentioned. Would you mind pointing me to the right thread? Thank you so much!

1 Like

Thank you so much! I appreciate it.

@hcd Did you find what you needed in the posts that responded to my question to the group? Let me know if I can share any details of my experience that would help. I basically followed the advice given to me. However, I could still move the spindle on the Z axis, although at first I had to help it with some “human lift” while the spindle was trying to raise.

1 Like

@tinkereratheart thank you. I read the post and even tho I am pretty handy I have to admit I am a little nervous about the procedure and would prefer to double-check with you guys before I do anything. I am also waiting for the official response from Carbide3d, and would love to hear from them as well.

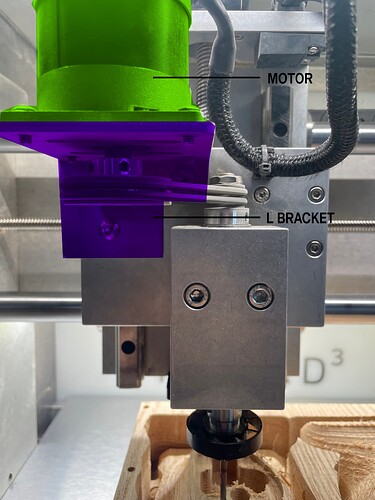
But, in any case, if I understood it correctly, I should remove the spindle first, which I am guessing is by removing these two bolts. Also, should I set free the belts first, or just unscrew the spindle and let the belts come loose?

Next is the motor. What I am not sure is if I should remove the bolts that hold the motor at the top of the L bracket or the motor with the L bracket at once?

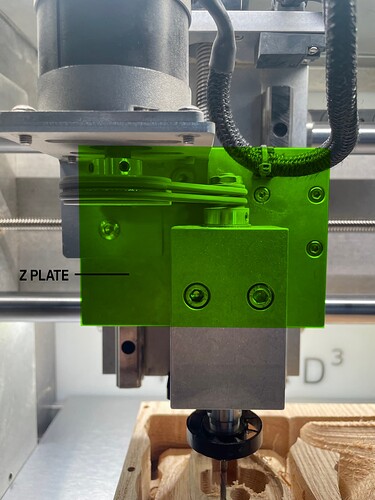
Lastly, remove the Z plate. I am sure after removing the L bracket for the motor there will be more bolts for the removal of the left side of the Z plate.

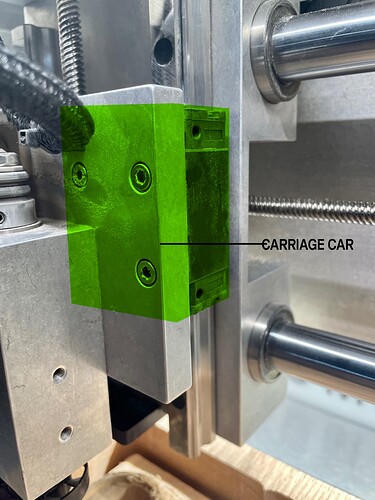
Before doing any of this I should put some support at the bottom of each of the two cars to prevent the thing from falling.

Dissasembling things is usually not an issue, putting things back together, that is a different story.

Some general questions:
-Where is the AB nut? (Anti backlash nut?)
-When reassembling is there a specific order and torque for each of the bolts?
-Do I need to pay attention to the tension of the belts? What would the procedure be when putting them back?

Thank you again!

I received an email from Carbide3d advising to use Mobil Vactra Oil on the Z bearings. I had been using Super Lube in there, I guess that is the issue.

From Carbide3D: “You’ll want to use Mobil Vactra #2 on the Z bearings, the Z axis is the only axis on the Nomad 3 where these HG15 style bearings are used. You’ll want to remove the oil port screws from the top side of the bearing to inject a bit of oil.”

And they provided a couple of links for following instructions:

-Oiling bearing blocks.
-Written guide

I’m going to try this first. As you probably know Mobil Vactra is not quite easy to get a hold of specially in small quantities. I ordered Carbide3d’s small maintainance kit wich comes with a 2z bottle. I hope to get this soon so I can work on it during the holiday break :pray:t3:.

1 Like

I found to work the hg15 bearings free I had to whizz them up and down a LOT and that is difficult to do with the Z leadscrew in place. Also you cannot easily flush the vactra through from the top of the bearing unless you take the z plate off. Filling from the bottom without flushing doesn’t really cut it. See how you get on, but I suspect you’ll need to take all apart to do it well.

1 Like

If you should need extra oil, you can get quarts from Amazon.

1 Like

Thank you so much! I thought I could get away with it, but if I have to disassemble the unit, I will do so. I appreciate your help! Now it is just a waiting game for the oil to arrive.

Thank you @Woodcrafter ! I decided to purchase it just in case, since Carbide3d hasn’t shipped yet.

1 Like

@flynnjs By the way Jason, did you see the questions I placed a day ago? Just making sure that if I disassemble the unit I won’t mess anything up.

Just make sure you support the HG15 linear blocks before you disconnect the AB nut. Make sure you support both blocks directly and not by supporting the plate else when you remove the plate both blocks will drop off the rails and all the tiny balls will fall out and that is a REAL hassle to put back together. A carefully sized support below the rail will also prevent the block dropping off while sliding them up and down when working the fresh Vactra through.
Other than that your dismantling pics/process should be fine.
However, if unsure, check with C3D suport.

1 Like

Thank you @flynnjs !