How many db is the dust collector. Is it the Festool?
@Remmy - EXCELLENT, AWESOME WORK!
When I build my enclosure I used what I had around - T-Slot and Alumalite - and resorted to two layers of sound absorbing foam to kill the sound better (heavy and light).
You’re using MASS in the walks to kill sound… the first and most important factor to address. Next, you’re using air spaces in the wall, also important.
A two MINOR comments:
-
Placing light foam inside an enclosure - designed for sound suppression - can improve things even
more.This is because the flat walks of the enclosure can be a fundamental or overtone of frequencies from
the machining… and things can actually get LOUDER due to resonance. The light, sound defusing
foam breaks up that process and prevents this from happening. -
The base idea with the hose underneath is EXCELLENT! That said, you’ve created a Dirichlet
problem. You’ve got the floor supported only around the edges and this makes it easy to vibrate.
Basically, a drum.If possible, it would be good to have some supports under the floor material. No matter how strong
and heavy the floor material is, it can vibrate. Some supports dramatically reduce the vibration.
Very clean, well designed, and cost effective. Your door solution is better than mine as you door seal is via compression. Mine have only minor contact and compression.
mark
P.S.
When CNC machine enclosures are involved, it’s very common for the air elements (i.e. vacuum and pressure) to DOMINATE the soundscape. The solution - use an enclosure! With vacuum and pressure the devices need air flow to feed as well as to cool so the enclosure design is similar except that they need input or output mufflers. Enclosure mufflers from vacuum and compressors are cheap and easy.
Daniel,
Happy to provide some additional information.
I attached a .pdf that I have off the shelve, so that you can see some of the things I used besides the profiles. It was done quick and dirty and it is propably not self-explanatory so I state the most important dimensions here again. (I also made some minor changes to the innitial design, the pictures show the latest design). Sorry for metric dimensions I am based in Europe 
Dimension inside are (that is the space that is available)
Height: 600mm
Depth: 470mm
Width: 500mm
Dimensions outside are (that is the space you need in your flat)
Height: 600mm + 2x45 (profile) +2x10 (MDF plate) = 710mm
Depth: 470mm + 2x45 (profile) +2x10 (MDF plate) = 580mm
Width: 500mm + 2x45 (profile) +2x10 (MDF plate) = 610mm
What I would tweak:
I was limited on the Depth dimension, because I put the enclosure inside a cabinet/Wardrobe. Without that limitation, I would add 60-80mm more depth to leave enough air space between the Nomad and the enclosure. If you use a “plug” like me, 60mm are enough, if you use a nice window, I would go for the 80mm.
The rest works just fine for me. I am very satisfied with the suppression, I can run a job in the evening when the kids are asleep without any problems. However, I can not use the Festool for that “silent mode”, as the Festool is just too loud for that, so evening time is more finishing time with only light material removal Maybe I also build an enclosue for the Festool, but I focus on CAD/CAM for now
Happy go answer further questions if you have any
Markus
Presentation2_v0.2.pdf (1.2 MB)
3 Likes
Yeah it’s a CT Mini and the noise ranges from 62db to about 70db depending on the level of suction. That is now the loudest part of the system so I should probably figure out how to muffle that next!
2 Likes
Markus, this is incredibly helpful. Danke schön 
The Nomad doesn’t have much power so it may not need to be vented. However, your vacuum is doing the venting so that’s not an issue either way.
My comment about venting was related to the SO3. It draws 10x as much power as the Nomad so it gets hot inside of an unvented enclosure.
2 Likes
Poor man’s adventure in “soundproofing” enclosure:
I’ve researched soundproofing and discovered I can’t afford the proper material. So here’s how I’ve accomplished 22 dbs of sound reduction. My enclosure is 2 sections, Shapeoko 3 and than the kirby vacuum cleaner. The makita router is only 85 bds although that’s not cutting. The kirby is 101 dbs. First I’ll describe the enclosures. The 2x4 frame and ext plywood pieces are all decoupled from each other with rubber tape (door / window opening sealant tape i had ) so to eliminate sound from traveling from member to member. Inside is 2 layers of 1/2 sheetrock. Soundless sheetrock has a layer of viscus elastic between the layer, so I used ductwork foil foam tape (12" x 15’ roll) (known as poor man’s dynamat), I wrapped the inner layer with the foil foam to decouple it from the plywood and the interior layer of sheet rock. I also left all edges of the sheet rock separated a little and sealed the gaps with silicone caulk. Same with the vacuum enclosure. I built a baffled intake/ exhaust for the vacuum and cut ports from the cnc enclosure to the vacuum enclosure so the vaqcuum’s exhaust blows into the cnc “box”. I also redirected the vacuum’s hose to the bag inside the cnc box so the vacuum recirculates clean air back into the cnc box after vacuuming the dirty air out (1 micron filter bag). It’s not pretty but does have a 22 decible reduction. Now my kids are buying a new couch and I’ll have lots of upholstery foam available. Do you (whoever is reading) think encasing the vacuum’s enclosure with the foam on the outside will benefit me at all. I’ll try it in a couple weeks. Also (hey Mark) I supported the bottom of the enclosure with an extra vertical 4x4 in the middle of the bottom to eliminate the “drum” problem you mentioned earlier. The floor is 1/2 inch of self leveling cement and padded with 1/2" play mat rubber padding. Flat and level in one step. Still need to built the door, I have a sheet of plexiglass and plan to triple pane the door, why not? I have a double garage door seal around the door opening to seal the future door. Everything is built from what I have except the foil foam wrapping. Money is very elusive and seems to avoid me so all I can do is what I can do, so I did. I can always trash the vacuum compartment since it’s not an investment just a use for scrap material laying around. That’s if I find a cheap impeller blower on craglist. The shapeoko 3 enclosure will be better soon as it’ll have a borescope camera mounted on the dust shoe which has a swivel mounted vacuum hose so the hose doesn’t bind up. Right now I have to clean up the mess so I can run the new elec circuits and switches for the system. Than the S03 can move in and test it’s neighbor’s patience. 22 db reduction is nice but I need less noise. Thanks for reading.
3 Likes
So here’s how I’ve accomplished 22 dbs of sound reduction…
Nicely done! I’ve always said that a good enclosure can be made on almost any budget.
Sheetrock is more than acceptable, especially when there is a flexible layer in between (Green Glue is commonly used).
The kirby is 101 dbs
Vacuum cleaners are effective but the fine particles will often dramatically reduce their life. It’s very important that the exhaust be filter otherwise this can INCREASE human exposure to dangerous particulates. If one cannot filter, consider exhausting the air outside the building.
I built a baffled intake/ exhaust
Air going and air going out “mufflers” are very important for compressor and vacuum sound reduction. Sounds like you’re approach is very good.
(1 micron filter bag)
HEPA filters are on the order of 0.5 microns. A 1 micron filter is quite good… and often cheaper. Remember that your recycler system is going to quickly fill the filter. Carefully and slowly, bag it, take it outside and wash it out. Let it dry thoroughly before using it again.
Do you (whoever is reading) think encasing the vacuum’s enclosure with the foam on the outside will benefit me at all.
Foam that works well for sound is different than many other types of foam. My opinion is that using furniture foam would be a small improvement at best.
I have a sheet of plexiglass and plan to triple pane the door, why not?
Windows are often an easy way for sound to escape. Double and triple panes are an excellent idea to reduce the easy of sound escape. Switching to solid walls and a camera - given that cameras aren’t expensive now-a-days, is a better way to keep the sound in.
I’ll try it in a couple weeks. Also (hey Mark) I supported the bottom of the enclosure with an extra vertical 4x4 in the middle of the bottom to eliminate the “drum” problem you mentioned earlier.
The Dirichlet problem is very real, but it’s affects vary with the materials used, the scale involved (distances), and frequencies involved.
Not long ago I had someone contact me about a CNC enclosure not being anywhere near as quiet as expected, particularly at the lower frequencies. I reviewed the enclosure and asked that two cross members go under the deck that the CNC rested on. Once done, the results were quite satisfactory, many decibels less.
mark
1 Like
Thanks Mark, I’ll forgo the couch foam, my son advised me how to perfect the soundproofing: ear muffs $10 at walmert (sp intentional). So now it’ll be finished and the window will be small just so I can see the machine hasn’t left on lunch. The camera is a borescope with light. Other accessories to be determined. Appreciate your review Mark, I’m looking for an impeller blower to replace the vacuum, may just build one. I added a cross member on the top plywood also for upper dirichlet tendencies, yes it is real, you don’t want a speaker box you want a speakless box, that’s why I put the frame members on the outside of the box with the face (wide side) against the plywood. By the way (for other noobies): the new electrical circuits are in conduit from service panel to switch boxes and grounded in the service panel. Workshop environments are dangerous.I’m trained and certified in electrical systems if you’re not, pay an electrician and don’t risk your life. I’ve wired my house and workshop and I KNOW it is correct and code compliant, rewiring is dangerous because you don’t know what completely what was done before, I never rewire, I’ll remove and replace but not redo someone else’s possible mistakes. That’s one reason I bought the shapeoko and router so I don’t have to learn about wiring spindles, that mistake could be my last. I just don’t want to encourage a novice about electrical stuff.
2 Likes
Thanks Mark, I’ll forgo the couch foam,
Some form of “coating” of the interior walls of a CNC enclosure is important. It can help diffract/disperse the sound and prevent resonances. A simple, flat wall is very reflective!
In the spirit of your invention, consider the ceiling tiles use in offices, the ones that rest in a grid hanging from the ceiling. They are CHEAP, easily available, and MUCH better than nothing (though formal acoustic foam coupled with MLV is better yet).
my son advised me how to perfect the soundproofing: ear muffs $10 at walmert (sp intentional).
Ear muffs have an NRR rating. It’s best to go for one with a NRR rating of 25 or higher. Certainly, don’t go below an NRR of 20. Spend a little bit more and be sure your ears are protected.
The ones associated with firearms are “OK” for this… but are designed for very loud pulses of sound (shots). Try to get the ones associated with manufacturing, helicopters, or airport workers - constant, loud sound.
So now it’ll be finished and the window will be small just so I can see the machine hasn’t left on lunch.
The camera in my large CNC machine looks down the T-Slot top of the machine so it’s easy to see that things are working well. No windows are best but small is best for windows when one is necessary.
… I KNOW it is correct and code compliant, …
Excellent! Thanks for reminding everyone that the electrical code is critical to safe operation.
I can’t tell you the number of neutral/ground swaps I’ve come across over the years. Thankfully, nobody was injured but I have seen equipment fried.
mark
Outlet neutral testers are cheap and available and very important. Everyone should have one, not to be able to fix it but to identify you have a problem and need an electrician. Common knowledge does NOT relate to electricity, if you can’t explain your situation clearly to an electrician than you shouldn’t work on it. People get confused with black or white for hot. “White Hot” or “White Lightning” does not apply. I’ll refrain from any other nomenclature so as not to imply instructional content. I rented a small house once, it had an electric system of 5 circuits with breakers. Except every circuit was cross wired so that no breaker could actually shut off the circuit, only the main breaker. Every outlet had errored neutrals and grounds and in the box, black and white wires went to both hot and neutral bars. I was the LL’s handyman so I ripped out everything and rewired from start the whole house correctly. My elderly neighbors asked me to check out an outlet that was burnt, I told them to call an electrician immediately. Anyway Mark, I appreciate your replies, thanks Jude
Maybe I know who that might be? ![]()
My innitial design was totally unacceptable, 57DB noise level doing the homeing cycle with the Nomad (I guess it’s even more than without an enclosure…say hello to our well known friend Dirichlet ![]() )
)
I changed the bottom: Added 2 cross profiles plus a heavy 1 8mm MDF plate
I now let the Nomad rest on Sorbothane 30 pads (fantastic stuff, but expensive)
I use a “plug” (see pictures above) instead of a window. In my experience, switching to a non-window enclosure has a huge impact on noise reduction. Especially the high frequencies find their ways out if the enclosure is not airtight.
The massive bottom and the Sorbothane really kill all the low frequencies, I can hardly feel any vibrations out of the enclosure.
Markus
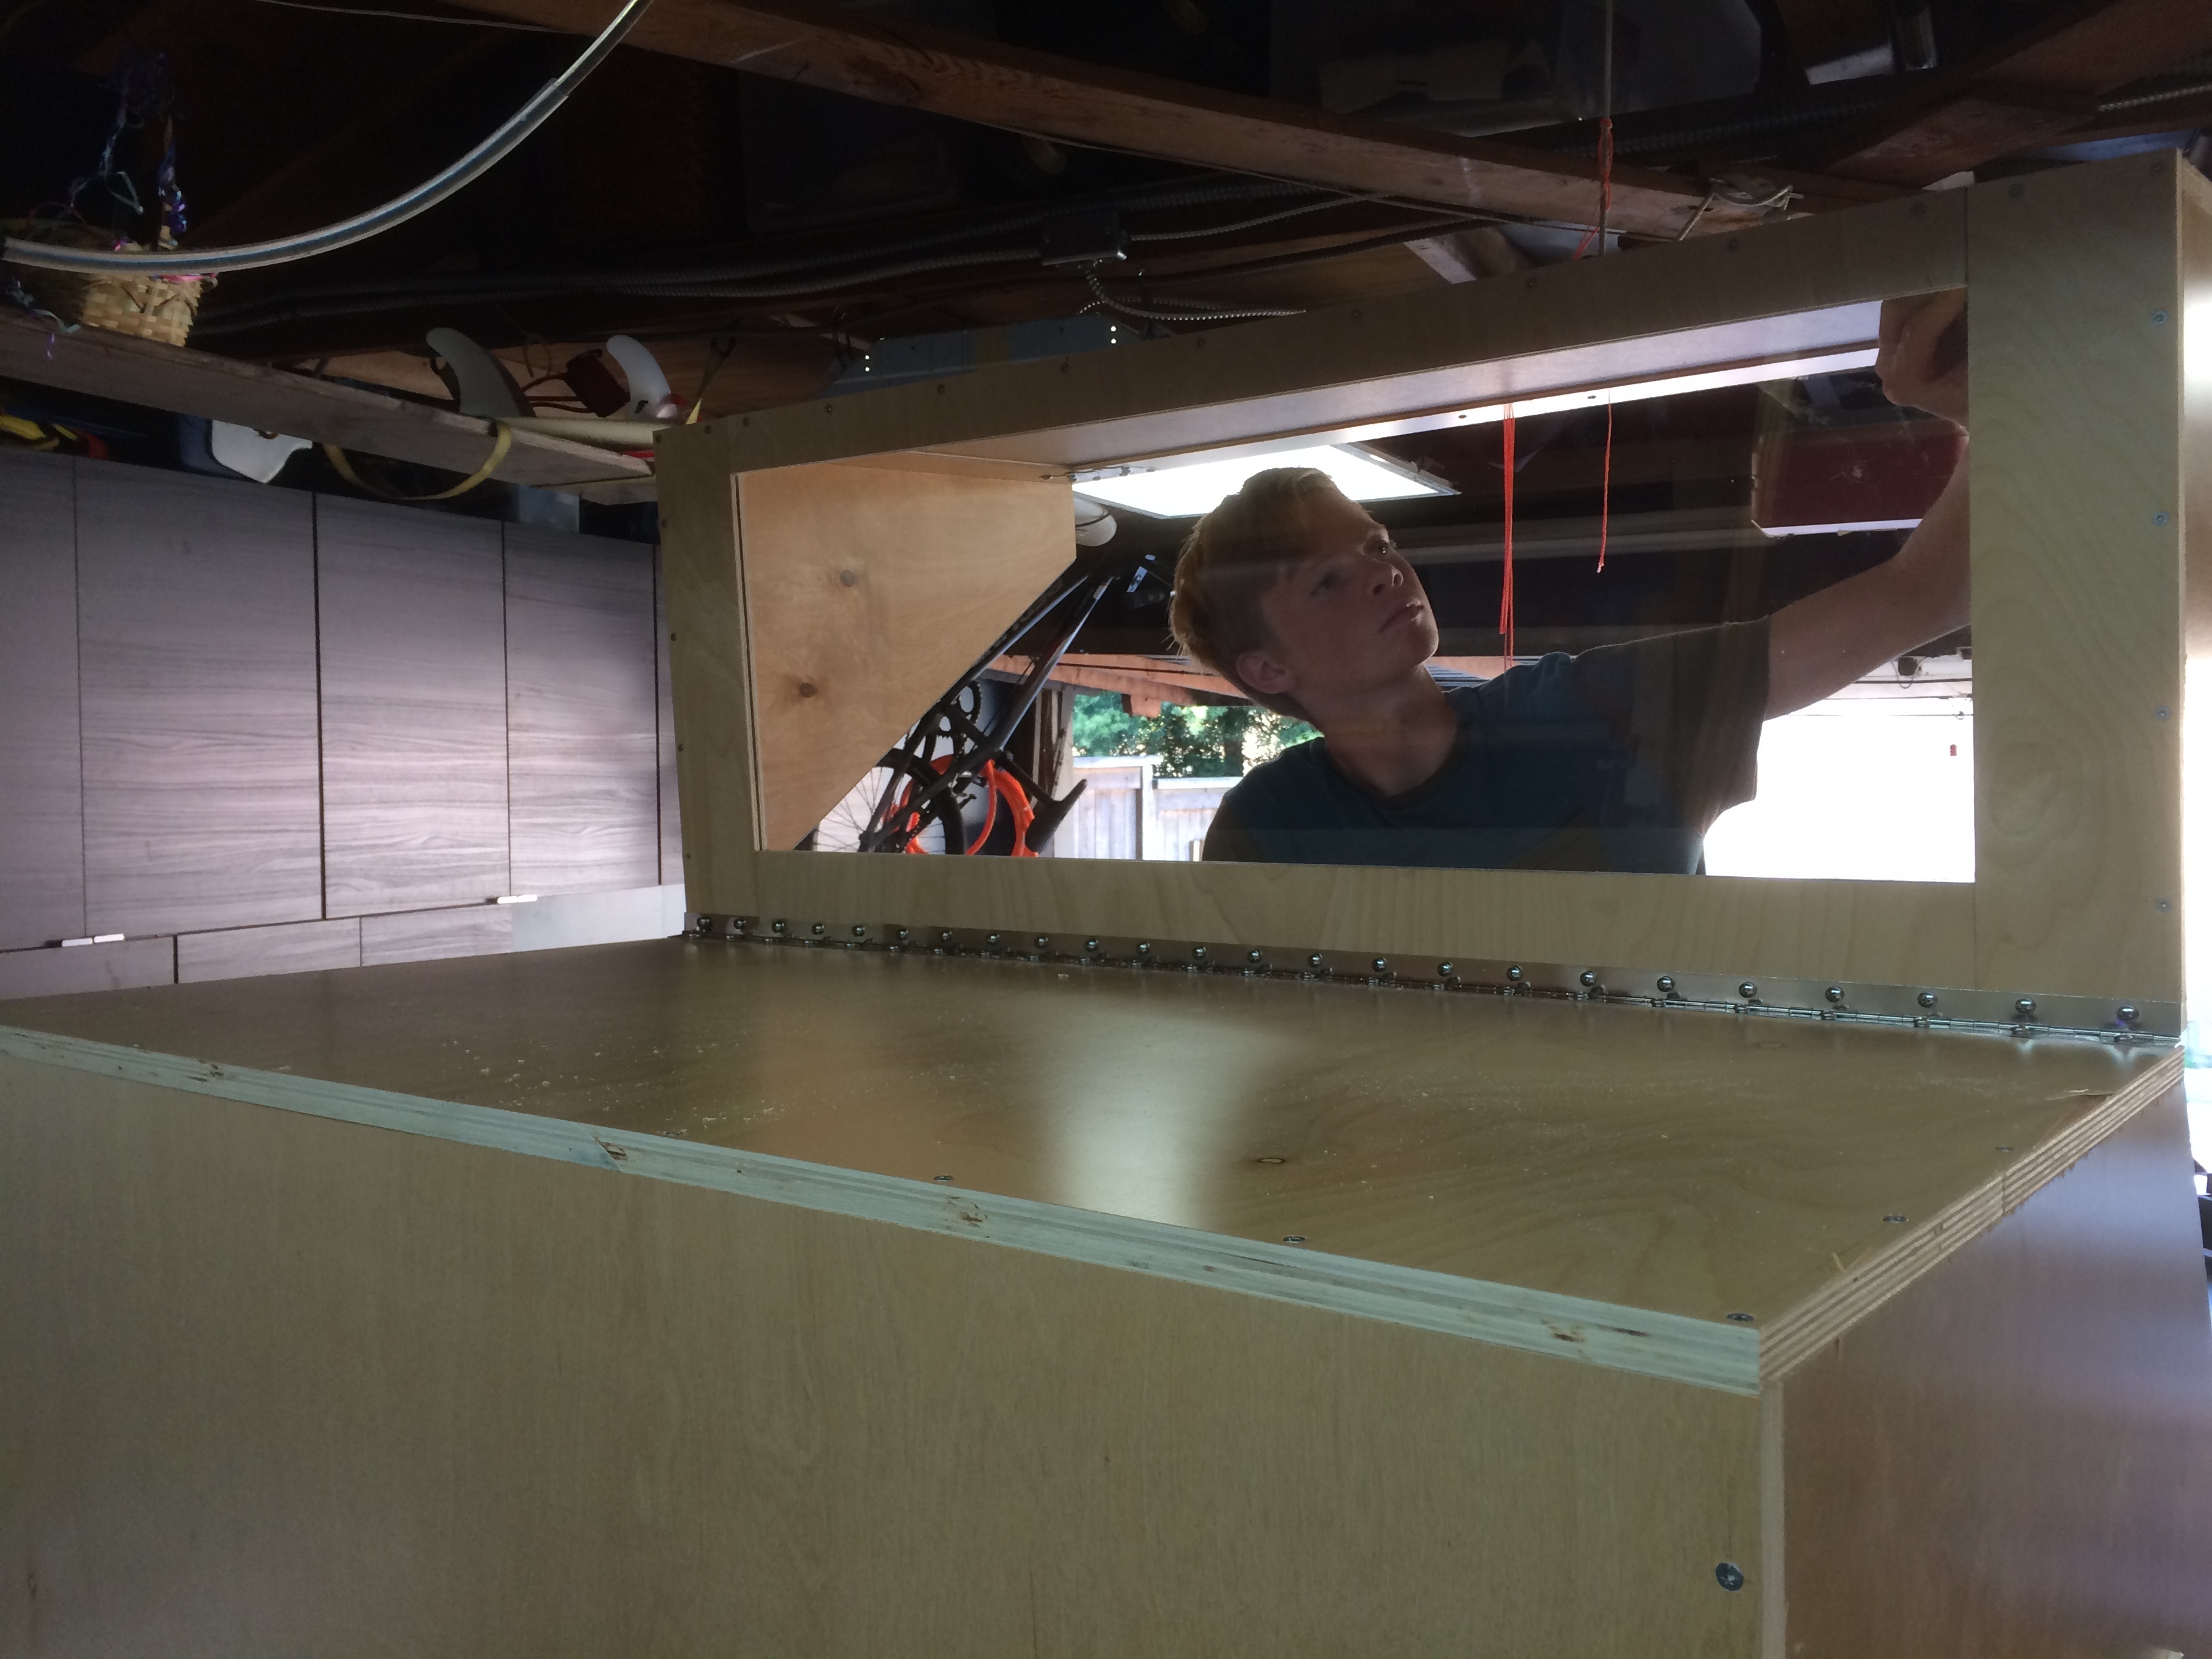
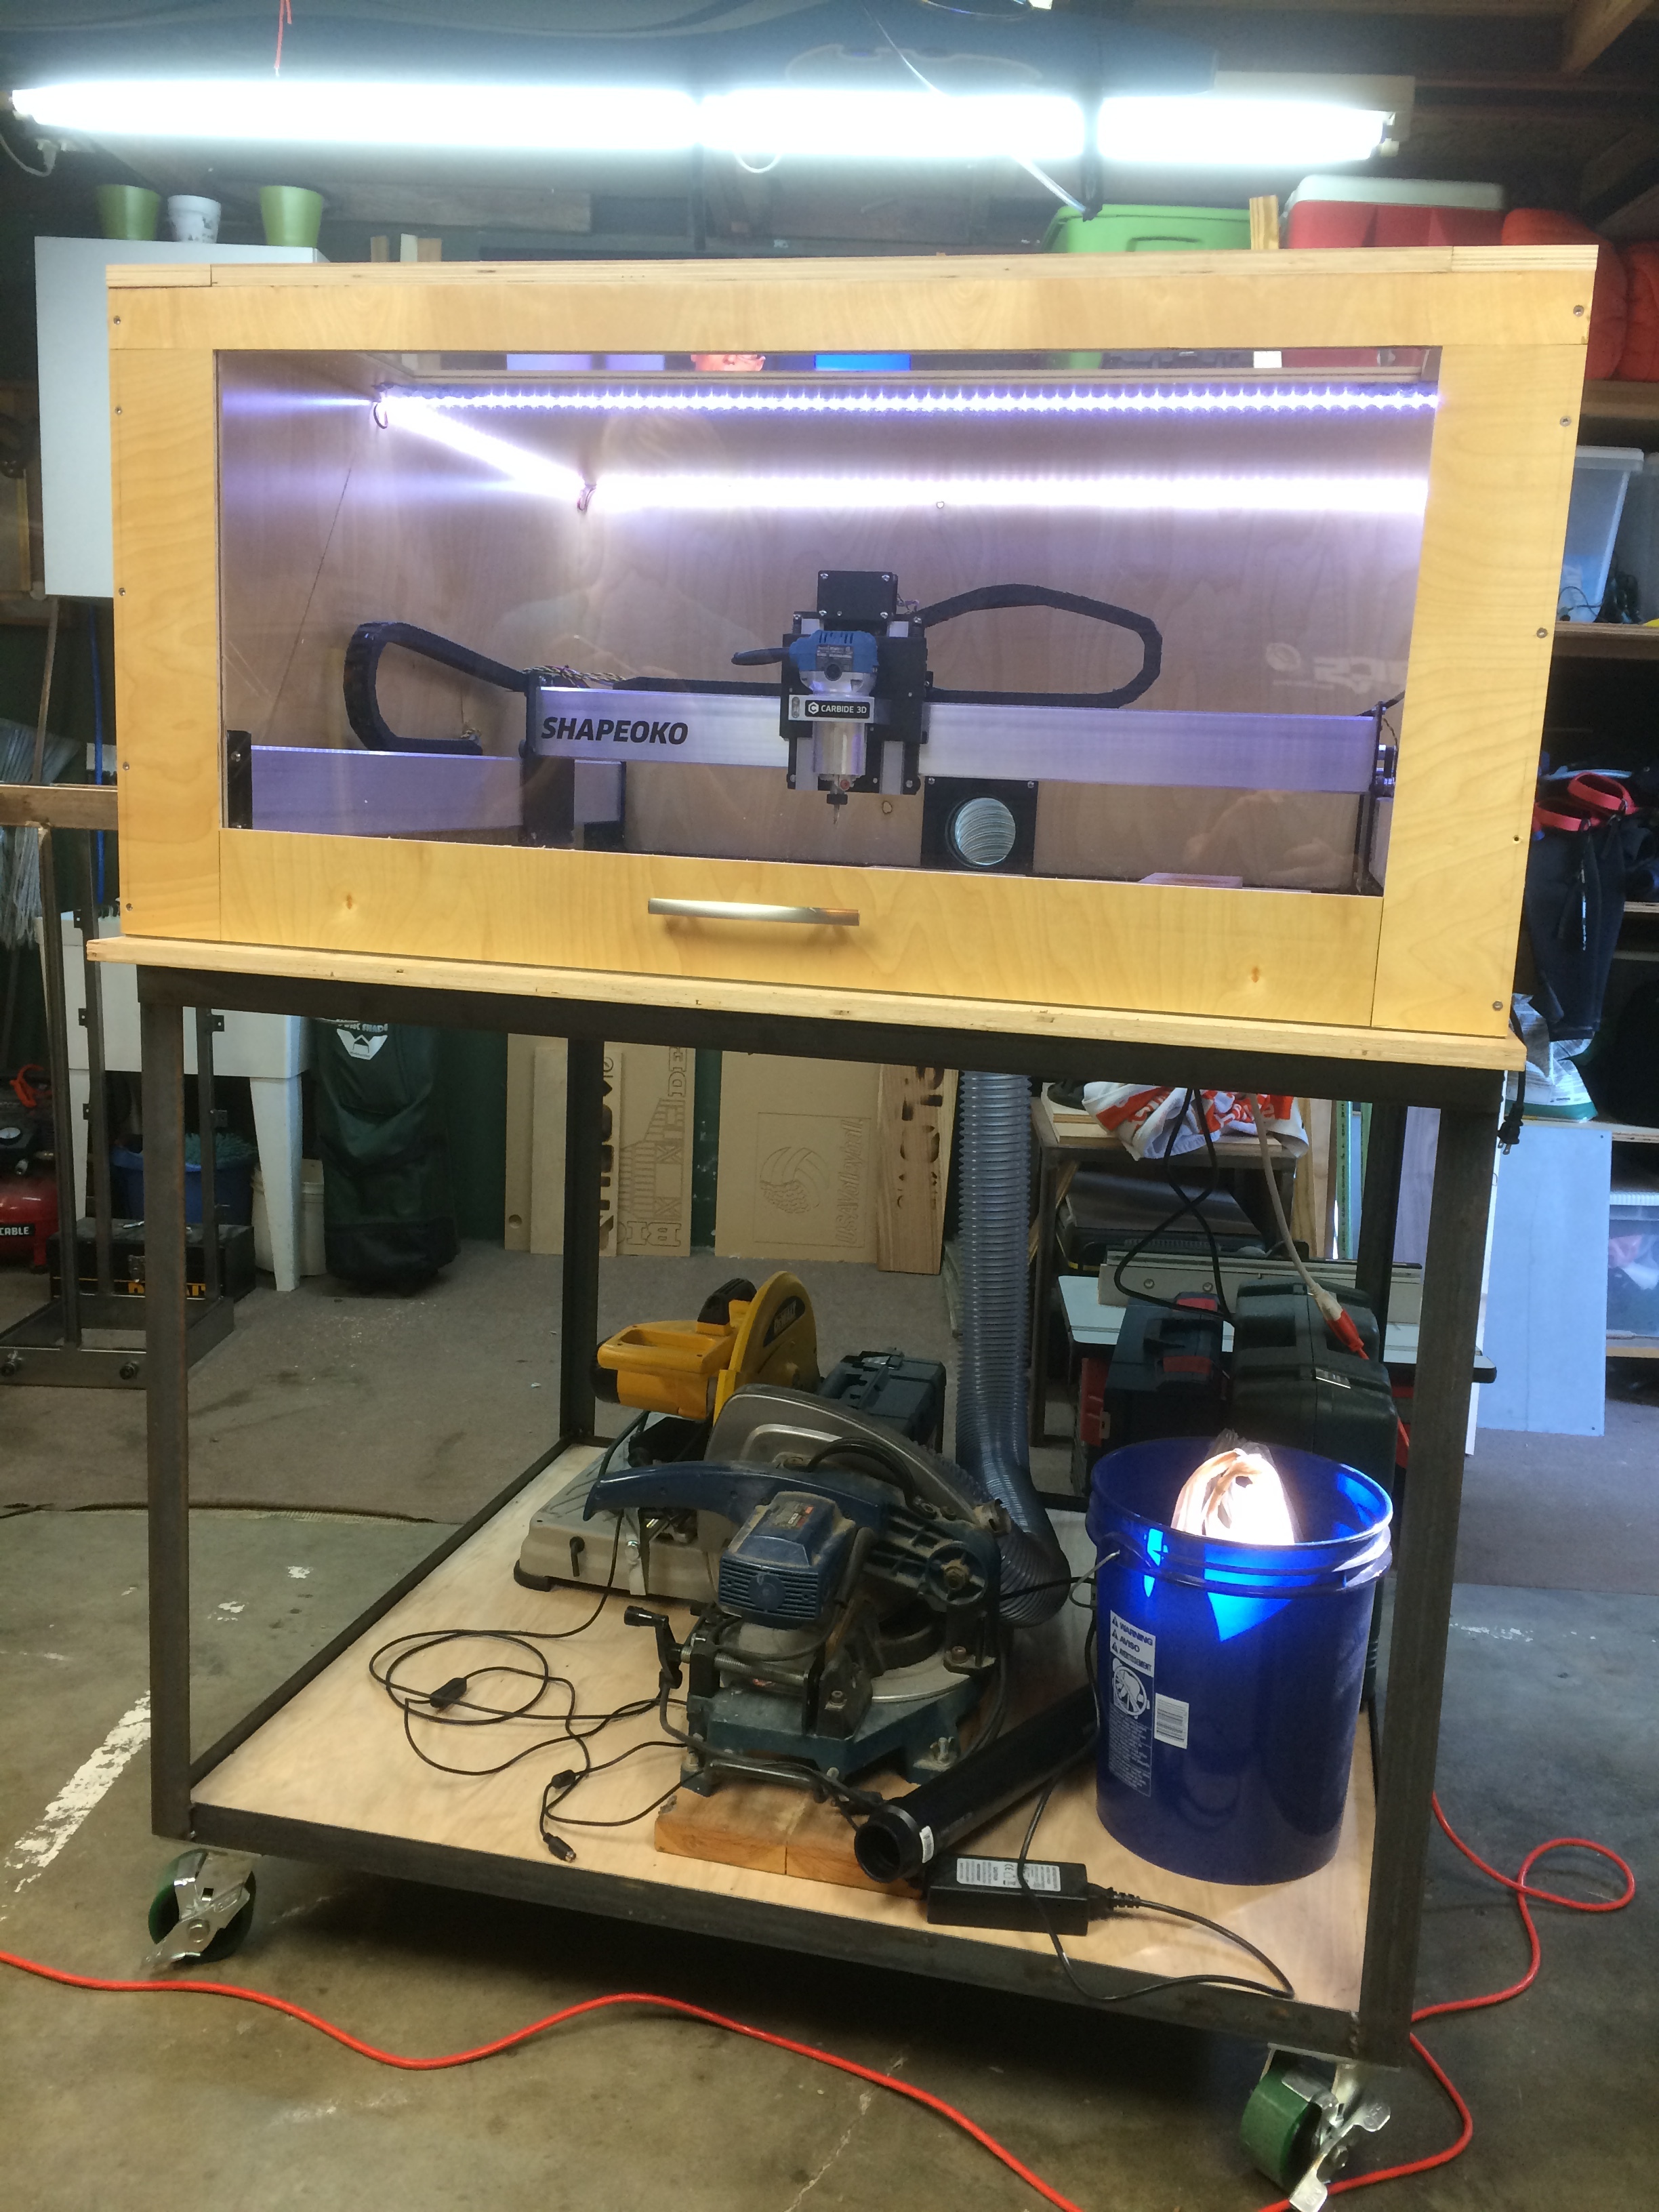
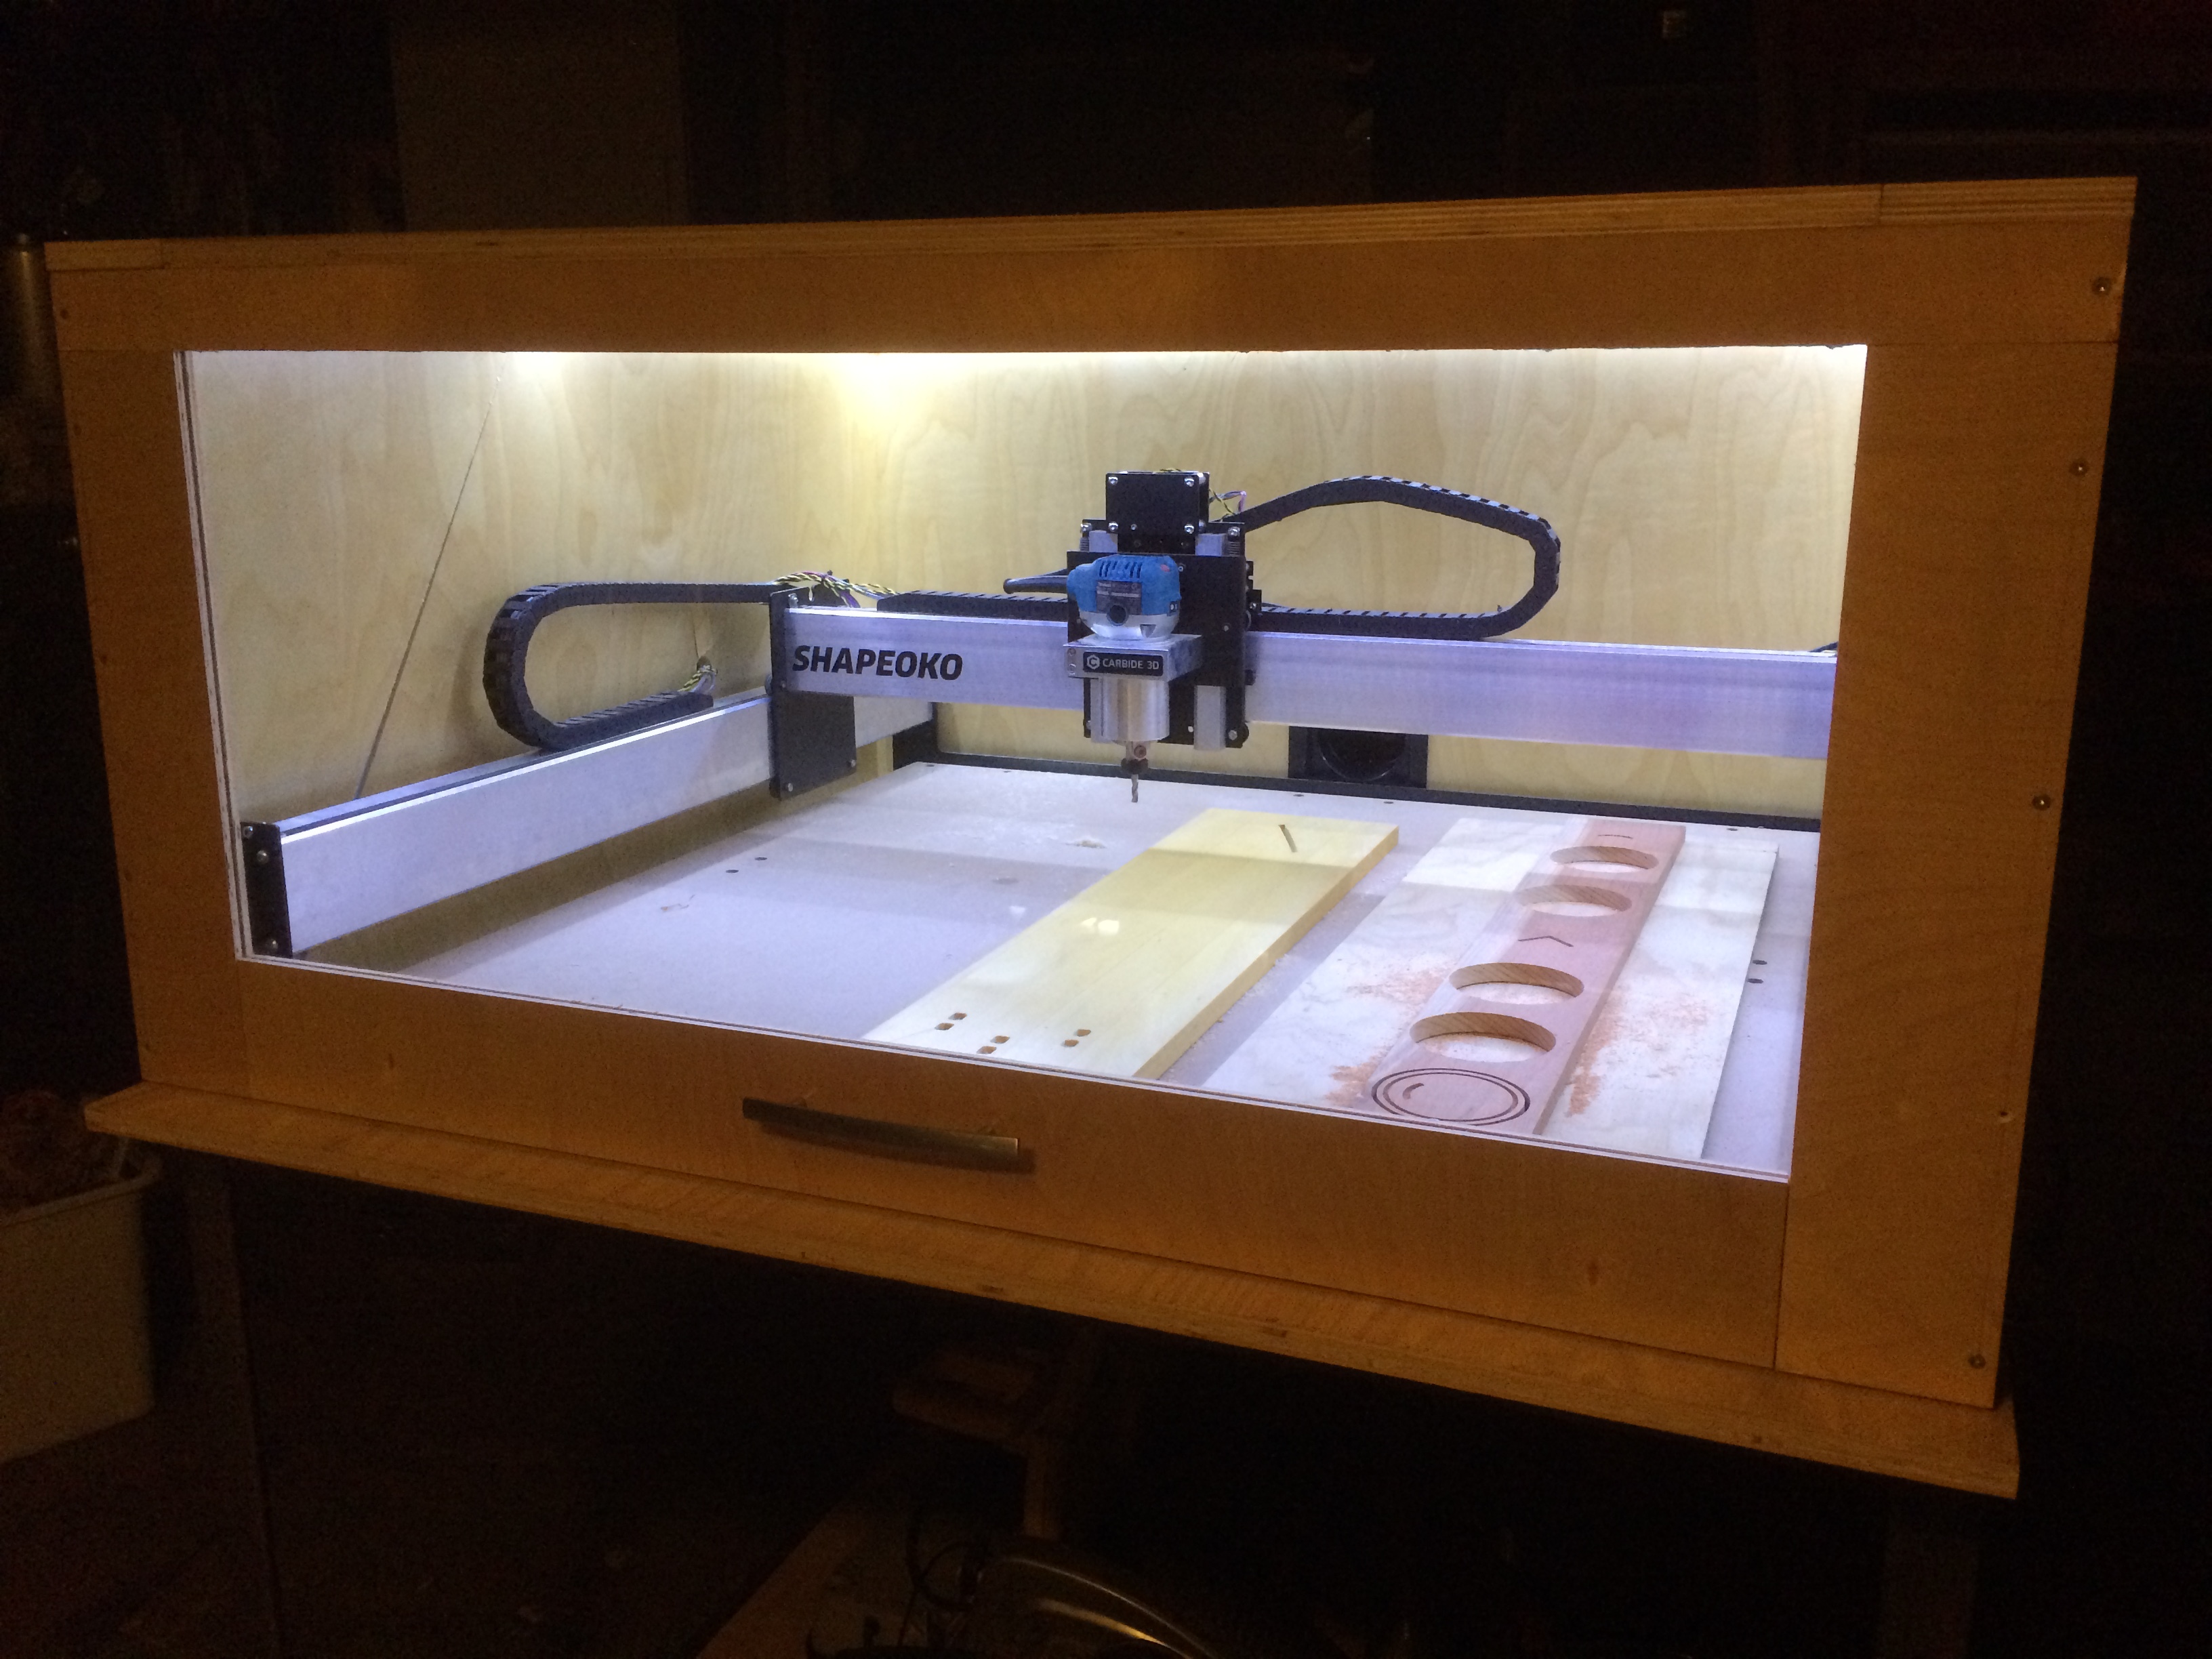
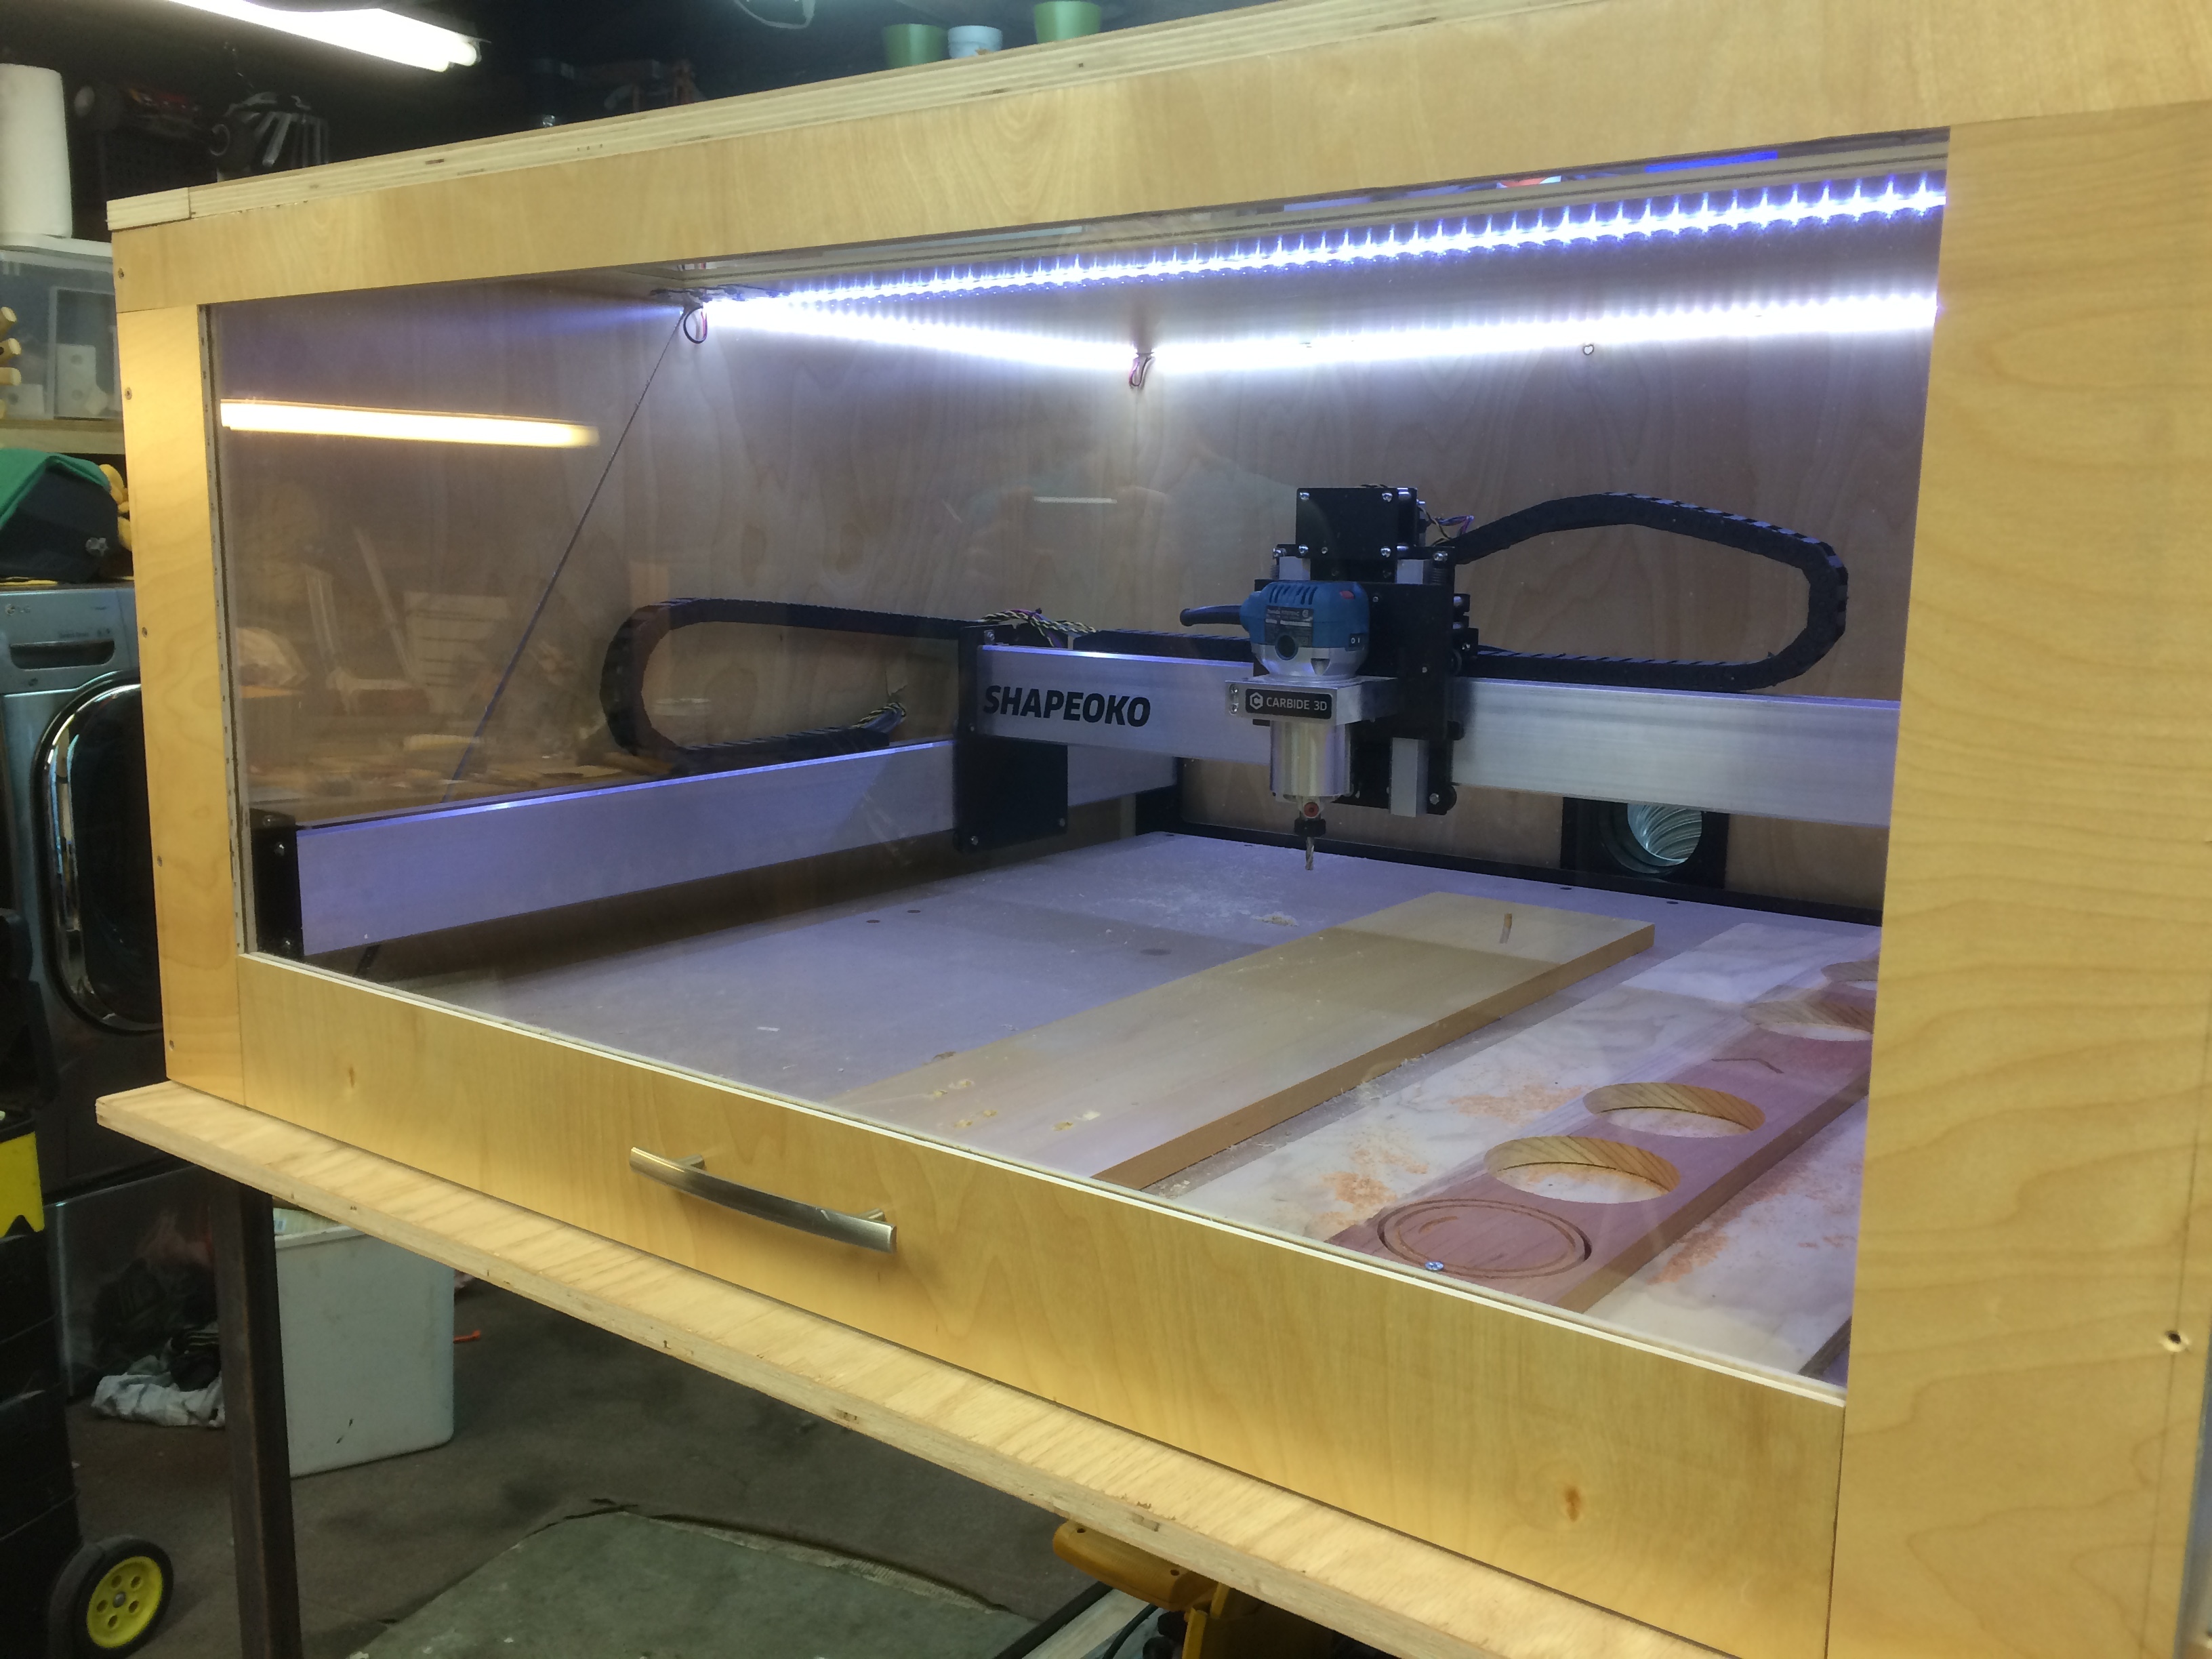
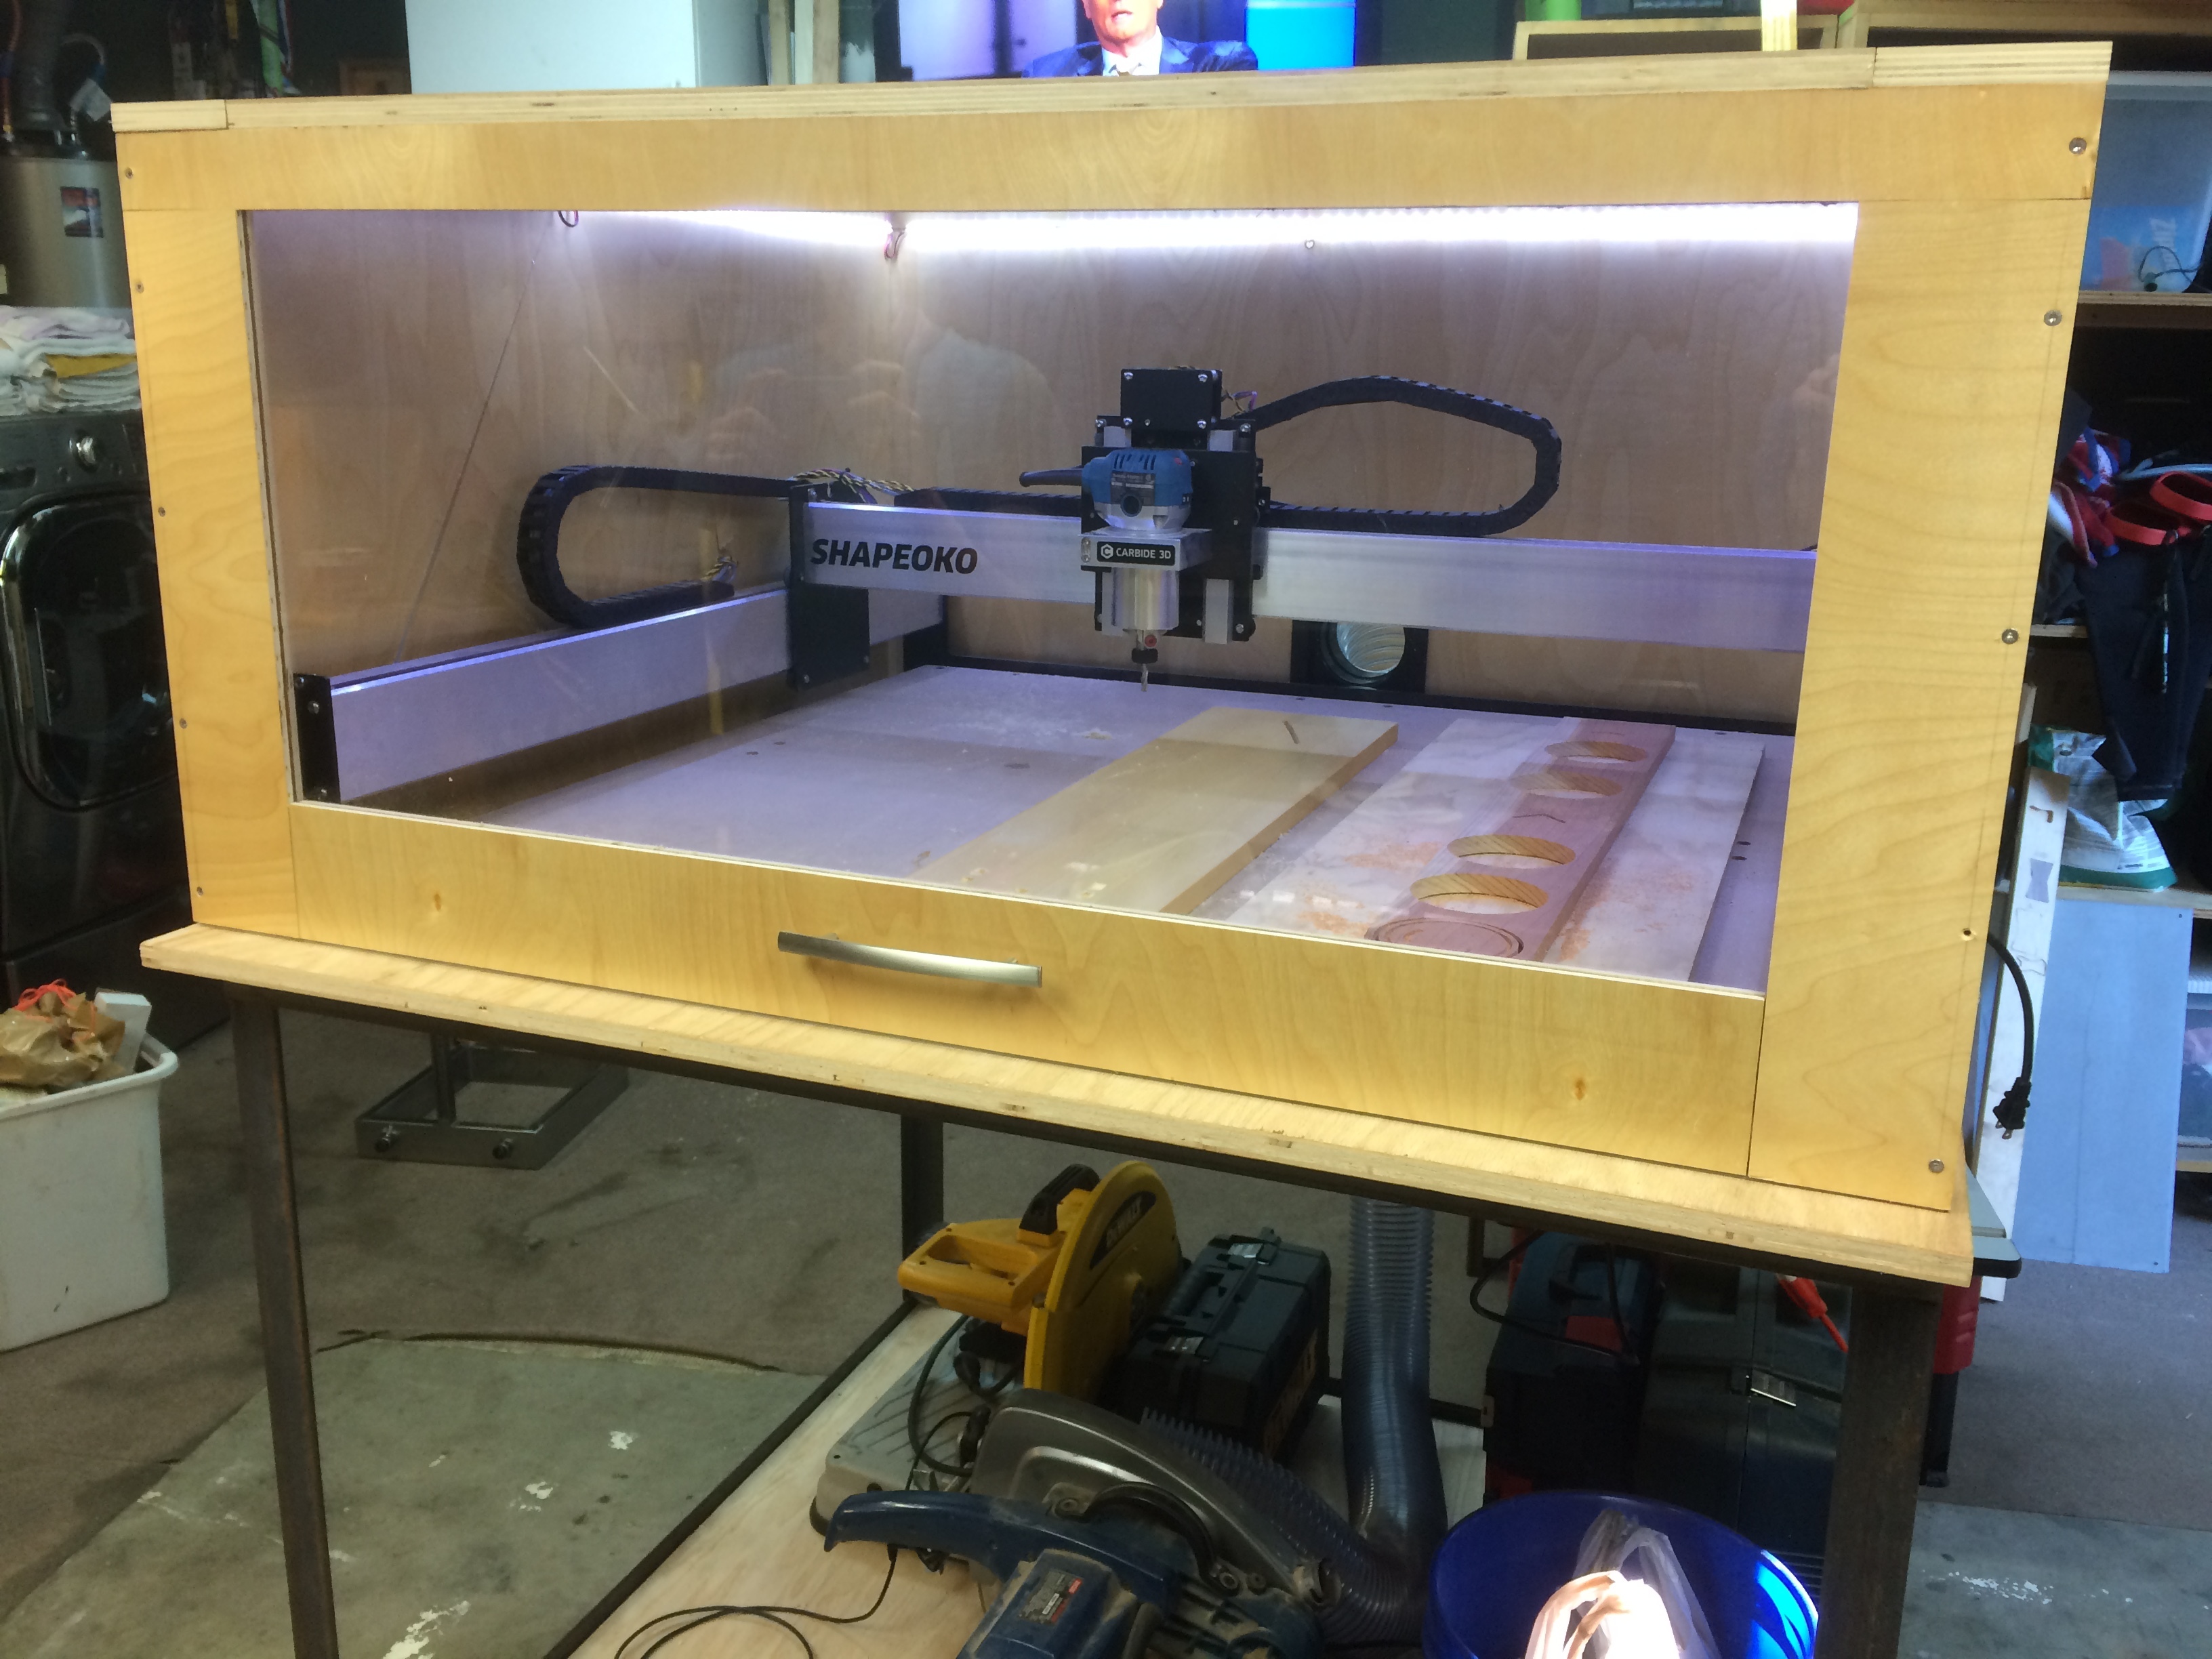
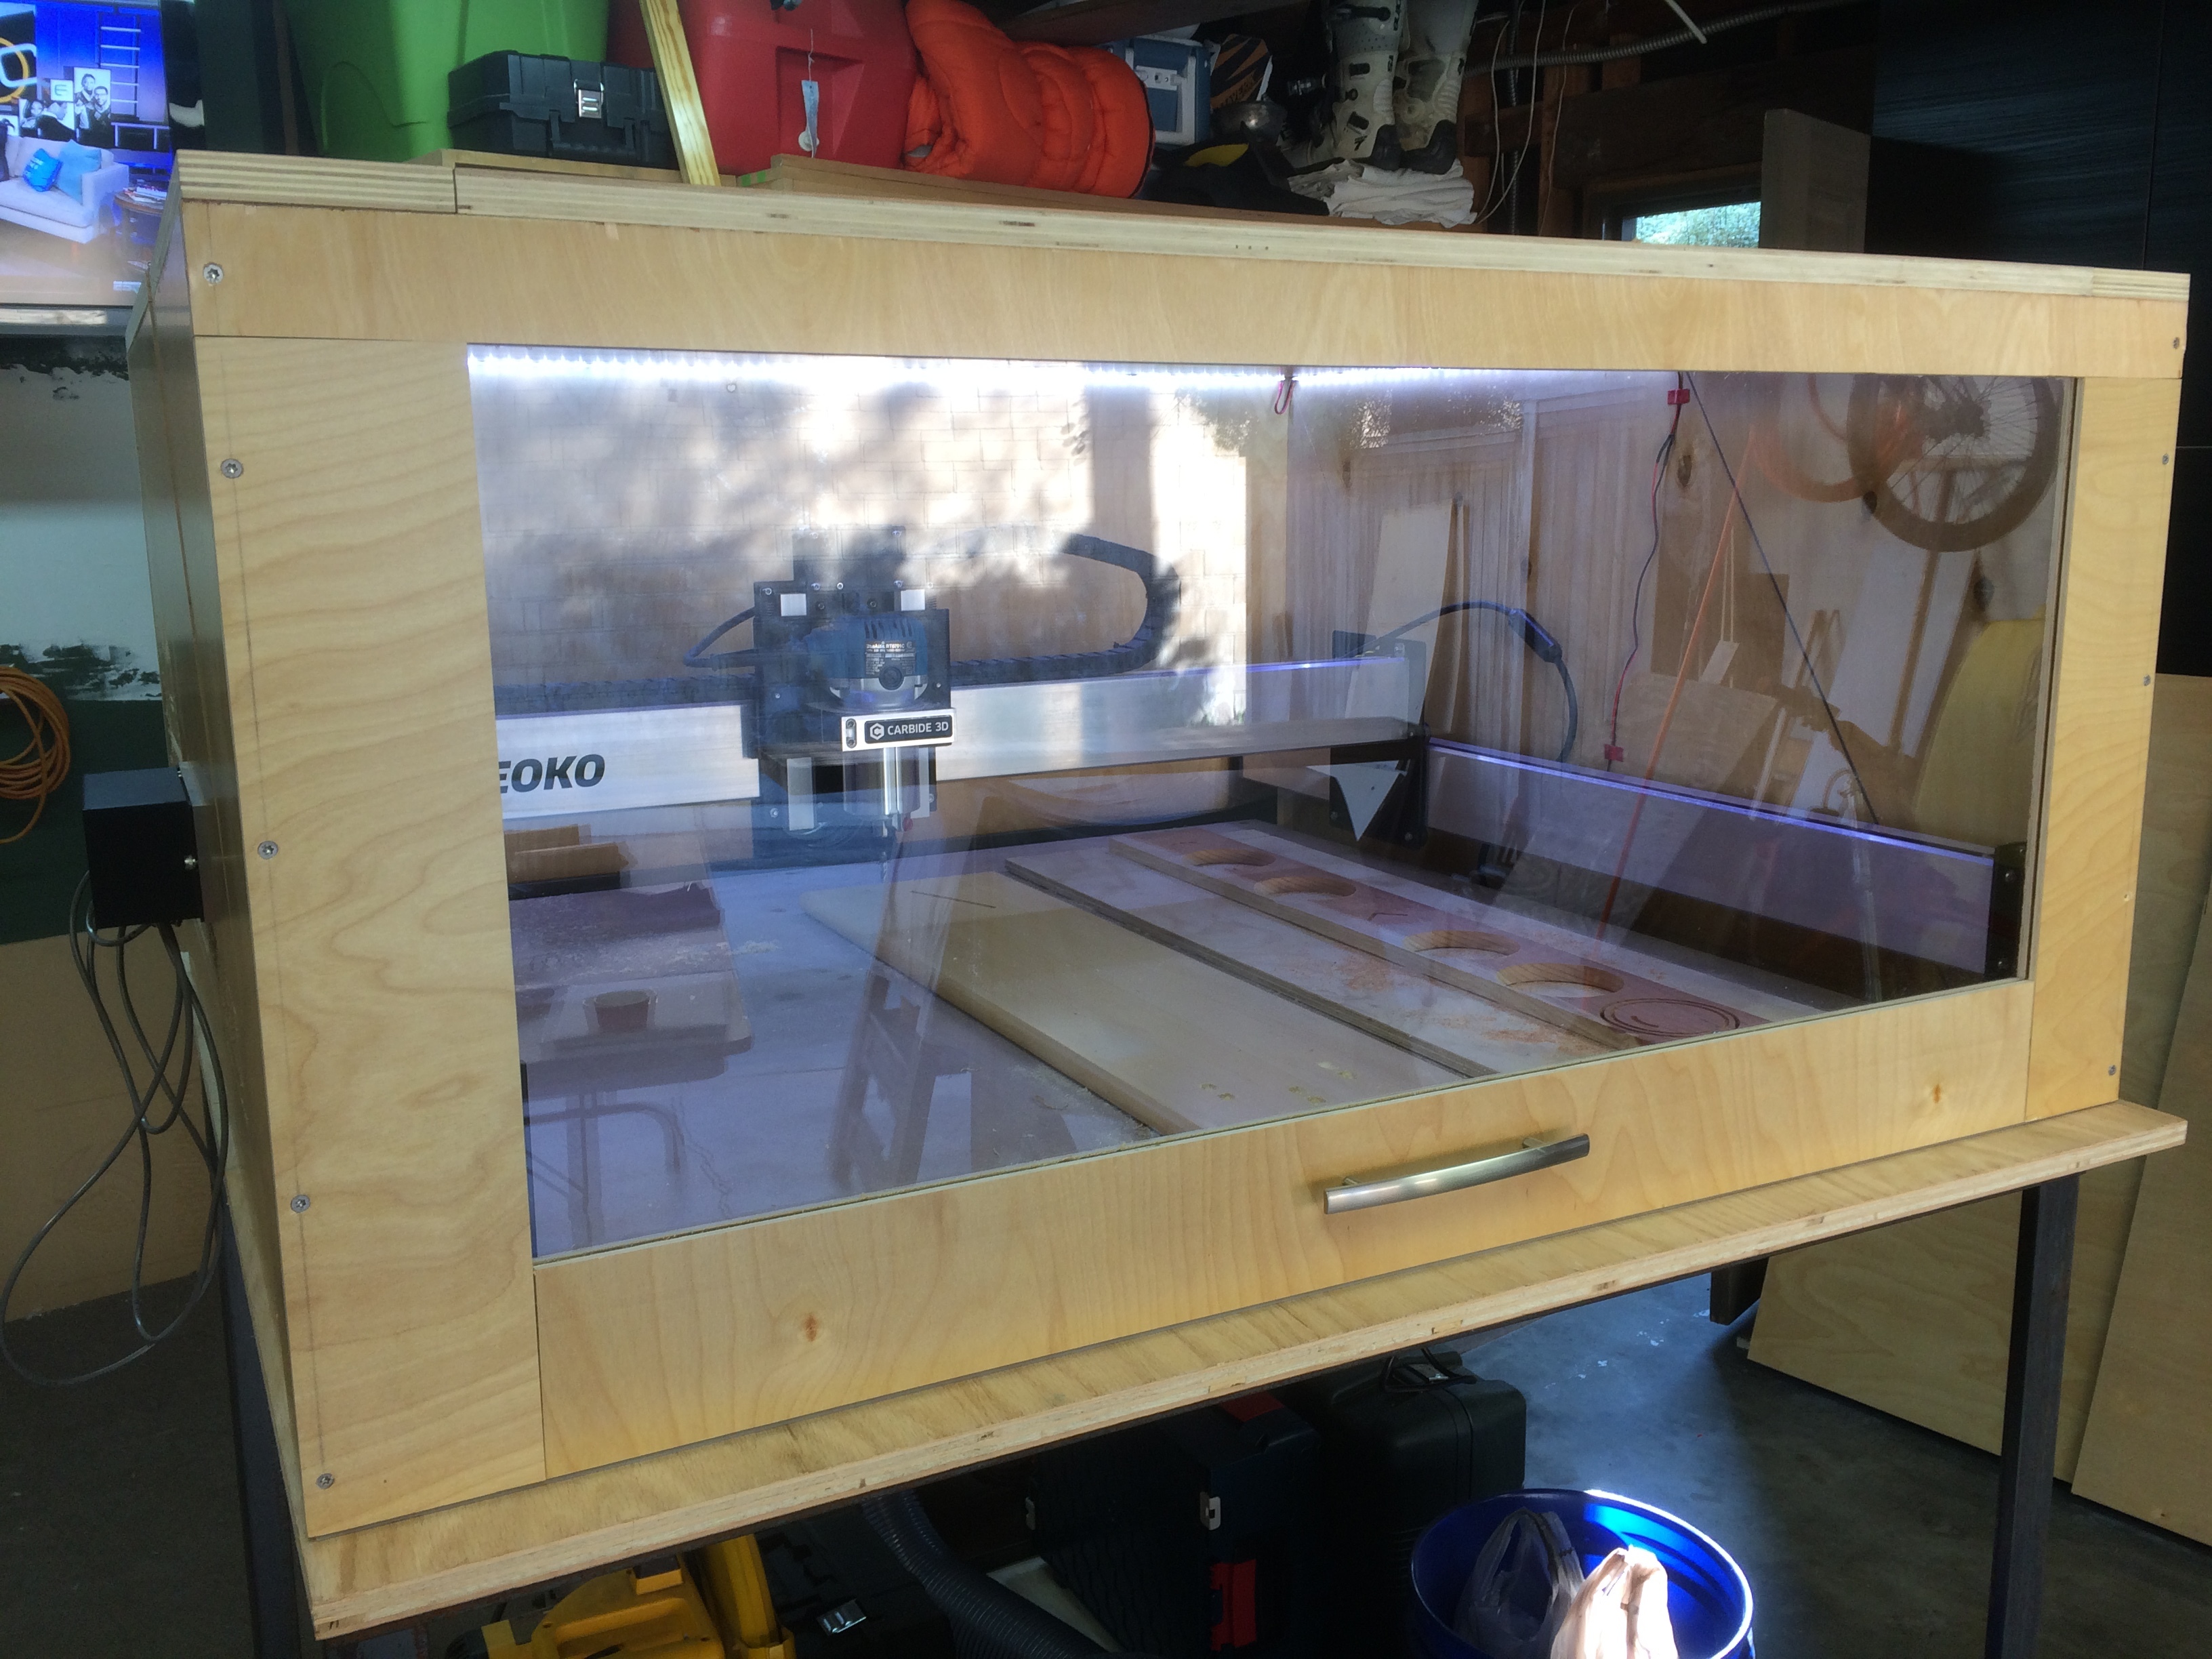
To all that posted here before, thanks for the ideas and advice. This will be an evolving item, but I’m off to a good start. My son and I made the cart and the enclosure from scratch. Now it’s time to machine more things!
Vacuum still must be attached and the lifters for the front. That will make it 100% ready to go.
I have to decide on the exact dust management system. 4" insert already attached at the middle back of the box. Any ideas on “best system” are welcome.


1 Like
Very very nice,Glad to see it used to bring family closer,dosent get any better #highfive
I bought (and just received today) this dust shoe:
I liked the clean look of it and it looks like it works well on the videos. I ordered mine with the 2.5 inch port. It might be something to look at Kevin.
My only thought on this - driven by my experience of having a dust shoe mounted to the router it’s self…
The hose puts pressure in different directions. This can mean small variances in cuts probably 0.1-5 of a mm but noticeable.
Well, right now I’m dialed in pretty good on my machine. I’m hoping to get the dust shoe hooked up this weekend. I’ll take some measurements before and after. Also, I have vinyl duct I use for venting bathroom exhaust fans. I’m going to see how that works to transition to the vac hose. Very lightweight. Will have to see if it will collapse once vac is on. That will take pressure off the shoe if it works!
That sounds like a good idea, I’ve seen a few people who bracket the hose from above - I imagine that would also take some strain off the hose and in turn off the router - very keen to see how you get on.
I love your extrusion design, @sliso!
Does anyone know if this design can be used with the Shapeoko 3 XXL? Or would the extrusions bend at that length?
This happens whether the hose is mounted to the router or mounted stationary. The SO3 z gantry isn’t very stiff so it does deflect a little due to hose pressure. So far it hasn’t casued any noticiable issues but if I needed to hold tight tolerances I would run the hose along the cable track to eliminate most of the forces it exerts otherwise.