I am not sure if posting my thoughts about CM here is the right place to post at, but I do have my 2 cents worth, or rather my 25 cents worth, lol. I want to commend the developers for designing Carbide Motion in a way where programs can be restarted further down in the program. It will help with my power issues here where my power flickers off and on every so often throughout the week and I won’t now have to restart the program from the very beginning.
Being able to write in G-code helps for sure. My only issue is, I don’t know the G-code list or the M-code list of our machines. If I did, it would help me to be able to work/program my programs with the work arounds that may so be needed. I manually program HAAS Mills and Lathes and knowing the G-codes and M-codes that perform certain functions of the machines really helps me when typing out my programs. I assume that CM is now basically to this point now, which is great, but where can I get the complete list of G-codes, and M-codes if we use M-codes in CM, so I can have a bit more control in my G-coding of my programs and machine?
I am so pleased to read about this new update that allows programs to be started in different points of the program. Thank you in advance in whomever is able to provide a direction to finding the codes.
What’s it like (or rather, how’s it done) in the “big boy” CNC world, Eli? In the hobby CNC arena, I’ve almost always stuck to the “last tool change” to re-start a program, because that is a safe point where the machine was stopped anyway…
It also helps if the CAM writes full XYZ coordinates for each move (now that we don’t have the extreme memory crunch of earlier days ) so it’s possible to go to a retracted G0 move within a given tool, maybe add an M3Snnnnn line before the next cutting move, and go from there. If the CAM isn’t really lazy, it will add a Fnnnn on the first cutting line after each rapid too, so you don’t need to go back and see what the feedrate should be…
When I write programs for these Big Boy machines, I run each tool as it’s own mini program. So, I have the G-codes and M-codes needed to prepare the machine for every setup to read the moves of each part of the program. This example that follows is an endmill program. I number every line because they are the referencing points of my programs. I can add notes to the beginning of the program so another person can read them and know exactly where the program has breaks in it for restart points. This is a Lathe program and I will explain each line as some people will understand most of this program, and others may not understand any of it.
In this program I have programmed a boring bar to bore out a process. This is the whole program to its entirety of just one tool.
The T404 is the line where the machine is told to use tool 4 with offset 4. The next line G00 is a rapid machine movement to the location in X and Z locations that is just in front of the part in the spindle. The next line G97 tells the machine to turn the spindle on constantly at the spindle speed of 200 rpms, and the M03 tells the spindle to rotate in a clockwise direction. The next line on N280 tells the machine to move incremental in Z direction and at a feedrate of 0.006. The rest of the lines all the way down to N360 tell the machine to move in various directions to cut in X and Z directions. Then N370 G00 is rapid move to 0.1 in front of the part. Then the M05 and M09 are the coolant shutoff and spindle stop. N400 line move the turret back away from the spindle to the two locations. Then the T400 clears the tool offset use. Finally the M30 tells the machine end of the program and to reset back to the beginning.
Now, if I want to rerun this part of the main bigger program then all I have to do is start it on the line N250 and it will just run this part of the program. These are types of my mini programs for just one tool. Knowing the G-codes and M-codes that this machine understands helps to make it function properly from tool changes, spindling rotation directions, and coolant running, etc…
I also write Cam cycle programs when I have a lot of stock material to remove before I am down to the print design size I want. A Cam cycle program will tell the machine that I have a certain max diameter of material in the spindle, and that I want to cut this material down to my dimensions all the way through the design. I plot out each X and Z move until I have the design plotted and then tell the machine how much material I want to remove per pass. The machine will then run depth of cut per pass until it gets to parts of where I want the design and it will leave however much material I tell it to leave for a final, or finish, pass, usually 0.02". It’s really neat watching the machine hog off material step by step until it is to design with a little extra material, and then watch as if contour cuts the part to finish specs.
Some of my programs can be very complex. By me writing the programs in mini program parts per tool, any other person can understand the programs a bit more when they pull them up on the machine and look them over. I write all of my programs from scratch and label/note everything I can to make sure nothing is missed. When running my metal parts on these Big Boy machines, there is no room for error. I have to hit the mark 100% of the time because the material costs so much and we dont have extra material for mistakes.
You talking about being stressful, this kind of working really tests the very skills one might say they have. A mistake can be as costly as $1000. These machines we build from scratch can cost upwards of $40,000 or more. No room for error or mistakes.
If you have such regular power issues, you may want to consider getting a battery inverter generator such as the EcoFlow Delta 2 Max. It can essentially act as a UPS & keep power to the machine steady. I have tested mine running my SproXXL & shopvac dust collection & pulled the power plug out of the wall. The CNC just kept going steadily & didn’t see any power interuption. I can’t say if it is totally foolproof as I haven’t encountered enough power issue events while running, but my experience with it thus far has been good. Weighs 50lbs & probably has enough power capacity to run CNC & dust collection for the better part of an hour - enough time to certainly pause a run until main power comes back or control where you stop a project at.
No, I don’t write my programs in any text editor. I write them directly on the machines control panel. I do most of my own calculations, print interpretations, and program design. I don’t know what program that I can really use yet for writing code for our S5Pro yet, but I will dig and see what I can find. I know there has been a lot of talking about these very things and I just have to do more researching and reading to figure out which is best.
I did the same thing when we were all talking about remote controllers that can run our machines without just a mouse or the computer directly. I was struggling to to get my PS4 controller to work on my machine and my computer. Then I found a post about a program that I downloaded and it made the controller work on my computer and my machine as well.
I used to use AutoCad to write programs back many years ago, and then got away from that program because I stopped working at that company that used it. So, then I had to start writing my own programs from scratch. Not too hard to do, just need to remember every code needed to operate the machines. It also helps when I would write a base program that had all the fundamental program parts to it for certain functions and then would just copy and paste the parts into a new program and alter as needed.
Eli, thank you for your detailed replies! I really appreciate them.
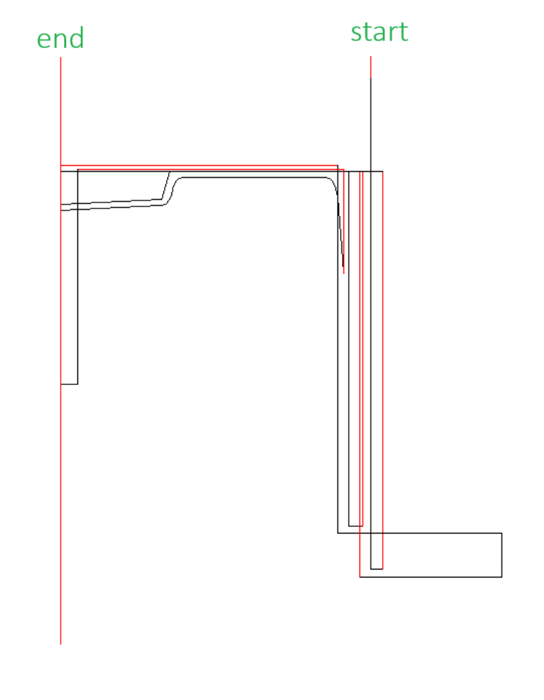
For my 2D CAD, I use a program called VersaCAD (first used DOS version in 1989 and currently using VCAD2004 for Windows). Many years ago I wrote a macro to convert hand-drawn lathe toolpaths to gcode. Red lines are rapids and black lines are cutting moves. An example is
[edit: that lathe had manual spindle control–it was a CNC-converted Feeler 2d-op) so no M3/M5 commands.]
I’m between lathes now, so I actually haven’t used it for several years, but when I have my Taig ballscrew CNC lathe up and running I will be using it again.
I also wrote a corresponding macro for 2.5D milling (mostly for facing odd shapes, cutting out blanks, etc.) that uses the same conventions, except there the rapid moves have a retract and re-engage move. I used that with my Nomad.