Hello, I am absolutely new when it comes to CNC and have only run a few basic projects on my Shapeoko since purchase. For a while things were O.K. until just very recently. One of the pieces I was working with came loose and the router got off path was stuck and started burning the wood a bit before I could hit pause. I think this has caused an issue because since then I’ve had problems with the machine not starting at the proper depth. I have a bit setter in place and everything seems to start correctly but the first cut attempts are well above the wood. I’m wondering if the Z axis is now off alignment. I’m sorry I haven’t quite got the hang of this yet so maybe I’m doing something wrong but as I said the first few projects went pretty well until the one that didn’t. Any assistance or suggestions would be appreciated.
Check the Z-axis and lead screw — are they in good shape?
Is the endmill still in good shape and clean and sharp?
Let us know what you find out at support@carbide3d.com and we’ll do our best to sort this out with you.
Might even be helpful to know if it is a older shapeoko or a pro, and what type of z carriage is being used…
Being as this is posted in the “Shapeoko” thread and not the “Pro” thread makes me ask this.
Sam,
Will and the Carbide3D team can fill in the actually steps and terminology, pictures would be great. I have gotten super, and rapid, support from the Carbide3D team. I am at the den, not at the Shapeoko so I am operating from memory- which is fault.
First, getting pretty basic here, ensure that the bit is tight in the router. There is a difference between router bits and end mills. Router bits are not designed to plunge according to my research, end mills are. Ramping entries ease the stress either way.
I am using the Carbide3D probe and that is the steps I think I have down pretty well. I screwed them up once during my training sessions with the San Diego Fine Woodworkers and made a crib sheet until it became habit.
I look at the image presented in the Set Zero process every time now to ensure that Carbide Motion and I are in agreement. For the initial setting, usually setting X, Y, and Z, the lip overhangs the material. For follow-on paths and for setting Z only the block is normally on the top surface of the material.
When the X, Y, and Z have been found by the probe the settings will read something like 1, 1.5 1.5 as the router has been retracted for the first time. Clicking on “Set Zero” (operating from memory here) at this point is the right option for my machine using the probe.
The next screen asks me something about setting zero and the answer is simply “Done” or the zeros get set to the position of the tool at the moment.
If starting with a V-Bit, I need to set X, Y, and Z with an end mill first, then, without any paths cut, set Z (only) for the V-Bit as the probe cannot set X, Y, and Z with a V-Bit to my knowledge.
Just me, I have learned to check those images provided every time.
Keep us updated.
Kind of associated, I squared up / zeroed my Shapeoko XXL a while back, mounted on a pretty firm stand. I check its alignment yesterday because it had been moved across the workshop. Now it is partially over the slope of the concrete out the door. And it was off. After releveling the foot pads, realigned the XXL. Now I marked the shop floor where the XXL will sit as a reference.
Thanks,
Rex
Now I see the use of the 
I definitely should have provided more details. my apologies. I have a Shapeoko 3 with Z plus. I am using an endmill and not a router bit. Since the incident I did make sure that everything was set properly and that all bolts etc had been retightened. I did notice that the plate that holds the spindle mount had come loose a little from the Z axis plate but tightened those bolts down as well. I have the Carbide spindle as well. I follow all instructions on resetting to zero when starting a new project so if I reset to zero which tells the Shapeoko where the work piece begins and then before the start it uses the bit setter to find out where the end mill begins then why would it not know where to begin its first pass at cutting into the wood? I checked level on everything after the incident but I will verify again. I built a rather sturdy stand for my Shapeoko so I hope that isn’t the issue. Besides if leveling were a problem wouldn’t it be going further into the wood at one point and be farther away at another? In my case it hovers above the piece evenly at all points until it makes its final pass and then it is just slightly embedded in the wood. I should say that I’m also working with a rather thin piece of wood in this instance, 1/8" baltic birch plywood and using a 1/16" spiral downcut end mill. I’m trying to completely cut out pieces of the wood for later assembly.
When there is a high-stress event applied to the endmill sometimes the collet can lose effectiveness, becoming less able to ‘grip’ the endmill.
Does the endmill slide more freely in the collet than before (when outside of the nut assembly)? This may be worth looking into once other avenues have been exhausted. (I would just buy the replacement collet set from Carbide 3d and replace it to see if the issue is solved, good to have spare on hand anyways.)…
Could you clarify your process for setting the zero in more detail, just to remove that from the list of possible issues?
Also, the v-wheels for the z-carriage are on the track, correct? With the eccentric nuts turned/tightened enough for the wheels to be just barely able to spin by hand?
Pics from different angles would definitely help…
I go to Jog in Carbide Motion, position the machine so the the tip of the end mill is just touching the work piece at the start point (I have been starting my work in the center of the piece) and then zeroing out the settings. Again I apologize if I’m not using all the correct terminology.
The end mill seems to be set well in the collet. I can’t say whether it slides more freely as all end mills seem to slide within the collets until they are mounted, to me at least.
Yes everything still seems to be on track. I checked to see if the wheels are spinning but they seem to be just as tight as they were when I first set up the machine. For the most part it seems as everything is moving as it should, no major issues or weird noises, no slipping. It’s just that when it goes to start the process the tip of the end mill is just above the wood.
Sounds good!
Do you ever replace the bit without a prompt in Carbide Motion telling you to do so?
Yes. So far with all my projects I have had the proper bit installed before even starting. I have only done a few simple projects, nothing that requires bit changes during the process. When the project begins and I am prompted to change/install the correct bit I simply hit Resume. The machine moves to the bit setter and checks depth as usual before the prompt to turn on the router/spindle.
Lol. I guess no one has been able to figure out what is going wrong. I have seen a lot of other posts recently where people are experiencing depth issues. I’m pretty sure I have the same thing and that perhaps the traumatic event wasn’t really the issue at all. Some folks have bit zero in addition to the bit setter but I only have a bit setter. I don’t know how this keeps happening. I have sent tech support a request but have not heard back as of yet.
When you get that problem, how high above the surface does the endmill hover? (while you expect it
to be cutting the first layer)
If you do single tool jobs for now, you could temporarily disable the BitSetter in CM settings, and see if you still have the issues. The answer would help troubleshooting the issue
I’d say it starts about 1/4" above the piece, most likely a little less but I haven’t measured it. I will try disabling the bit setter but I had already run a few projects before up to and including the mishap using the bit setter and everything was working fine. The incident had nothing to do with a depth setting, the piece wasn’t secured properly.
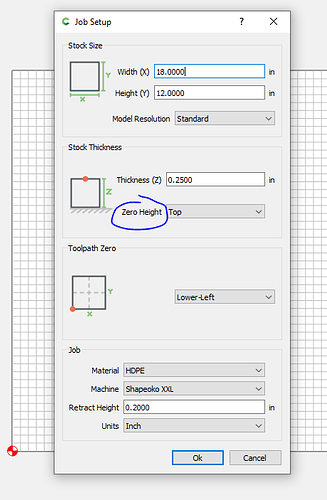
You mentioned your panels are pretty thin and the Z-offset is also small - this makes me wonder about your zero setting in your design file. If using Carbide Create check Zero Height to make sure you are actually touching off the same point when manually zeroing on the stock. So if you choose Top like I did, you’ll touch off the top of your stock. If you choose Bottom, you would touch off your wasteboard.
Even with a lot of jobs under my belt I got burned by this today when my setting was flipped for a previous job - fortunately this just led to an air cut!
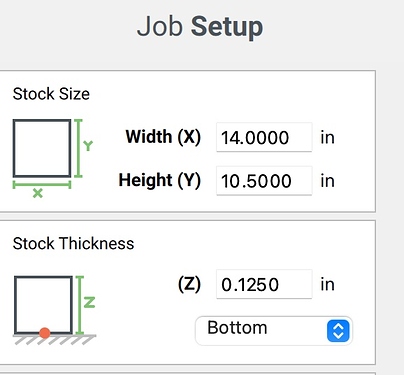
Unbelievable! That was my issue. I have to say that my layout looks a little different in that section for Stock Thickness it shows the measurement entry field and then the drop down underneath just has the selection for Top or Bottom. It does not say “Zero Height” like yours does. Here is a screenshot.
I’m not even sure I would have known exactly what that selection would have meant without the proper context. I had always just left it as is with the other, more successful projects I had run up until this one. It must have been accidentally changed for this project.
I really appreciate your help! I’m going to give it another go and hope that everything works out O.K.
Great! Glad it was a simple fix.

