I did the stupidest thing today. And as much as I like to share successful projects, I figured it’s only fair to also share utter disasters that I have only myself to blame for.
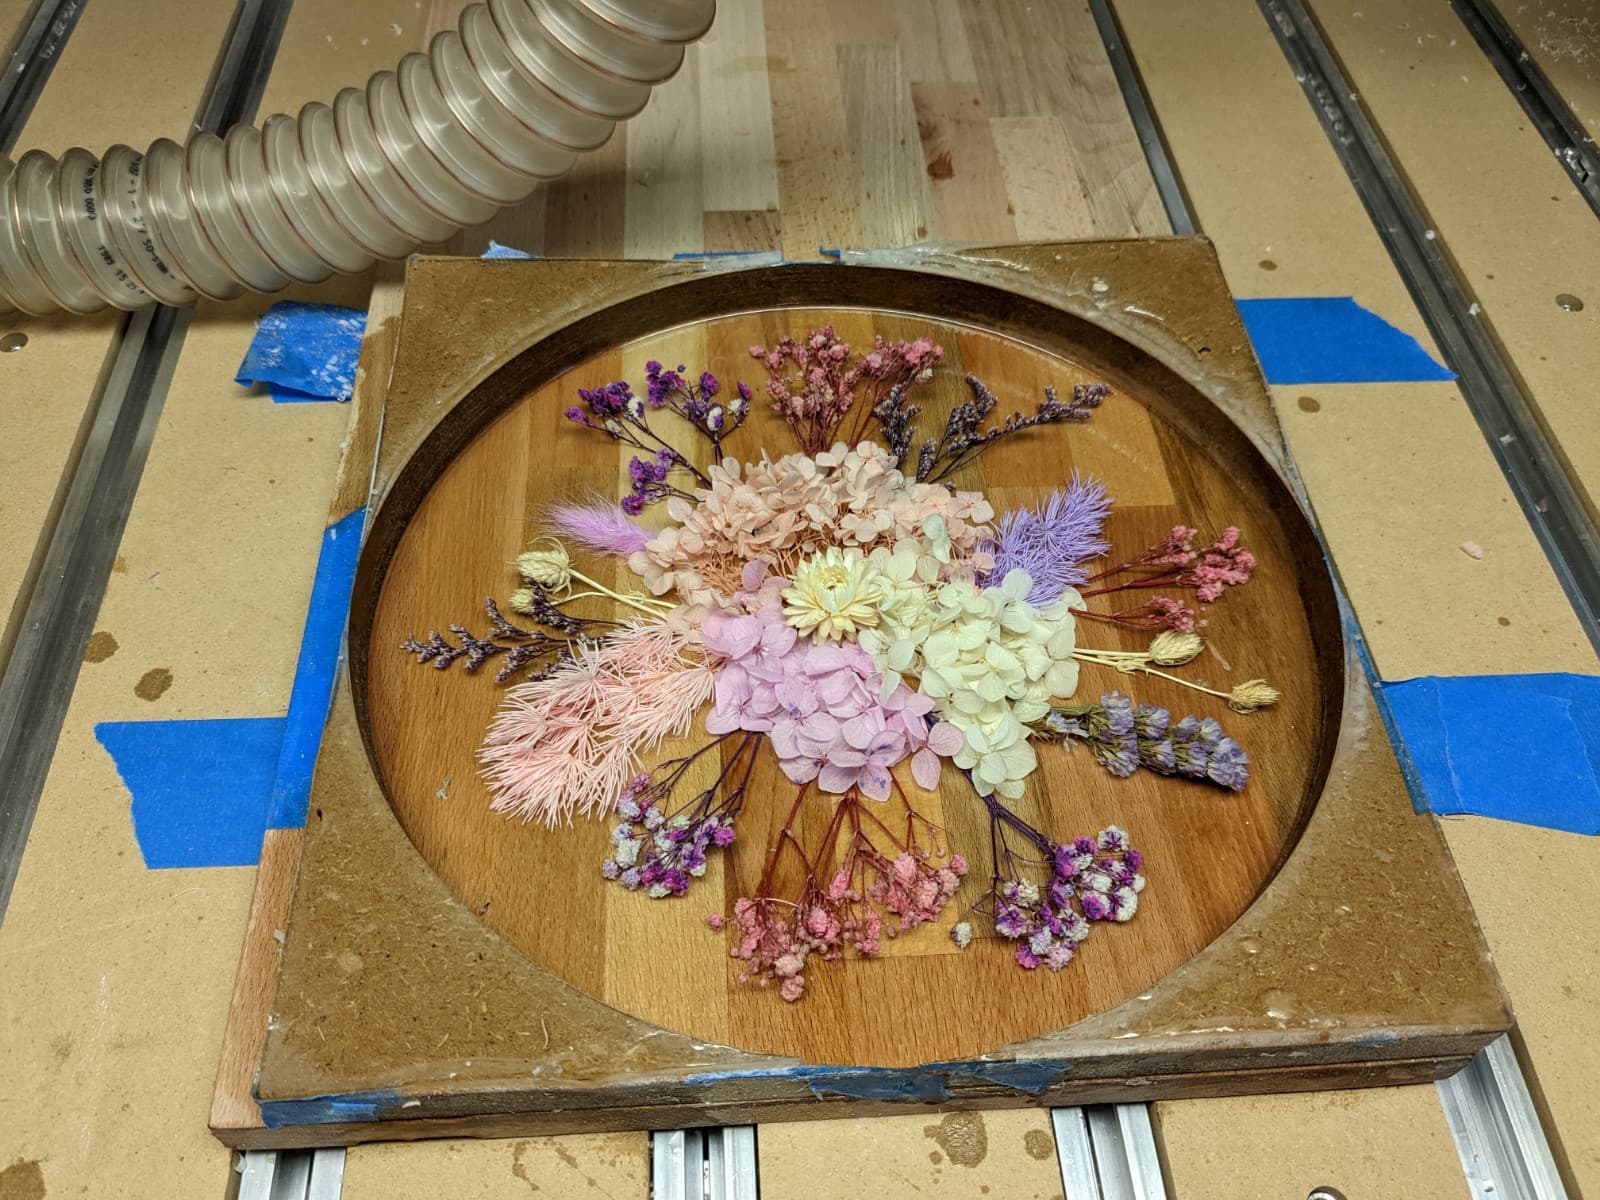
So I was doing a decorative piece for my wife, which has a wood backing and was supposed to have a top layer made of clear epoxy, containing some artificial flowers. I milled a round fence, applied a layer of epoxy to seal the wood/fence, let it cure, then laid out the flowers. It was all good at that point.
I then slowly poured the epoxy into the “mold”, and initially it looked great. Small bubbles would appear now and then, I would pop them away with a torch as I always do, every 5 minutes or so.
And then…I turned my back on the piece for a couple of minutes, and when I looked again to check for new bubbles to pop, the whole thing was borderline boiling and there was a lot of smoke (!) coming off the epoxy (those fumes are nasty, so I rushed to open the window, and get some fresh air)
I took the whole piece outside and let it settle down, and ended up with this bubbly mess and epoxy that cured almost instantly, cracking wide open in the process.
And then…I remembered. Not all epoxies are born equal, and most of them have a specified maximum pour depth limit, and there is a very good reason for that, as I just found out. I had poured close more than 0.5" in one go, which is just plain stupid, because the natural exothermic reaction went crazy due to the large volume of epoxy self-heating. I don’t usually do any deep pours, so I had somehow forgotten/overlooked that effect. LESSON LEARNED (the hard way). I’m happy I did not leave the piece unattended either, because this could have gone south really fast.
Kinda crazy it got so hot it discolored the fake flowers as well. I have never done this with epoxy but I have done similar using too much hardener in fiberglass resin in a red dixy cup. It got crazy hot and cracked and popped shooting chunks out.
I recently posted about an epoxy river table I am building. I used Magic Resin brand and had emailed the customer service about whether to pour in two sessions or all at once. The particular product I used was rated for a 2" pour. The customer service suggested I do it in two pours so I did. They warned that the biggest potential for disaster was in the mixing bucket because the mass of all the epoxy could over heat. Well I mixed the epoxy in a 5 gallon bucket and the epoxy from Magic Resin never even got warm. I waited a couple of hours and mixed and poured the second pour and that never got even warm. As time passed I kept checking and no temperature rise. I was also mixing the epoxy to stir up the color because many colorants fall to the bottom of the mold. By the time the slow set epoxy was jelly like I stirred it one last time and the color came out perfect. I slightly overfilled because there other small cracks on the board I wanted to fill and many epoxies tend to shrink a little when dry. By Tuesday next week I should be able to surface the table top. The Magic Resin takes a couple of days to harden and a week to cure completely.
I have used MAS table epoxy which is rated for no more than 1/4" deep pour. The first time I used it I used a Solo disposable 16 oz cup. I mixed about half of the cup with resin and hardner and color and starting mixing with a little drill mounted paddle. The cup started distorting. I was through mixing and quickly poured the epoxy with no issue on the project. I was surprised how hot the mixing cup got.
I have also used JB Weld 5 minute epoxy and mixed in a cup that got very hot as well. That cup was a silicone mixing cup made for epoxy so no distortion.
The shop temperature also effects the epoxy reaction. Obviously when it is hotter the epoxy gets hotter faster. So as Julien found out all ways read the instructions and understand them. If you have a question email the manufacturer to clarify the instructions. It never hurts to ask questions.
One last observation about the Magic Resin is there were very few air bubbles. When I initially mixed this slow setting epoxy I let it sit for 10 minutes and used a heat gun on the epoxy in the 5 gallon bucket. I did go over the epoxy in the mold a few times with the heat gun but there were very few bubbles to have to pop. On the second pour the part that ran over the top of the board had a few air bubbles and they popped with the heat gun. Unfortunately with other epoxies I have used a bubble erupted to the surface too late to smooth it out and I had to decide to try and fill it or just let it go.
Yep, been there done that, hopefully not doing it again.
My mistake was a sloppy one, I had everything set up for a resin infusion part, a large one too and was ready to mix the epoxy.
In error I grabbed the wrong hardener, my mind was preoccupied figuring out if I had forgotten anything in the material stack.
I poured the resin and hardener to the correct weight, started stirring with my drill, transferred the mixed resin to another bucket, put the resin bucket into the degassing chamber and started the degassing process.
I stood watching the degassing wondering over the amount of air that was in this mix
As soon as the fumes started bellowing out of the vacuum pump I knew what I had done
I have watched a lot of videos on youtube and some use a pressure pot and some use a vacuum pot. Do you only use vacuum or do you pressure sometimes. I have seen a lot of videos about converting a pressure paint pot to a vacuum pot. What is the deal on vacuum vs pressure?
For degassing I use a vacuum pot, loose lid with gasket that seals when vacuum is pulled. I find it easier to work with, no twisting the lid on or off, no clamps or hasps to fumble with.
Typically, you use vacuum on mixed epoxy before pouring (causes all bubbles to expand, and therefore rise to the surface better), and pressure once poured (crushes bubble down in size, AND forces the epoxy into the material rather than letting air escape the material).
If the material / mould can-not trap air (for example, a silicone mould), then you can pour and use vacuum, instead of using vacuum on the mixing container.
Magic Resin is a good product at a good price point. We use it for our lake maps.
Brushing on a sealing coat with regular epoxy first can also help with bubbles in porous wood, and more importantly for us, help with bleeding as the tinted epoxy can be soaked into the grain if not sealed. It’s tedious but an important step, and we don’t do it with a spray poly since we want a really good bond to the wood.
That said, otherwise, with 3 days to initial cure for the 2" pour product, we’ve never had issues with bubbles.
I am quite pleased with the Magic Resin 2" pour. The air bubbles were minimal compared to other types of epoxy I have used. It has been a week today so tomorrow I will surface off the epoxy on the table top and if I get very industrious I will start on the turning of the votive candle. My goal is to get the table ready by Tuesday next week to take to Houston for Thanksgiving dinner at my grandson’s house. The weather has turned cold (for us) and I am running a heater in the shop so I can do the finishing. Poly is not that sensitive to the cooler weather and the heated shop. Everything just takes time and I dont have that much time so I must get cracking.
Things we learned in our Plastics Lab while working in a larger Corp. organization.
With ANY epoxy pour, small, medium, large or humongous - put your PATIENCE hat on before you begin any of the Process. Weird things can always happen so PREPARE EVERYTHING before hand and even Walk Through The Entire Process before you actually start mixing.
You want a very slow curing, long work time, premier epoxy and mixed EXACTLY per directions whether by weight or volume.
Also, with such a complicated pour over a flower arrangement you should perform a vacuum on the item as there will be lots of very small air bubbles - underneath the flowers, stems, and leaves.
IF thinning is practical and do-able with your brand of epoxy then you might also consider that.
Recommended for any pour would be a vacuum on the MIXED epoxy and a vacuum over the whole project AFTER the pour before it starts to set.
IF every thing comes out O.K. give the job the FULL CURING TIME - PLUS!
Post Process whatever needs done. Stand back and admire your job!