QUIET air blast setup?

Look at you guys spendin all this money on air blast setups!

All you gotta do is run your machines upside down and chip clearance problems become a thing of the past! Inverted vertical machining centers are the future! :upside_down_face: :upside_down_face: :upside_down_face: :upside_down_face:

I 100% meant this as a joke but I bet you actually could run a Nomad upside down and this joking comment would actually work perfectly.

3 Likes

I like the way you think, but clamping material down would probably not be fun. Now if you could dream up an inversion table for your Shapeoko, you might be onto something!

Dan

1 Like

Something like this?

1 Like

It’s an interesting thought experiment, but chips raining down(up?) onto the spindle bearings, moving parts, etc sounds less fun. Perhaps sideways is better???

2 Likes

It is very common to have a slant setup on lathes and horizontal milling centers. Similiar pros/cons

1 Like

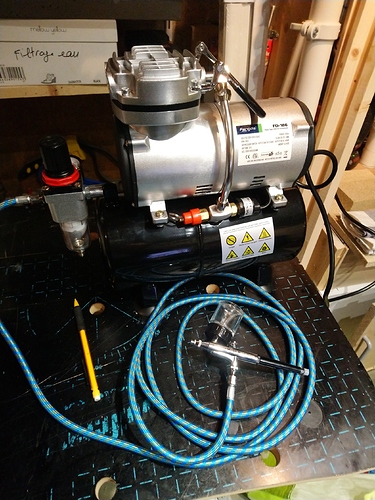
Quick update: I finally unpacked the airbrush compressor and gave it a go.

(pencil for scale)

With nothing connected at the end of the hose, the air flow is unusable. But I went back and re-read this thread, and took @BartK advice to use an actual airbrush (and in my case its 0.5mm nozzle), and it gives me a steady jet of air, that while not incredibly powerful should be enough for medium-intensity metal cutting jobs.The good news is that the compressor sustains this steady flow (at around 1.75bar) nicely, it does heat-up a bit over time so as others have mentioned I will probably install a fan over it in my final setup.

I now need to design a piece to attach the airbrush head to the spindle mount, and then proceed with some test cuts.
7 Likes

Julien, if this fails or is not meeting your needs, I was thinking that when I decide that I need an air blast for long periods of time, I would consider a Centrifugal Brushless Cooling Fan like this where I would 3D print a funnel type adaptor to push the air through a tube. I saw a YT video where someone made a fan similar to this and was able to use it as a leaf blower to move sawdust on the shop floor at high velocity. You can also add a speed control for the fan to modulate the airstream. The 50X50mm fan noise level is below 25db and produces 15 to 30CFM, probably more than one needs to move chips. As a bonus, placing the fan above the router (for those of us who do not yet have a water-cooled spindle, could also act as a cooling fan for the router.

3 Likes

Interesting idea. I had a look at the “air pressure versus air flow” curves for these fans, unsurprisingly the CFM drops to almost nothing when pressure raises, so I guess one would have to keep a large enough 3D-printed duct. Or not duct at all, just aim the fan output at the endmill and see what happens. At a few bucks a piece, it’s worth trying anyway, so I ordered a similar one and will test that whenever it arrives. If somehow a 2.5$ dollar setup worked well enough, then so be it !
And if it fails, I can still use it as a cooling fan for my air brush compressor :slight_smile:

5 Likes

I’m not quite there yet, but my airbrush-based air blast setup is slowly taking shape. I shamelessly copied @BartK’s excellent idea to use the airbrush itself as the air nozzle, since this is what grants the best airflow/pressure result (I used the 0.3mm nozzle), and it generates a very focused air flow which is good too.

I ended up hacking the locline from my previous (cheap) mister, and I am not using the air hose inside it anymore, I just use it for holding and orienting the airbrush. The diameter of the rear (removed) part of the airbrush happened to be the same 1/4G as the locline.

To hold the locline to the frame, I printed a small block with three screws and one 1/4G threaded hole on the side. Oh my, the satisfaction of just selecting “Hole => tap => BSP pipe threads => 1/4G” in Fusion360 menu, 3D printing the piece with no special care, and screwing that locline in with a perfect fit on first try…priceless.

I have not removed the little paint bottle/tank yet, I want to figure out if this could somehow be used with a water/alcohol mix inside to use more than just air.

In the meantime, the fan arrived so I have some Fusion360 fun ahead of me to design a duct for this, to explore @luc.onthego’s recommendation:

5 Likes

I tried to find the original video without success but from memory, the nozzle was going straight from the fan to a 1/2in or so diameter. Maybe you can go to 1/4in and cut back if needed as it may restrict the flow too much for the fan but it is easier to cut a bit if you need a larger diameter than to add material after the fact.

2 Likes

@Julien looks very similar to my previous setup that was working flawlessly. You could certainly use the small water jar/tank but you’ll find yourself needing to refill it too often. I just used (believe it was 4mm ID hose) rubber hose to extended it and now I can cut for hours with worrying about it.

2 Likes

@Julien What in the world is this black housing you have around your spindle? Is it your Spindle Mount? I’m using the HD 80mm Spindle Mount from Cabide. Also, what is the little clear reservoir that you got attached to your air mist?

@ispot the black part is the 3D-printed frame I designed around the HDZ & spindle, so that I can attach things to the front, while still maximising the X travel on my SO3:

image

(details here)

I am also using the HDZ 80mm spindle mount. The reservoir came with the airbrush, you normally fill it with paint, for short cuts I may use it with a mix of alcohol and water for lubrication. As @BartK mentioned I will probably remove it eventually and plug a dedicated tube to a remote coolant tank instead.

4 Likes

@Julien That is awesome. May I ask you if you can share the file for the frame? I’m using the exact same setup as you, HDZ and 3KW spindle. I think that frame will allow me to attach a USB camera.

Sure, here it is:
HDZ_attachment_gen2_cleanup v2.zip (939.3 KB)
(just rename from .zip to .f3d and import in Fusion360)

A few notes :

  • I sized the various pieces by taking various measurements on my machine. Even though you also have an HDZ and 80mm spindle, I cannot guarantee that the pieces would fit perfectly on your machine.
  • in the file, the modeled pieces are OK but the fusion design history/timeline is a mess, I went through many iterations and butchered parts of it. It’s not going to be easy in case you have to modify anything.
  • most captive hex nuts are M5. The two that go in the back of the bottom piece are M4, because M4 bolts happened to be better to tighten that bottom piece against the back of the HDZ. It’s kind of a hack, these two M4 screws come and push in the back of the HDZ plate, in the exact spot where two hex screws (holding the “foot” of the HDZ ballscrew) are located, so that the tip of the M4 screw self-centers in the HDZ screw heads. Well it’s not easy to explain, but you’ll see what I mean if you print this.
  • I think I printed them at 20% infill. It should not matter much.
3 Likes

I sincerely appreciate it, thank you, thank you. You probably saved me lot’s of hours of work. I already opened it on Inventor. I use Inventor 2019, much better than Fusion 360. I use to be an instructor for Autodesk teaching 3d max, about 16 years ago.
I already opened the project. How long did it take you to do this?

I honestly have no idea…an hour here, an hour there over a few weeks, and since I’m learning Fusion360 as I go, I often diverge to check things/learn new tricks on the way. It’s also very iterative (design a part, 3D-print it, realize I messed up a dimension somewhere, go back to design, rinse and repeat). I’m at that awkard learning stage where I can probably rush this piece in a couple of hours now, but need to resist that urge, to take the time to create sketches and operations the RIGHT way so that the design is acutally modifiable later (i.e. really parametric) without everything breaking, which is harder than I anticipated.

3 Likes

Quick update to report that I’m quite happy with the airbrush solution so far. The focused air flow is strong enough to clear chips almost perfectly in cuts like this one:

I did not use coolant though, to avoid sticky chips in the pockets. I’ll try this scenario later.

In other news, I really need a chip guard. I’ll design something because these tiny critters jump all over the place (one more indication that the air blast is not that weak :slight_smile: )

5 Likes

Looks really good. Did you add cooling fans to the compressor? I’ve been running mine for hours without cooling and while it gets uncomfortably hot, it still hasn’t given up hehe. One thing I was looking into is adding relay to turn the mister on and off, however I’m using post processor that’s been suggested by mrbeaver long time ago and despite coolant being selected in the F360 I don’t see that command in the code. I’ll have to try to figure it out once I have some extra time on my hands.

2 Likes

I did not add any cooling fan on the compressor yet, I am using that long job (in progress) to monitor how hot it gets. So far after about an hour on and off it’s hot but I can still put my fingers on it, so I’ll proceed like this and consider adding a fan later.

Fusion360: I only swear by @neilferreri’s post now, it has lots of user-defined parameters, I have not actually tested if coolant option is managed correctly, but I do see coolant-related lines in the file, so you may want to give it a try.

3 Likes