Still relatively new…Here is file with a pocketing operation at the top. Using 1/16 seems to get better detail but takes along time. I started with 1/8 but concerned with detail. Any thoughts?
Wisper Louise v3.c2d (592 KB)
i know i could change the font but trying to match to original. And my board size is fixed.
I’d go back to the 1/8" & set the depth per cut to 0.095. Instead of 10 levels at 0.020, you will have 3 levels at 0.095, 0.190, and 0.200 (The last taking only 0.010 for a finish cut).
As long as you have enabled the clearing bit, the vee bit will clear out the corners that the end mill couldn’t get to. So you’re not sacrificing any detail either way.
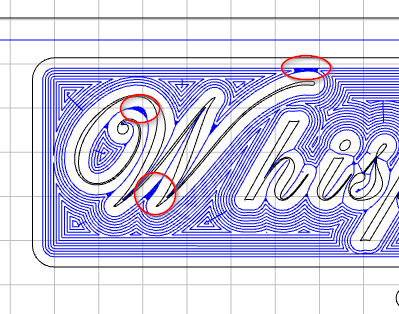
When you zoom out, the darker blue areas are where the vee-bit is doing the clearing.
3 Likes
thanks, will give it a go. down to 40 minutes. cutting cherry.
If 0.095 is too aggressive for cherry, try your 0.200/3 = 0.066, round down to 0.060 so it will make 3 passes at 0.060, and the last pass at 0.020, or maybe 0.063 so your last pass is about 0.011.
1 Like
took your fist suggestion and everything worked. really like the outcome. thanks.
2 Likes
another question…what is you experience working with oak? we have a small woodworking operation building tables, bookcases, etc…alot of live edge. have alot of cherry, ash, maple, walnut and oak. I have another CNC project and was thinking about using oak.
Oak is a little more splintery due to its more open grain. Do some experimenting on small pieces to see if you can get what you want.
For Oak… What ^Cullen^ said!
I like to, if the process allows, seal the wood really well before cutting. This binds the fibers in the grain together & prevents a lot of tear-out & splintering. I like a good lacquer based sealer as I can thin it out & it really gets down into the grain. As many coats as it takes to start filling in the surface grain.
A flood coat of epoxy would probably work really well.
Down cut bits also help for surface work & shallow cuts. Deeper pockets the downcut bit will push the chips down & cause burning.
3 Likes
I like to avoid Oak. This solves all the above mentioned issues. ![]()
3 Likes
Having said all that, I volunteered to make some signs for a local Boy Scout camp. Somehow they morphed that into having me make 20+ award plaques for a large camping event coming up at the end of Jan.
I don’t want to use my stash of walnut and maple. My local lowes really only carries red oak, poplar and pine so I am thinking about using red oak. The plaques will really just be flat with images and words thinly vcarved and then filled with black epoxy. I don’t really have time with that many to do much else given my day job.
I am replicating the patch for their event on the plaque and adding some words.
This is a simulation from Vcarve Desktop

I tried a sample cut in red oak over the weekend to see how some of the elements would work. Of course they liked the more detailed eagle which takes 50% of the time. Here I used black CA rather than epoxy just so I could get it dried and sanded more quickly.

I have not worked with poplar much but if they planned to stain them I know it just doesn’t look too nice.
Any thoughts are appreciated.
I’ve used oak with success. Bleeding is going to be the main issue for oak, poplar and pine. (Probably in that order of best outcome to worst). Maple would be my go to for this type of project.
I know cost is often an issue. The comparison of wood shop maple versus big box oak might be closer than you think. The suppliers and area of the country will have a huge effect on those final numbers.
1 Like
Not a lot of decent wood shops around here with a good hardwood selection. I have some maple but I am donating my time, not my wood ![]()
I didn’t take the time to put shellac or anything on that test piece but will pretreat the real ones with something.
Still conferring with the guys that want them done. Maybe they will have a better wood supply.
2 Likes
Well, the Boyscout camp provided the wood. I think it is white oak, but could be red. Unfortunately they “helped” by cutting all the pieces, but not very straight so I had to clean them all up and lost some size. Finished size was 5x7.75.
I had a busy weekend making 26 of these. Complete with a slight chamfer and keyhole slots on the back. They are coated in Danish Oil. I am not sure if will topcoat them or not.
Since it is oak and the graphics are detailed and small I lost some pieces here or there like the stars in the crest on the eagle. I originally planned to fill with epoxy and flatten but the “customer” liked the carved look instead.
The tent with the boy and dog is the logo for the event. They are giving patches to all the participants with that design. The pine trees are the logo for the camp.
The random dark spots on some are worm holes. Some had quite a few. Not ideal but since the wood came from the camp it tells a story.
To save time changing bits I cut the design in all of them, changed and cut the chamfer,
Changed and cut the keyholes.

Closeup

I still need to add my brand to the back in the hopes of getting a paying job.
5 Likes
Well seeing how the Scouts supplied the wood for your project, that works out for you.
Check your area for wholesale lumber/building supply distributors. Or talk with your local custom cabinet shops. I’ve had great luck getting their off cuts & occasionally buying from them. Hope that helps you out.
1 Like
I have plenty of wood, I just didn’t want to use it for a free project. I have been meaning to stop buy a couple of the local lumber suppliers to see if they have offcuts. Also planning to reach out a a local sign shop. I am figuring they would have some material that is scrap to them but gold to me.
The whole set is done now with 3 coats of shellac. He picked them up today and is happy.
This topic was automatically closed 30 days after the last reply. New replies are no longer allowed.