Reminder to measure your stock and emergency stop question

After eventually finishing my first wasteboard, I turned my attention to building a fence for it. Myers fence project needed a 31" by 4" mdf for it and found just the piece I needed. It was scrap from a recent assembly table build and was a nice 48" by 7". Cut it down to 31" and set it up for a fence cut.
Halfway through the cut I discovered the problem when the fence completely broke free of the stock even though it had tabs configured. After eventually figuring out how to stop my Shapeoko… it didn’t take me long to figure out what had happened. Sadly the stock was 5/8" thick rather than the 3/4" thickness that the Myers project file was configured for.

Now… onto my question… I’m interested in knowing what others do in an emergency stop situation. Do you have an emergency stop button setup, turn off router, etc…

I just use the power switch on the surge protector the machine and router and vacuum are plugged into as an E-stop.

Regretting not picking up a power strip which had an E-stop switch back when they were available, and keep thinking I should take the time to wire up something properly.

1 Like

I built an Estop and switch box and attached it to one leg of the table on which my shapeoko sits


The Estop cuts everything.

4 Likes

I have a feed hold switch and have parking enabled in my firmware. If something like that happens, I press the switch, the router lifts and I shut it off. If all is good, I hit the resume button. I use it frequently for all sorts of reasons.
For a true emergency like a fire or a router falling out of the mount or something, you need to cut power…however you can do that fastest. I’ve yet to have an “emergency”, but I’ve had to scrap lots of stock.

1 Like

I have a big red mushroom switch on the wall behind the table. Hitting that kills the router power via an IOT Relay connected through the normally-closed terminals of the switch, and it also triggers feed hold (Carbide Motion pauses with a “Door Open” message) via the controller’s FEED_HOLD pins connected to the normally-open terminals of the switch.

I also have a big red paddle switch (like you’d see on, say, a Bosch router table) right where I stand. Slamming that immediately kills all power to everything.

If I saw my tabs failing or that I was about to mill a clamp or whatever, I can hit the first button, handle the situation, release the button, and resume. On the other hand, for an actually dangerous situation, the big paddle switch physically disconnects all power immediately, as in an actual emergency, the job does not enter the equation.

I also just use the power switch on the surge protector. It ends up shutting off power to the router and the shapeoko.

I would be nice to have one of those big red buttons, but that’s a project for another day.

1 Like

One of the projects I will eventually get to is a control box. Right now I also just position the power strip close by so I can kill power to everything. But I’m planning a control box with a keyed master switch, individual switches for Shapeoko, Router, and master laser power (Endurance 10W attached to the router mount). I’ll have soft switches for Feed Hold, dust collection, jogging, and a few other functions. The dust collection soft switch will actually trigger my home automation system to turn on the dust collector, and open the appropriate blast gate.

Sadly, I haven’t had time to do much other than sketch out a rough design, and do some proof of concept testing on the automation side, which includes manufacturing a bolt-on to my Rockler manual blast gates with WiFi servo control. It’s all fun stuff, but I found a more fun project (i.e. potentially profitable) that has taken all my spare time.

Thank you all for the feedback. A mushroom switch would be rather convenient and sounds ideal.
Has anyone wired one of those into the pause function? Seems to me the best way to deal with a failure is to simply pause the gcode and maybe even code it to raise the spindle 10mm or something.
I’ve also seen a project which wires in the default spindle control into the shapeoko’s board. Not sure i’m brave enough for that yet, but pausing execution, stopping the spindle, then raising 10mm sounds like the best solution.

1 Like

The soft stop / pause aren’t intended for emergencies — if there’s trouble, please kill all power — endmills and materials and even the machine aren’t as important as safety.

1 Like

What he said. A pause button is fine, but the big red killswitch shall remove all power, bar none.

1 Like

Guess it’d depend on your definition of an emergency. I wasn’t even thinking of the human-emergency situation, but you are correct… cutting all power is definitely ideal in this situation.
I was thinking of stock breaking loose or going off expected course (ruining stock), etc.
So when designing something, two layers of “emergency” situations need to be accounted for.

1 Like

That’s a “feed hold” situation.

1 Like

DON’T (only) PANIC! – The Case for Two Buttons

Having two levels of handling off-nominal situations is something I strongly support. Let me see if I can explain it well enough once and for all.

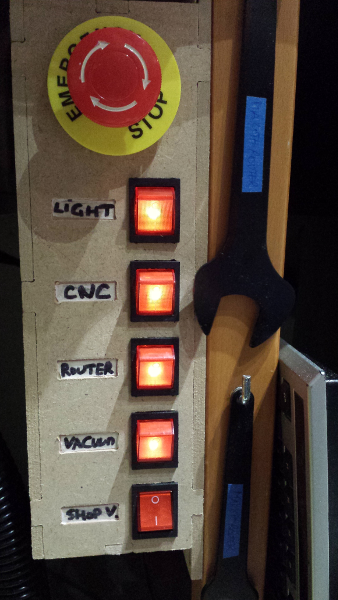
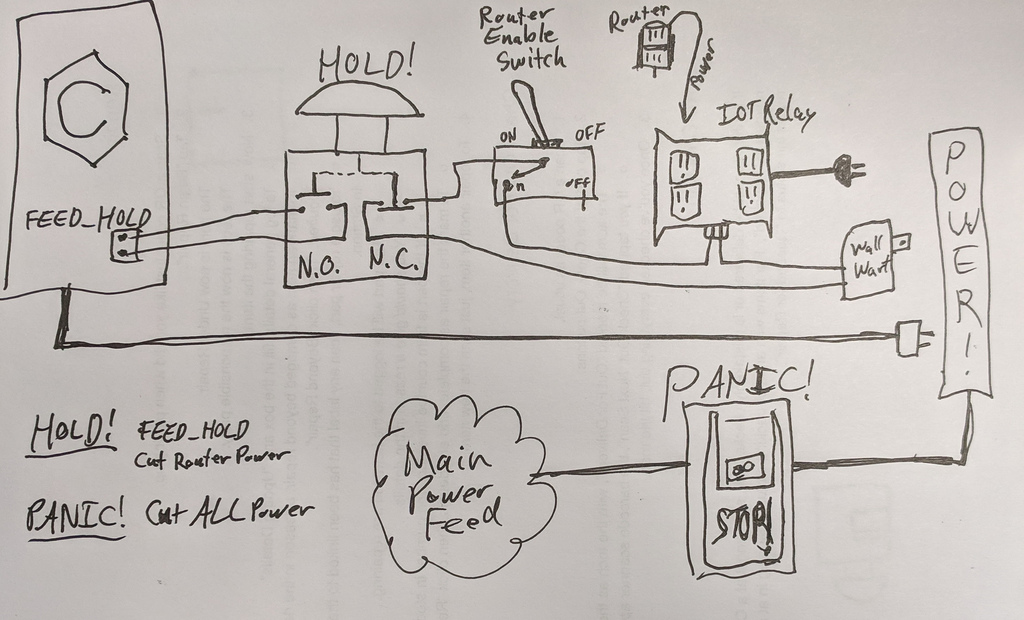
It’s plainly obvious that you MUST have a way of killing everything NOW! in an emergency. Nobody sane (and few even among the rest) would argue against that. That can be a convenient plug you can yank out of the wall, a big switch that physically cuts the power to the whole kit and kaboodle, or whatever. Invoking this option means the job is likely lost, but that’s as utterly irrelevant as worrying about the hassle of repacking your reserve chute when you’re falling to the ground under a fouled main. Let’s nickname this the “PANIC!” button.

What’s less obvious is that you SHOULD have another level of responding to situations that are not an emergency but still require urgent action. This is not instead of a “kill switch”, obviously, which seems all too often lost in the discussion. This is in addition to your emergency shutoff that kills everything. This option will pause everything, allowing you to deal with an impending situation and then continue. We’ll nickname this the “HOLD!” button.

In a way, the “HOLD!” option is universally acknowledged, as I’ve never seen a g-code sender without a pause button in the UI. That pause button is obviously for calling a hold in non-emergency situations, but it’s simply not effective in urgent, rapidly-developing (but non-emergency) situations. If it’s a button you have to click with a mouse, you most certainly cannot depend on that ability in an urgent (but non-emergency) situation, and while a keyboard shortcut is better (where supported by the UI, i.e. not Carbide Motion), if your hand isn’t on the keyboard, it’s still not a great option.

Where this comes into play from a safety perspective is in the space between noticing an impending issue and that issue turning into a true emergency. Without a “HOLD!” button, your options boil down to:

  1. Hit the “PANIC!” button.
  2. Attempt to get the job paused.

There is a strong disincentive to the first option, as the situation is not (yet) a true emergency. Nobody wants to blow up a job unnecessarily, and the second-guessing that follows tends to make the person less likely to hit the “PANIC!” button in future borderline situations. Human factors, then, mean people will tend to lean toward the second option, but while they’ve already made the choice to call “HOLD!”, there is a time lag before that can be executed (especially if they’re using something that can only be paused by clicking a button). During the time they’re trying to pause, the situation continues to develop and may even be descending toward a potential true emergency.

What you really want is to make calling “HOLD!” as easy to do as calling “PANIC!”, as that way you can stop an urgent situation from escalating into a potential emergency. If you add a physical “HOLD!” button, i.e. “FEED_HOLD” and cut router power, you’ve changed the calculus significantly. Your options are now:

  1. Hit the “PANIC!” button.
  2. Hit the “HOLD!” button.

If you see a situation developing that is at all concerning, you can immediately hit the “HOLD!” button. Where there was a disincentive to hit the “PANIC!” button in a questionable sitation, there is actually an incentive to hit the “HOLD!” button. It gives you time to evaluate the situation, and if it turns out to be justified, you’ve just saved the job. If it turns out you were simply being cautious, there’s no second-guessing or regret, and you’ve learned something to watch for next time so you can preclude a repeat of the situation. There’s no incentive to hit the “PANIC!” button prematurely, as you can hit “HOLD!” just as easily, so when you do hit the “PANIC!” button, relief is much more likely than regret.

In addition to the safety perspective, the addition of a “HOLD!” button provides a significant benefit in general work. If you see something becoming off nominal, you can hit the “HOLD!” button to get time to consider the sutation and address it as necessary. In this case, there may be no safety benefit whatsoever. Your job looks like it was heading toward a start at the wrong zeroes? “HOLD!” About to turn a wooden clamp into an art piece? “HOLD!” Getting a lot of chatter and want to double-check everything? “HOLD!” Just remembered that you left a Hot Pocket in the microwave? “HOLD!” Of course, being able to call “HOLD!” for non-urgent situations only gets you in better practice should something more pressing develop, so safety in general is enhanced.

As a scuba instructor (one of my many alter egos), I teach rescue skills to use in case of emergency, but I also teach my students to respond to a developing situation with “STOP. THINK. ACT.” When a diver starts to feel something off-nominal, they stop. They consider the situation to figure out what to do. Then they act on that. Having a “HOLD!” button allows you to do the same at any time and without delay. If something is starting to head downhill (or simply doesn’t feel quite right), you can hit the “HOLD!” button to stop, then think, then act, and that is certainly a good thing.

7 Likes

Thank you for this well thought-out post, you convey my thoughts on the subject too. Too often I start a job and I place the pointer over the pause button and get ready to click but I encountered situation where the pointer has move just off the button and I have to quickly move and click in a panic not to ruin the job or create a real emergency. The ability to hold the job through a big physical button would be a major improvement in safety and in reducing stress.

Thank you @ClayJar… this is exactly what was forming in my brain. I needed a super-easy way to hit pause/hold. Moving mouse (may be on other side of table so3xxl) and clicking that tiny pause button is not optimal.
Two buttons would definitely be best… has anyone written up a project they’ve done like this? I love the mushroom buttons as they’re simple and easy to use.
The Panic, i’d think would be a simple depress and everything is off…
The Hold button i’m thinking more like a push and clicks down… pull to resume type functionality.

Door switches would be a good thing to integrate into a hold command/button. (Tangentially… it would prevent me from sticking my hand into the beam of 40W laser. I’m sure, I’ll meet the spinning bit one of these days.)

The FEED_HOLD pins on the Carbide Controller are apparently “really” used for equating portal protectors with pottery (“The door is a jar!”), as the message you get when your “HOLD!” switch connects them and pauses execution is basically “door open”. If you had an enclosure with doors and switches and wanted it to hold on door open, it’d be a simple matter of connecting the door switches in parallel with your “HOLD!” switch – since it’s a normally-open circuit, you can have as many parallel triggers as you’d like, all independent.

That’s a quick scribble of my setup. The “HOLD!” switch is just any old $10 emergency stop switch on Amazon or eBay, for example, this randomly-chosen one. You connect the normally-open side to the controller’s FEED_HOLD pins. Then you take any old “wall wart” power supply and connect one side through the normally closed side of the “HOLD!” switch, on through a “router enable” switch (literally any old switch), to either side of the control connection of a $25 IoT Relay. The other side of the wall wart connects to the other side of the control connection on the IoT Relay.

Hitting the “HOLD!” switch will trigger FEED_HOLD (“door open”) on the controller and shut off the power to the router. Adding the “router enable” switch just means that you can also control the router power remotely via the IoT Relay, which is rather nice. The router will only run if the “HOLD!” switch is not engaged and the router enable switch is set to “ON”. The IoT Relay has two receptacles that are on only when it has a control signal (i.e. for the router power), one receptacle that’s the opposite, and one always-on receptacle.

Now, for the “PANIC!” switch, something more along the lines of a larger e-stop paddle switch capable of carrying (and breaking) the full current draw of your entire setup is called for. A quick glance comes up with this $13 e-stop paddle switch as one example. The “HOLD!” switch (and “router enable” accessory switch) only make or break a control-level signal. The “PANIC!” switch must be more robust, as it’s carrying the full power of everything running.

6 Likes

This topic was automatically closed 30 days after the last reply. New replies are no longer allowed.