This is a check-in with the sages on what surface finish an SO3 can achieve in aluminum. I know it’s a remix of other discussions, but perhaps something new and useful could surface.
To start with, the setup:
Machine: SO3 XL with Z-plus and MDF spoilboard. Carbide router.
Machining parameters:
Spindle = 18600 rpm (setting 3 on carbide router. Should be 18250, but I didn’t double check that before running. For carbide router setting to speed conversion chart, see V Bit Noob Question - #10 by Cemrey22)
Endmill: Square ended, 2 flute, 0.250 diameter HSS, ~1.7" stickout from collet.
CAM: HSMworks
Direction: Climb cutting
Cutting feedrate: 48 in/min,
Feed per tooth: 0.0013"
Stepdown: 0.015" per pass
No lubrication, but does use air blast
Material: 6061 aluminum extrusion. Probably T6
First did roughing pass with 0.006" stock to leave. Followed by a full-depth double finishing pass.
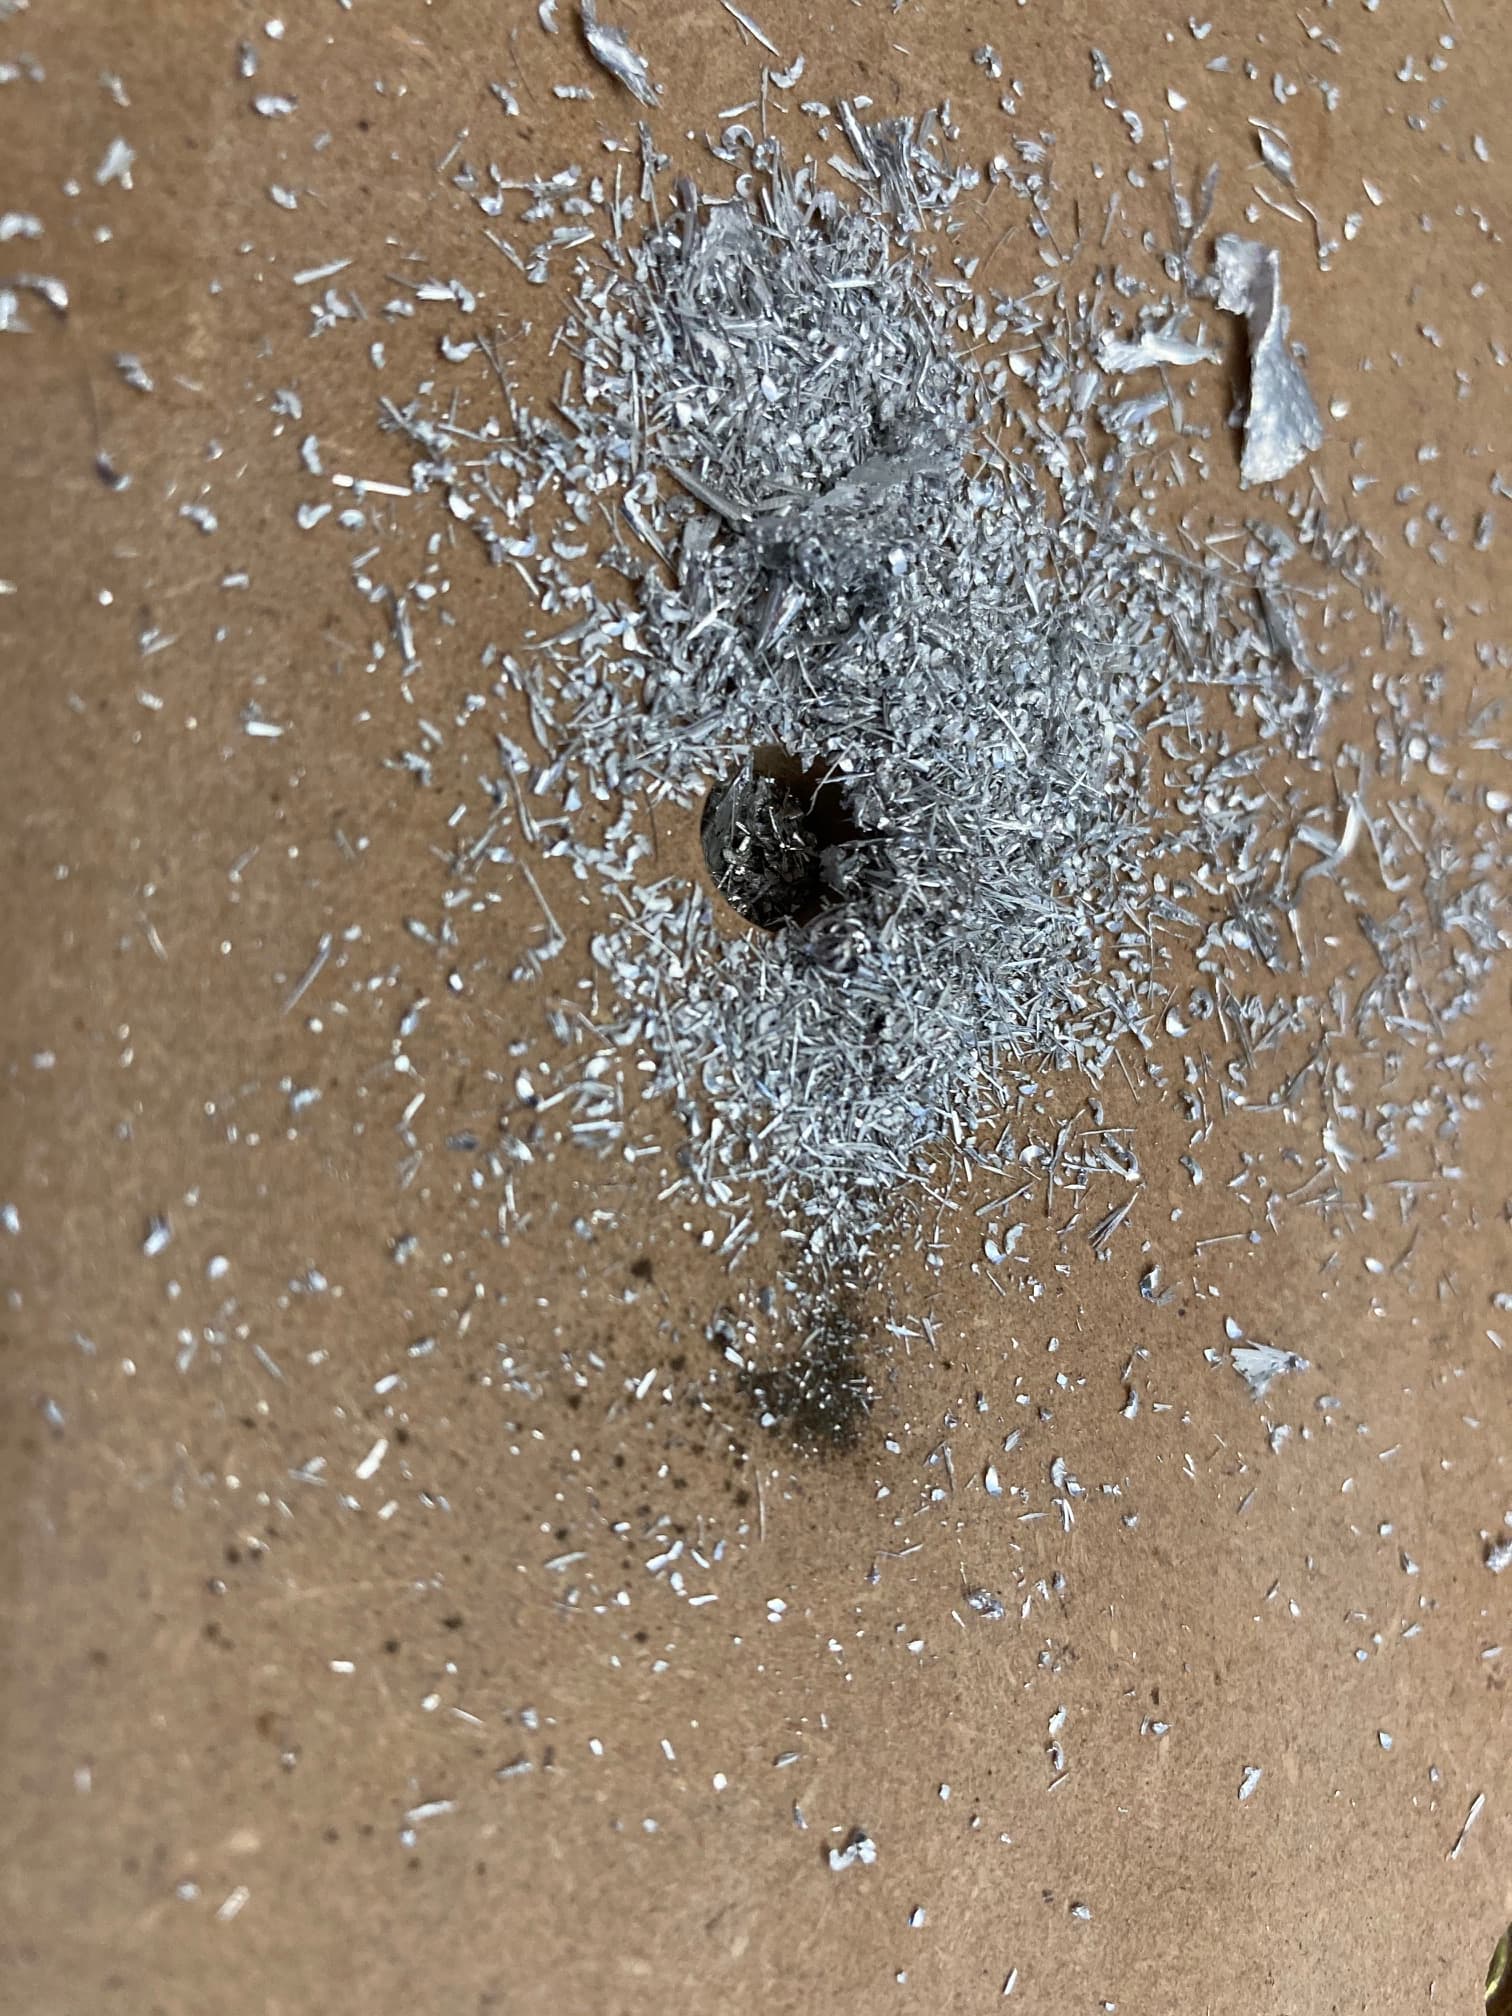
The surface finish was …passable… I suppose, but I’d like to tune it in. See images below for surface finish and chips.
The cut is 0.9" deep. The tool stickout is 1.7". I understand this will affect surface finish due to rigidity and chatter. If I could be at 1" stickout, would you expect substantially better finish?
The chips are very small. Not dust, but definitely note chips, and the collet was quite hot when it was done. Is this normal? I increased feedrate to 200% during milling. Any suggestions on how to get better chips? I would think a 0.0013" chip thickness would work, but perhaps there’s a better idea?
I haven’t sprung for a single flute 0.250" end mill, would that make life lots better? Any suggestions on lower cost single flute options? The cheap ones online are metric but the Carbide collet is 0.250".
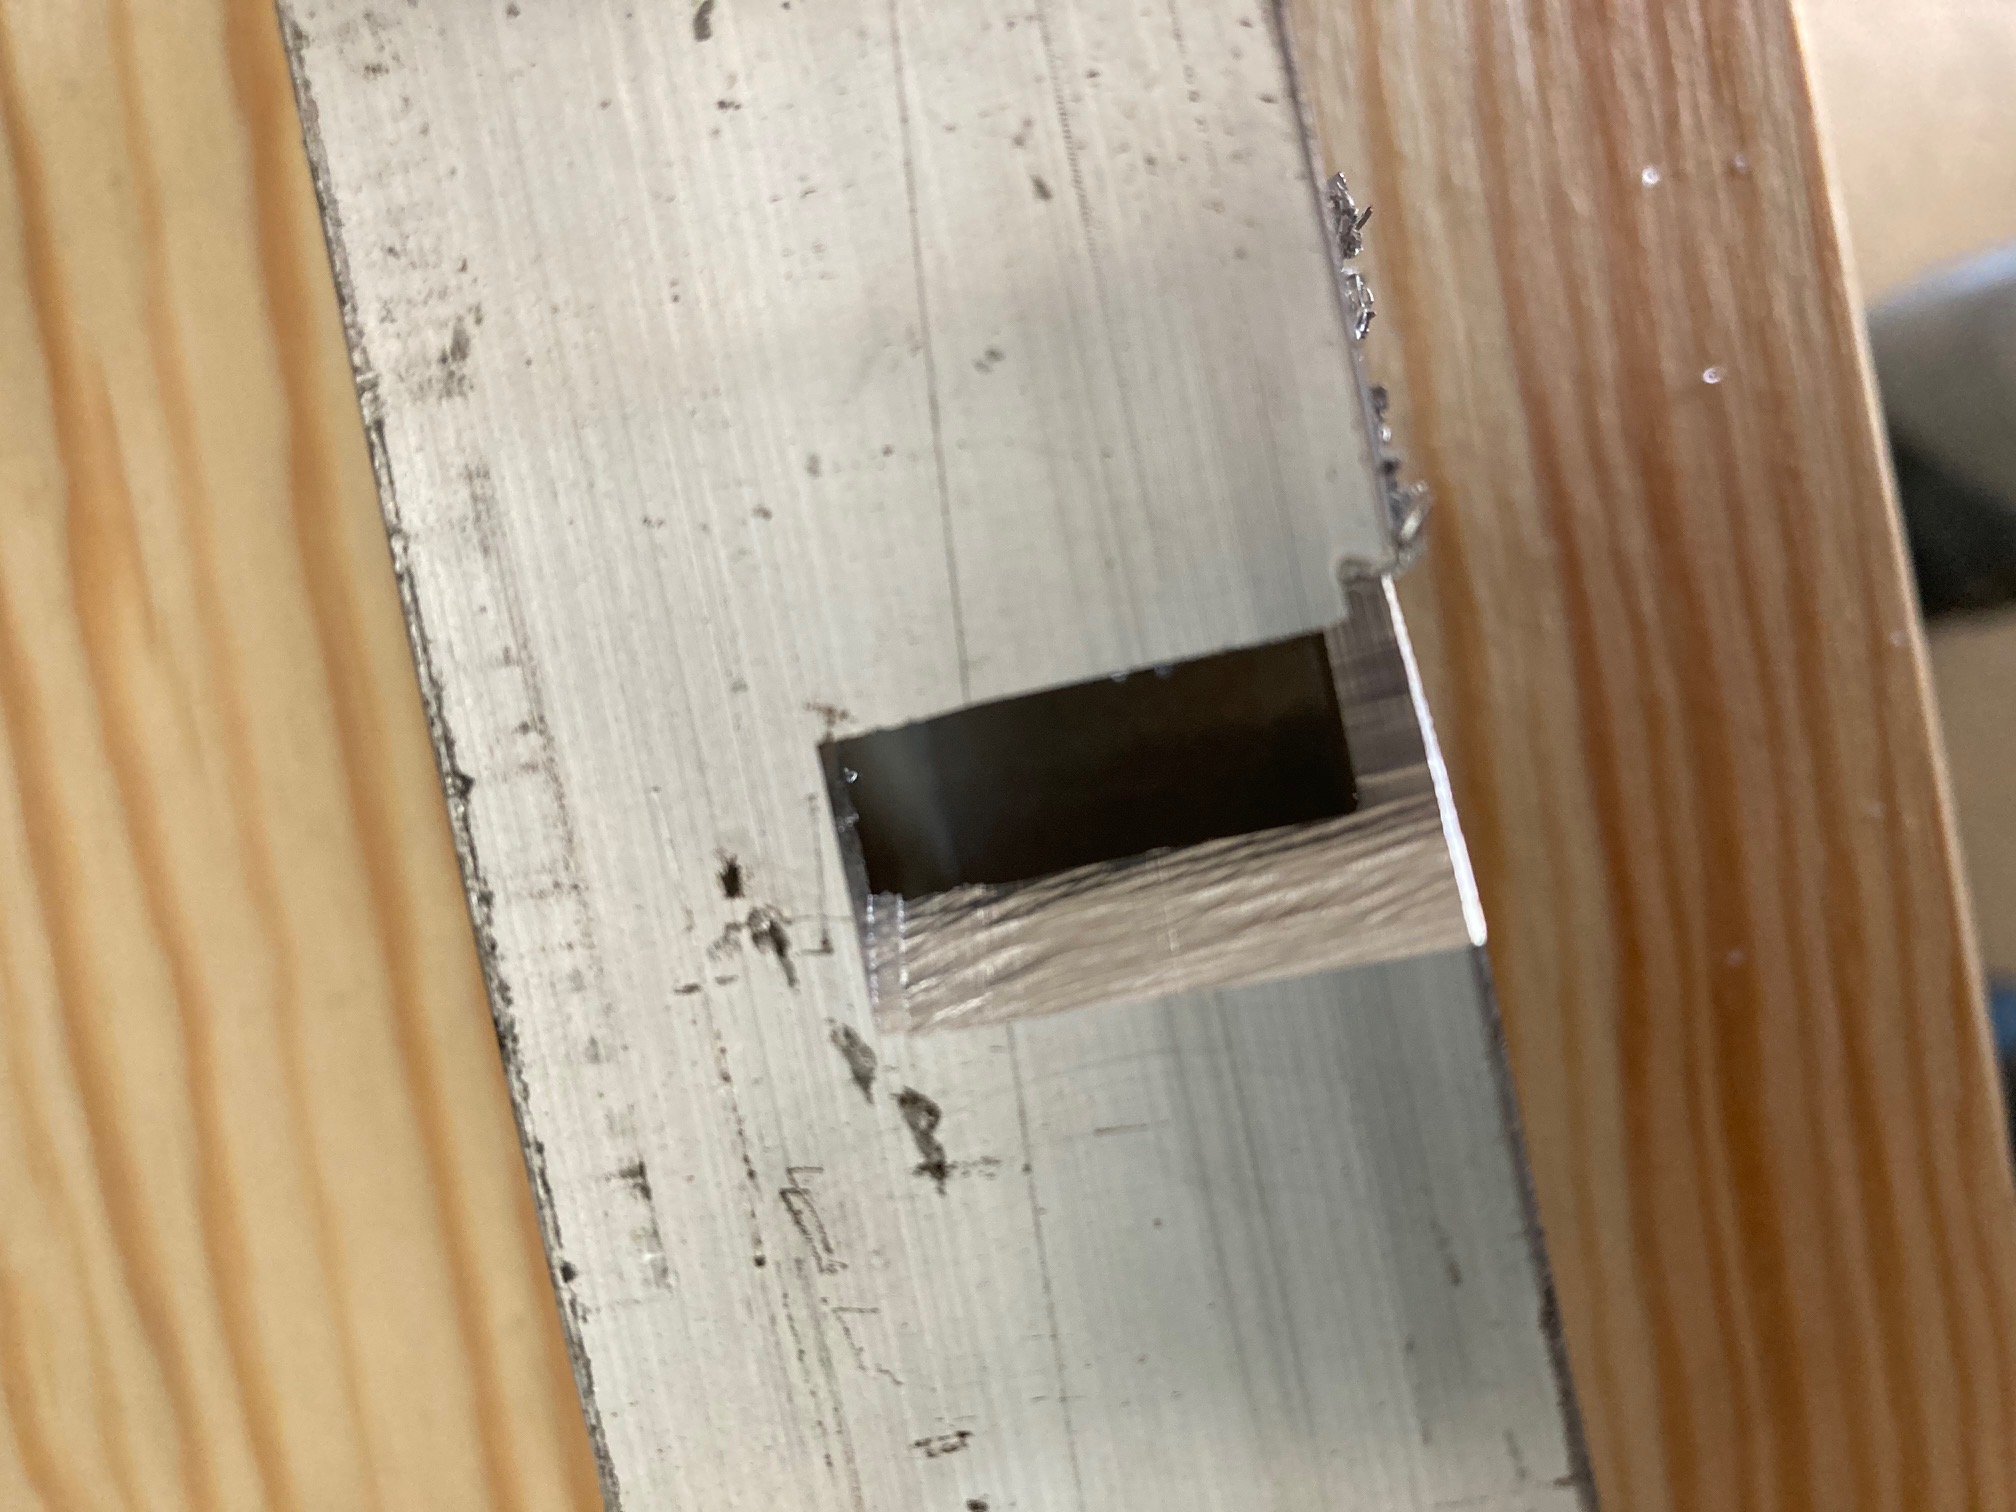
I have some small holes that I use a boring CAM path on and an 0.125" square end mill. It clogged up with chips. Is there single flute options at that diameter and would that help me?
You can’t see it in the photos, but the 2 flute endmill did not give a good bottom of pocket surface finish. Any best practices to improve floor of a pocket?
My go to when I am chasing surface finish are the 4-in-1 single flutes from Datron. They are expensive but they work great for both floor and wall finishes. I know people have had success with DLC coated single flutes. Most single flutes don’t do as well on floor finishes which is why I like the 4-in-1’s. Single flutes will also help because the rigidity requirements are lower for them.
I’m not sure about substantial but it will improve. You always want as little stickout as possible.
You generally get what you pay for, especially when you are looking for good finishes. The 274Z from Carbide 3D is a pretty good deal for what you get. Amana also makes some decent single flutes. You can get a good metric collet from Elaire if you want.
When I was cutting aluminum with my unmodified S3 Standard I did not do full depth finishing passes. I found that the flex from the V-wheels introduced that wavy pattern you can see in your image if I tried. I just did a stepdown at about double my roughing depth for the finishing pass.
The last thing I would recommend is trying to avoid slotting if possible. If you can, increase the width of the slot and cut it with multiple passes so your tool is only touching one side at a time. This will require less rigidity and improve chip clearing.
That mostly makes sense. I did slotting, but, being new to CAM, what’s the alternative for parting off the end of the stock? Do you model the larger slot into the model rather than only using the profile?
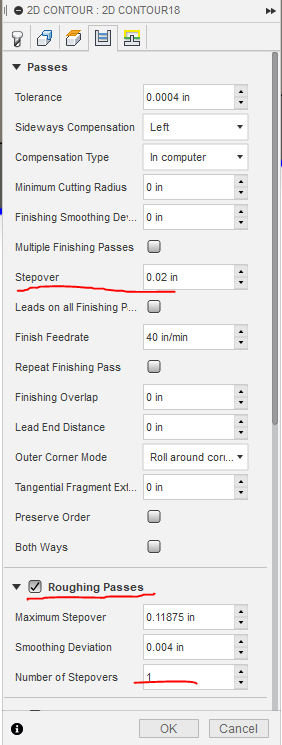
It really depends on the geometry. In Fusion (sorry, no experience in HSMworks) I just use a 2D contour path and set it to do a roughing pass most of the time. If it is a complicated shape, I may model the slot I want to cut. I have also used adaptive roughing to cut slots before. Here are a couple screenshots of a 2D contour toolpath:
So, to part things off (in this case from a long extrusion) I had to do slotting. Is the main alternative to model in the slot and then do 2D adaptive clearing? (HSMworks is the same as Fusion360 CAM only as an add-on for SolidWorks).
Second, could anyone offer an alternative for clearing small holes aside from boring? My strategy on a 0.257" diameter hole through the 0.125" thick wall of the extrusion was to use the precision 0.125" collet for the Carbide 3D router and a 2-flute 0.125" endmill. Both times I ran it, the end mill packed the chips in on the initial plunge. I cleared them one time and re-ran and it worked fine. Second time I couldn’t get the chips out after the endmill punched through and switched end mills to increase the diameter of the holes to the finished size. The issue appears to be the plunge. If the boring was working off of an existing hole it would probably go better. What is the strategy for making the initial hole prior to enlarging it to the finished diameter? Do you peck drill?
Finally, the collet nut on the router gets very hot. Too hot to touch, after a ~7 minute milling cycle. The part temperature was fine. Is this normal? I’m not using lubrication but I am using air blast.
In a couple of instances, Carbide Compact Routers have run hot at the collet/nut/shaft for the first few runs until the bearings have run in — if this doesn’t go away after a couple of uses, let us know at support@carbide3d.com
You could cut your part to rough size outside the machine. Most woodworking tools will cut aluminum just fine. I use a standard miter saw to cut down my aluminum. Band saws with the right blade work as well.
Boring holes is your best option on a S3 XL in my opinion. I didn’t have any trouble with it once I got the process figured out. Here are the things that I found to make boring reliable:
Make sure your machine is well trammed. This gets more important the smaller the hole.
Use a single flute cutter. Chip evacuation is both very important and difficult when boring. You need all the help you can get.
Use a tool that is slightly larger than half the diameter of the hole if possible.
Don’t go deeper that 3x the hole diameter. Use a hand drill or drill press to finish holes if you need to.
Use some sort of coolant/lubricant if you need to.
I never got drilling to work as well as boring for me. I found the X carriage would flex too much on the V-wheels to make drilling viable in aluminum. Probably would work just fine in wood.
I would recommend doing 2 passes to make the hole. You are boring something larger than half the diameter of the bit. If you have the option of specifying a stepover, you can do that to make the boring really doing a hole smaller than 0.25".
What do you mean by initial plunge? When Fusion 360 does a Boring operation, it goes slowly down into the hole, it never does a “plunge” as I think of it.
From the surface of the part, Rich, I’d guess you’re using drip lubrication? Are you exercising a single-flute endmill or something else? What’s the minimum radius? Looks small.
@crpalmer Perhaps wrong vocabulary. By initial “plunge” it was going around in a spiral as you’d expect of a boring operation but the chips packed in, it couldn’t cut, and the hole got smaller going down. That said, if boring is the right way to handle it, I can monkey with the parameters of the CAM until it works better, just don’t want to go after that solution if there’s a better option for hole drilling than boring.
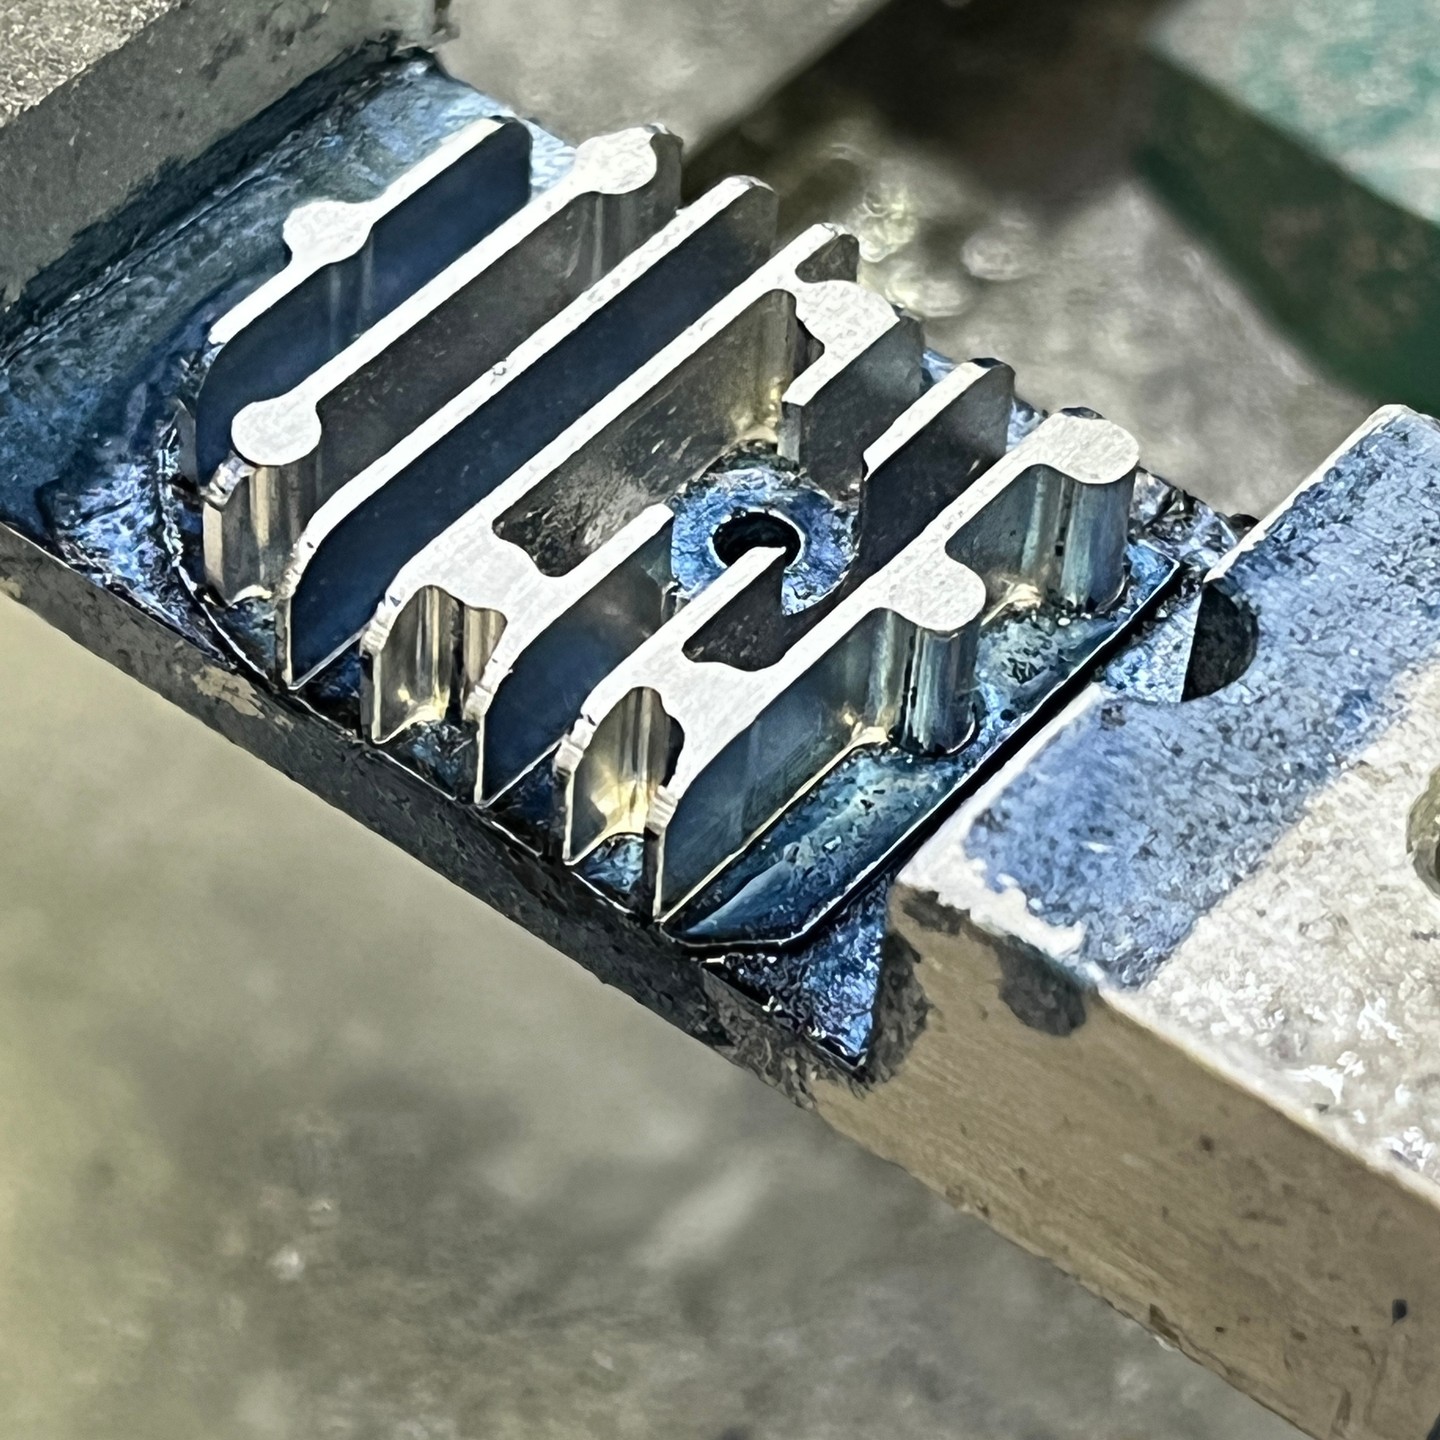
Two Flute ($2) 1.0 mm x 5 mm DOC (0 Rad), cutting a full 5mm depth side wall cut (0.002" final finish pass) dry. (Slow feed rate due to the diameter to length ratio. 20k RPM, 2.0 ipm).
@ads If you haven’t done so, watch the video linked about about feeds and speeds. It is really helpful to understand boring. I had problems with boring (although I’m mostly doing smaller holes, 2.5mm - 5.5mm) before I slowed things down enough to get the chipload under control.
When you are boring a hole size about double the diameter of the bit, your chipload is going to be double what it would be if you cutting a straight line.
@crpalmer Thanks for the video. It was helpful. I’d have to check to see what was happening and if HSMworks has a toggle to compensate for tool diameter or whether I need to do it manually. Again, good video, thanks.
If you don’t mind an extra tool change you could peck drill a .125" hole then use the endmill to open it up. 10k rpm 25-30 Ipm .025" deep drill pecks with full retract. This will make the helix entry go smoother and should stop issues with your chips packing.
After some more aluminum milling, the collet is still getting too hot to touch. This evening I let it just run for a few minutes without milling anything and it heated significantly. Does this suggest a bearing problem? I’ve sent a note to support@carbide3D as suggested.
Usually, on some units, the collets/nut start out by heating up, but once the unit has run-in for a while, stop doing that. Saw your ticket on support and we’ll work it out there.