Greetings all, newbie here trying to impress my better half. I am trying to cut out a simple sign and I am sure I missed something but can’t put my finger on it. I am getting an error message - project will hit left of the machine (X-) and then 289 or something to that range of number. Maybe I am doing something out of order…I loaded my project file, then set my zero to the center of the material, then used the probe on the bottom left corner of my material which is 30 inches x 2 7/8 inches and finally changed out the probe bit for the #301 bit and did a tool change prior to running the program. LETTERING GREENHOUSE.c2d (836 KB)
I have the material set across the X axis on the bottom third of the machine. Can someone tell me what I am missing here or how to fix the error?
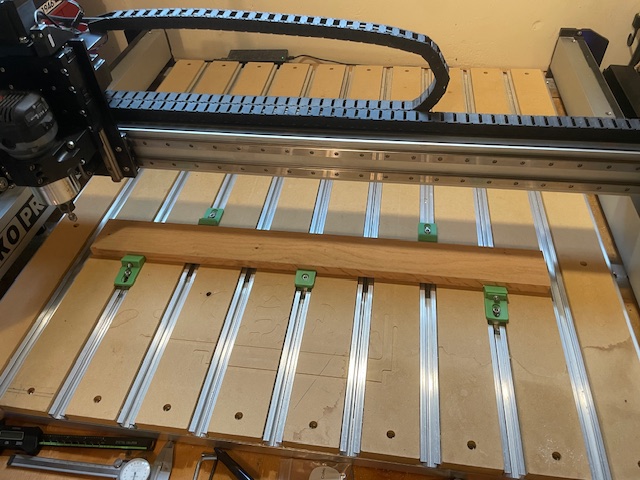
If you continue to have difficulties, please upload a photo showing the stock secured in place on the machine and the machine at the origin (or a specified offset from that position).
Vcarving will cut as deep as necessary to touch both sides of line/lines. That can cause you to cut deeper than intended. I would recommend using advanced vcarve so you can limit the depth and the flat end mill will carve out the flat areas more efficiently than a vee bit.
Attached is the modified file. You could play around with different bits to get the 145 minutes down. LETTERING GREENHOUSE_modified.c2d (900 KB)
Well to be honest the Red indicator in the CARBIDE 3D file was set automagically. As for in CARBIDE MOTION I have set the zero to the dead center of the material (same location as the red indicator) per the tutorial using the paper method. Then, I also have the probe tool which I used after that (which I am not certain if I need to do both or if using the probe tool will suffice) to set the zero at the bottom left corner of the material? I have attached a photo of where the tool moves when I tell it to rapid to the xy zero.
Thanks for the info…after taking another look at those videos I was able to determine that it was in fact my zero location. Something so simple…back to the basics for this guy! Thanks again. Project is running!
You could try the 90 in the design and use the simulation to see what it looks like. The smaller the lines t he smaller the vee bit has to be.
When doing a simple vcarve the bit will go as deep as necessary to touch both sides of line/lines. On a simple vcarve you should always use bottom of material (t) otherwise you get weird results in a vcarve. On thin material using the bottom of material and lines far apart can cause you to go through the bottom of the material.
So when you want to limit depth use advanced vcarve. the flat areas are cut out by a flat end mill and then the vee bit goes around t he perimeter only. Advanced vcarve is best if you need to limit the depth or on carving on thin material where you might go through the bottom.
Great info and advice! I am going to play with it a bit and see what the different simulations look like. I ended up cutting three projects this evening and they all came out looking very nice. Your previous message gave me an idea on two of my projects this evening and I ended up changing the selected bit out. The end result was much more detailed than what I originally started with. Appreciate the guidance!