Hey guys hoping by posting on here I can get a quicker response on to what is giving me this issue.
This just stared happening to me, when I try to initialize the machine my X axis I believe is giving me problems. It seems that maybe something is wrong with my wheels or belt I thoroughly checked everything, and I did not see anything out of the ordinary. Any tips or possible solution’s would be greatly appreciated.
Is the switch activating? You can monitor it in CM (setting screen I believe, away from machine can verify tonight) and press the switch before the homing routine. Also it sounds like your belt is either loose or damaged as it is too gentle a sound at the end of travel. If the motor was locked up and cogging it would be louder and more violent. Power off I’d move the axis to the other end and inspect the belt. Look for stretching, broken fiber glass reinforcement threads, or missing teeth. If it looks OK then check the tension and make sure the pulley is secure with a set screw on the flat of the motor shaft.
it tells me it cannot find the limit switch, it does not touch the switch since the x axis vibrates back and forth. I inspected the belts and there is no sign of damage, and the belt is still guitar sting tight. wheels appear to be in good condition as well, perhaps be a problem with one of the motors? I am just thinking out loud. I am still at a lost to what is causing this.
Turn on your Shapeoko and do not initialize. Press the X switch and see if the switch shows activated. It is hard to tell in the video but it appears the X switch is not being actuated. Check your X belt tensioner. If the tensioner is slightly twisted it hits the v wheel and the carriage cannot go all the way to actuate the switch. If the belt tensioner is crooked get a pair of pliers and the allen wrench. Slightly loosen the tensioner and hold the tensioner with the pliers straight while you tighten the allen bolt. The tensioner and the v wheel just barely by pass each other. The tensioner must be straight or the v wheel will hit it.
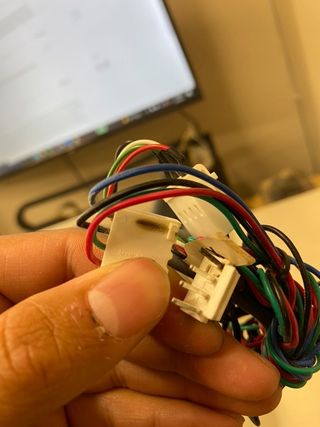
That’s what I was expecting. Is that in the drag chain?
Basically, cut off the connectors and reconnect in some way.
I think I just used some lever nuts on mine.
Curious… What kind of support is there for old SO3s?
On the SO3 (maybe just some sizes), that connector was in the drag chain and constantly flexed. I wasn’t sure about soldering. I threw on some lever nuts as a temporary fix I then forgot about until @mattlo97 posted today.
We support older SO3s as we would any other out-of-warranty machine — no Shapeoko gets left behind, and for any machine which needs something to be functional, we will work out a way for that machine to have that something, whether it’s a custom invoice, a 3rd party source, or shipping the part in question.
Probably should just replace all the wiring to ensure there are no connectors in areas that flex. On a different build I used cable rated for flexible applications, but it’s not cheap or plug n play.
When I have time and no projects to complete, I want to replace all the wiring and make it easy to replace in the future if I need to.
You had any thoughts on what sort of cable to use?
I was looking at some CY screened signal cable for at least the home switches and maybe the steppers as well.
For a Seig X2 mill I converted to CNC, I used 4 wire, trailer light ribbon cable. Granted the colors didn’t jive with the motors, But i haven’t had any issues. Of the three axis, only the wire for the X axis moves with the table. If I ever install the sensors, I will use a shielded cable of some sort.