The plates were surfaced on both sides from SMW and the braces are machined perfectly flat as well. I use SS screws to mount to the shapeoko frame with dielectric grease to prevent galvanic corrosion. After I make a mount for my dial indicator I can shim and adjust as needed.
That does look very nice indeed.
Is there any side to side bracing or does it use the Carbide metal plates to do that?
Yep,
Like Griff says, a torsion box is simple to build, so long as you can cut the supports square and straight.
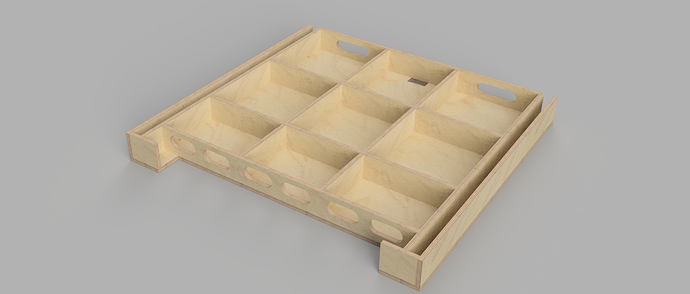
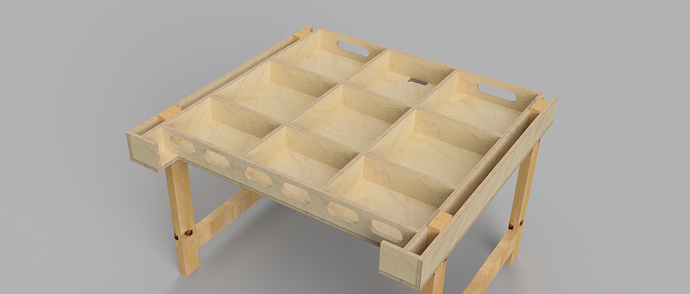
It’s just an I beam in two dimensions, two flat pieces held at a constant distance from each other so that they resist bending moment, here’s a couple of renders of mine (with the top panel removed);
The cut-out in the front was an idea to help with setting up for vertical machining but honestly it’s not worth it, especially now that the machine is bolted to the box and can overhang the front anyway.
Yea does not look hard to make.
For the aluminum bed how did this help with cutting aluminum? Does it just allow you to hold material better?
My understanding, is that the aluminum beds have two prime advantages— flatness and rigidity. I’d argue a torsion box accomplishes at least as much overall rigidity as a plate. Maybe @gmack can enlighten us. As for flatness, given the belts and wheels and other components in a stock Shapeoko, it’s overkill.
As for holding aluminum for cutting, I mostly use tape/CA. Use @gmack excellent calculator to keep heat in the chips and out of the stock. I also use a vice on occasion for 2 sided machining, it clamps quite nicely to MDF. I’ve also successfully secured a vice with tape/CA.
Do you have a link to the calculator and your vice you use?
Not sure this is the latest ss but here you go:
https://community.carbide3d.com/uploads/short-url/ybDv1lDezO3kmlQHVKJMozJZLS3.zip
Got my vice from the Little Machine shop, it’s pretty tall, there may be better options out there. https://littlemachineshop.com/products/product_view.php?ProductID=4871&category=
The latest is available here - I’ll post future updates there too. (I try to improve it with each update.)
Unless aluminum plates are properly manufactured, installed, and supported they won’t be very flat. Well supported plastic (HDPE, acetal, acrylic, etc.), like MDF, would be relatively easy to machine flat on the Shapeoko.
Well that would be the job after installation, tramming the Y rails parallel to each other and the plate and then tramming X across them, there’s quite a few through-bolt joints there which would need to be carefully aligned.
True, I now use an HDPE wb as well. Very easy to flatten.
The SO3 steel rails are the side bracing and the middle bed support brace bolts to both plates keeping them from being able to shift, lift, or sag.
I don’t work for SMW and I’m not trying to sell anyone anything.
the aluminum bed with braces is some what over kill for the power of the machine but for me the investment was well worth it as the work holding capabilities improvement fit my needs.
I’m a quadriplegic so making a torsion box or custom threaded table is well beyond my ability and this was the best approach to improving machine accessibility so I can do more complex machining by my self. I am grateful to be able to design, machine, and 3d print adaptive tools on my own that improve my life so I gladly spend what little savings I build up on upgrades that reduce struggle and allow me to accomplish more on my own.
Thanks,
Huge respect for what you’re doing BTW.
I was asking out of interest to see what SMW had designed and if I’d missed anything in the pics. I spent quite a while sitting staring at the bare metalwork of mine thinking what the least invasive, best use of existing material approach was to beefing it up.
Using the steels as the cross bracing makes a lot of sense, there’d be a lot more cost in extra aluminium parts otherwise and they’re already bracing the weaker direction. Also, if those huge aluminium girders are on a flat base they’re going to pick up some bracing from that too.
Those aluminium rails underneath are also big enough to squash most vibrations the aluminium plate might want to have and the bolted joint will help with that absorbtion.
And it looks really nice, much nicer than MDF brown that makes you play with the white balance every time you point the camera at it 
Does tape/CA glue work well with the HDPE waste board? How thick is the waste board?
My HDPE wasteboard is 0.5" and tape&glue is the only kind of workholding I have been using on it for two years, never had a problem (as long as I diligently use a roller to apply the tape). I thought I would drill holes in it sooner or later to have regular clamping as an alternative option, but I never did.
Back to @Griff!
Yep, as Julien said. Except, all I’ve ever used to adhere tape to any sort of waste board is the heel of my hand. Never used “activator” either. As I always say though, to each his own.
I use .5" HDPE for all of my mobile tables, router tables ect. And I have a 5x10’ sheet of .75" I bought for my Shapeoko. I’ve been trying to use the superglue and tape method more often lately… I bought a large quantity. I cant get the stuff apart without excessive effort, too much effort. But my average part is large. All of my parts are HDPE and Acrylic. I’ve got a professional welder(I am a backwoods gutter welder, I pick up a stick before my tig) coming over tonight to pick up some lobster, and the plan is to replace the base of the shapeoko with tubular steel frame. I figure it will not be “flat”, but with a little machining on the HDPE base, and a HDPE waste board/vacuum assembly, I think it be cheapish and an overall win. No aluminum or premium products. (Saying that is debatable with the current cost of plastics)
Doesn’t need to be flat, just needs to be rigid and vibration damping. Then you can use brackets to fine adjust where the Shapeoko bits sit above it.
Liam, thanks for the reply. Also, I dig the stuff you do.
I plan to incorporate some kind of wiggle adjustment into the mix. Unfortunately, as it stands, I do not have the design abilities of you and a lot of the people on this cool spot. I just blindly make my way through fusion doing what I got to do. This will be like everything else in my life… built using random shit I find around the scrap yard(my actual yard) + plus clean steel for the sake of less processing(I am also lazy, and its hot here, very hot). Most likely I’ll fill the whole mess with epoxy(I have alot, and I try to waste it.) and some kind of aggregate, like the coral pearock in my yard.
Maybe something like inexpensive 2" x 2" x 1/8" 6061-T6 aluminum tubing struts fastened to the Shapeoko frame (for Z axis rigidity) fastened to a vibration damping HDPE waste-board (for X and Y axis rigidity)?

