Since its my firts time doing this in the Shapeoko i decide to ask how to do this first.
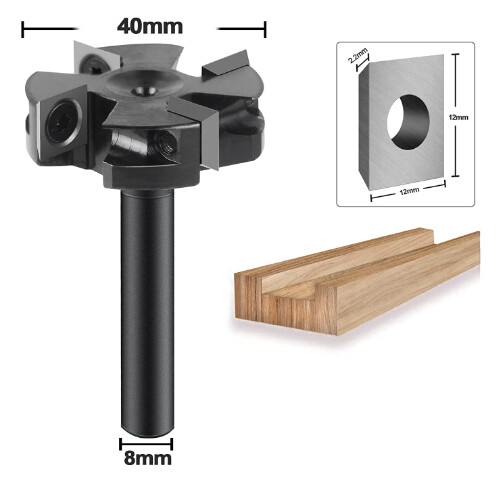
I need to surface a cookie slab that im using for an epoxy project with my Shapeoko XXL pro. I purchased an surfacing bit for this purpose:
Now my question is… What is the best way to do this? How do i set the zero and how i use this bit with bit setter? do i need to turn off the bit setter? Can i do it manually in the Jog menu? turning on the spindle and make the passes manualy? what is the best way to do it?
Some one did this before? there is any video that i can see the preparation and set up of this kind of job?
Best to disable BitSetter before using this bit. You should re-initialize before doing anything else after doing that. Easiest way is to disable BitSetter, quit CM, then restart CM.
you can set zeros any way you are comfortable. It should work with a bit zero, or the paper method, or the “just bring it close, good enough” method. Since you are skimming of the entire surface, you vould rotate the bit by hand and bring it down until you feel it scraping the surface.
I personally would avoid the manual jog method. It’s hard to control speeds, and any kind of pause risks burning the surface and dulling the bit.
This will likely take several passes. For everything except the last pass, you don’t care about tool marks, so you could just do a pocket operation big enough to cover the entire surface. In CC, you can program one pass at a time (changing the start and finish depth each time), OR reset your zero each time to the new surface and run the same program again.
For the final pass, you need to decide if you want to try different methods in order to reduce tool marks, or if your surface prep (sanding, etc) will take care of that anyway.
For large bits like this, you want low DOC, low RPMs and high feed rates. So DOC of maybe .02" (.5mm), 10,000 RPM, feed 100 IPM (2500 mm / min). If the first pass goes well, you can either increase DOC, or increase feed rate. If you see burning, lower RPMS and / or increase feed rate.
One last thing - a bit this large will really show if your machine is out-of-tram at all. If you are getting ridges, you may need to stop and re-tram if the ridges are too pronounced for you.
Measure your cookie and form either a circle or square that is slightly larger than the cookie so you get all of it surfaced. If you give yourself about a .5" bigger circle/square than the object use the center and before inserting the fly bit use a vee bit to set the center. You will have to approximate the center since it is not a regular shaped object. Thus giving yourself a little more area to cut ensures you get the whole thing flattened.
If the cookie is not flat on either side be sure to shim it so on the first side you get a square flat surface. Then flip it over to surface the second side.
I would use painters tape and super glue to hold this down so no clamps are in the way. You could also use the Tiger claw and/or gator tooth clamps to hold it in place. Maybe use both tape and super glue with the tiger/gator clamps to secure the project.
So your bit shows to be 40MM and that equates to about 1.5" +_. I use a Whiteside 6210 1" fly bit so here are my cutting parameters. The trick with big bits is they can burn the surface if you cut too aggressively. So take shallow depth of cut and simply rezero after each run of the job. So if you zero on top and remove 0.010" after the job runs move the router off the project and jog down to zero and then another 0.010" and set Z zero. Simple rinse and repeat until you get the cookie flat. Flip and again rinse and repeat. You could give your fly bit a bit more depth of cut but a big bit has a lot of momentum and with a deeper depth of cut and your material not properly secured it could be a disaster.
number
vendor
model
URL
name
type
diameter
cornerradius
flutelength
shaftdiameter
angle
numflutes
stickout
coating
metric
notes
machine
material
plungerate
feedrate
rpm
depth
cutpower
finishallowance
3dstepover
3dfeedrate
3drpm
601
whiteside
6210
Fly Cutter
end
1
0
0.25
0
2
3
0.25
0
10
80
16000
0.01
1
35
80
16000
602
Sugelary
X002JUT7TF
Fly Cutter
end
1
0
0.25
0
2
3
0.25
0
10
100
16000
0.01
1
35
80
16000
As Michael suggested disable the BitSetter. After disabling the BitSetter power off the Shapeoko and reinitialize. Something goes haywire when you disable the BitSetter and do not power off the Shapeoko, initialize and then set your Zeros.
I do all the prep the others mentioned ( ie placement of cookie with shims, how it’s held down, clearance toolpath, etc. ) BUT where I do things differently I guess is I set my zero as the top of the bed. Then I measure with calipers to determine my highest point and lowest. Then you can set up the clearance toolpath to start at that height and cut to the lowest all in one operation. No need to reset zero over and over again. Just be conservative on your depth of cut and follow the speeds and feeds as mentioned. Once you get one side done. Flip as mentioned and do the same for the other. Just my way, works for me, your mileage may vary?!
Your idea is a good one. I am usually surfacing something that only needs a few thousands taken off. A tree cookie may be cut with a chainsaw and have a less than perfect 90 degree angle on both sides. When I surface my spoilboard I put pencil marks all over it. Make a single pass then reset zero on the spots that still have pencil marks. So I am doing pretty much what you suggest. On my spoilboard I want to take off the minimum amount to get it flat. On the cookie the thickness overall may not be that critical.