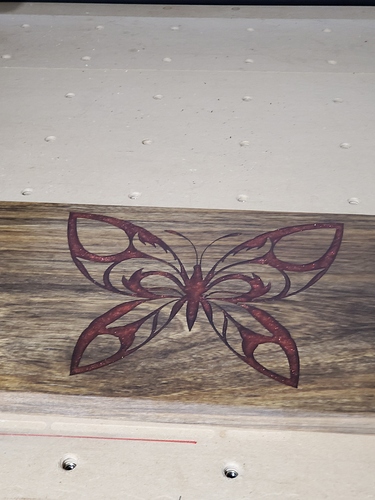
I have made up a board with a v-carved image and have filled it with epoxy. It has hardened for 72 hours and I now am at the point of surfacing the piece. I am seeking help on speeds, doc and best bit to use. Thanks for any help you can give me
I’ve used the same feedrate as on hardwood (say 60 ipm for bit 201) but half the DOC… and that worked it likely was on the conservative side. I would recommend doing 2 steps; one step where you remove all but the last 0.03" or so, and then a final pass with a much reduced stepover.
(and assume you need to sand the result upto like 300 to 1000 grit or so)
what @fenrus said, but I like to go faster, more like 120-150ipm and shallow DOC (1mm or less) with a #201.
What I do now is CAM a single surfacing pass, at say 1mm DOC, start high enough that I know I won’t remove all the epoxy. After the first run, check what epoxy thickness remains, lower Z zero by [a reasonable amount to shave off incrementally thinner layers], and rerun the same G-code file as is.
It will usually go like this:
- run #1 shaves off 1mm
- it looks like 0.5mm remains, I’ll lower Z zero by 0.35mm, rerun file
- then lower Z zero by 0.1mm, rerun file, rinse and repeat as many times as necessary to completely remove the epoxy YET be able to stop between the final passes, run my hand on the piece, and decide whether it still needs one more pass or not.
I used to CAM a single G-code file doing multiple surfacing passes at predefined depths (Vcarve lets you specify manually the depth of each pass, so I would set it to 0.5, 0.25, 0.1, 0.1, 0.1mm) and just stop the execution between passes, but it’s more trouble than it is worth and there are more opportunities to mess up.
I do not know how to reduce the z using the same g code?? I presume i am doing a pocket run of the entire board using a 201 bit, 150 ipm, doc 1mm, plunge ???. I have read to set rpm as low as I can to prevent heating up the epoxy and making it gummy? Any idea on that? After I make the first pass with the g code how do I set the doc for the next pass using the same g code file?
Yes, generate a single G-code file for that.
What matters is the combination of RPM and feedrate. If you minimize RPM, that’s fine but then you will need to limit the feedrate so that the cutter does not take too large a bite (chipload). I choose to increase RPM and increase feedrate accordingly, so that the cutter moves fast, hence does not stay in the same place for long, hence avoid melting.
My rule of thumb (to each their own) for chipload in plastics with a 1/4" cutter is say 0.0025" (middle of the range). With a 3-flute like the #201, that requires a feedrate of 0.0025 x 3 x [the RPM value you choose]. So for example 135ipm at 18.000RPM
You just return to Z0 (which should now be 1mm above the freshly cut surface, since you just ran that 1mm pass), and use the jog menu to lower the Z by, for example, 0.5mm. Then your reset Z-zero there and rerun the file: this means the cut will try to remove 1mm, but since it starts 0.5mm above the surface, it will actually only cut 0.5mm deep.
Repeat as many times as needed, each time returning to Z0, jogging down by a small (and iteratively smaller) amount, and resetting Z-zero before re-running the file.
Thank you very much! I shall do this and get back to you with the results. Much appreciated.
Until you get the hang of it it’s better to start a little higher than necessary initially, and gradually lower your Z zero. The one time I eyeballed it and thought “there must be a good 1mm there”, there was in fact more like 0.7mm, so it shaved off 0.3mm too deep / into the wood, and ruined the finest detail in my v-carving.
I find Julien’s method described above as my generally preferred methodology for surface based operations, like engraving, or dimensionally unimportant surfacing. Allows one to creep up on a desired result without breaking from the project to reprogram if necessary. I think more advanced control interfaces allow for onboard offsets, one would just program at 0 or a known offset, then use machine offsets to alter final doc.
Nice job! The thin antennas came out perfectly
Thank you. Yes, the antennas were my worry but turned out ok.
This topic was automatically closed after 30 days. New replies are no longer allowed.
