Text depth is inconsistent

I’ve really been banging my head against the wall on this, please help.

Issue summary: Text depth is inconsistent.

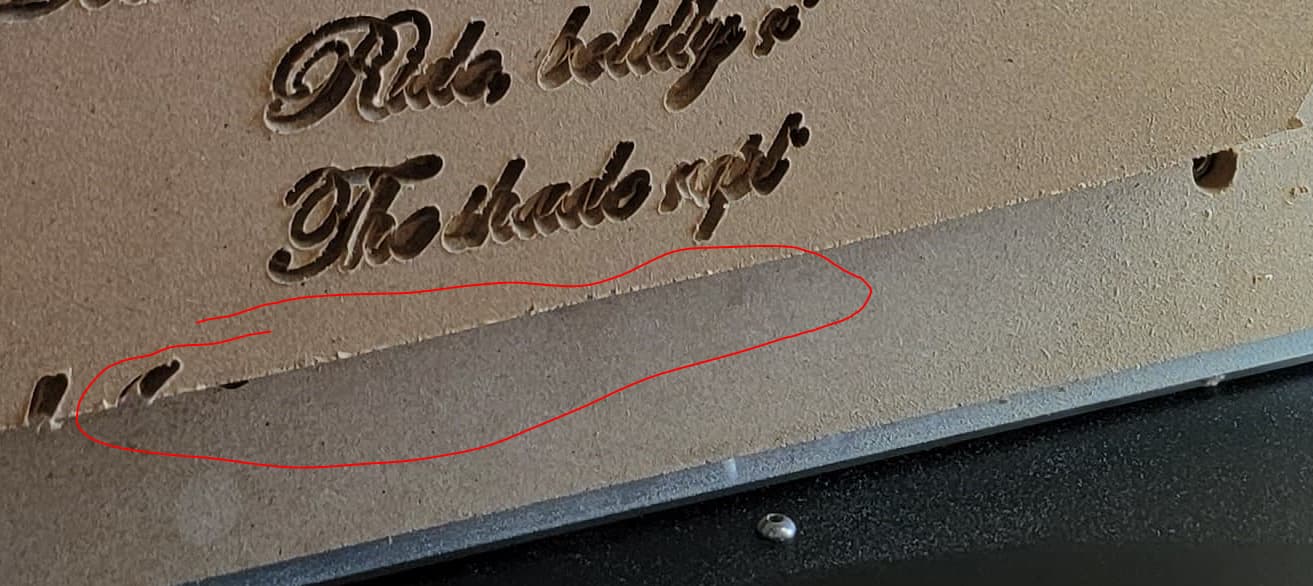
Detailed equipment//bit/material description/attempt issues: I have a shapeoko HDM. I’ve planned my spoilboard to ensure a flat work surface. I’ve used multiple plywood and MDF pieces of material. I’ve used a 60 degree V-carve and a 30 degree engraving bit. I’ve used different fonts. I also use a bitzero vs 2. Regardless of what material, bit, or text I use, when I try and carve text the depth is inconsistent the further into a project it gets. It’ll start out just fine but by the time it’s at the end it’s nearly double the depth.

Detailed design description: I’m using aspire vs 10.512. note: i’ve used carbide create and have encountered the same depth issue
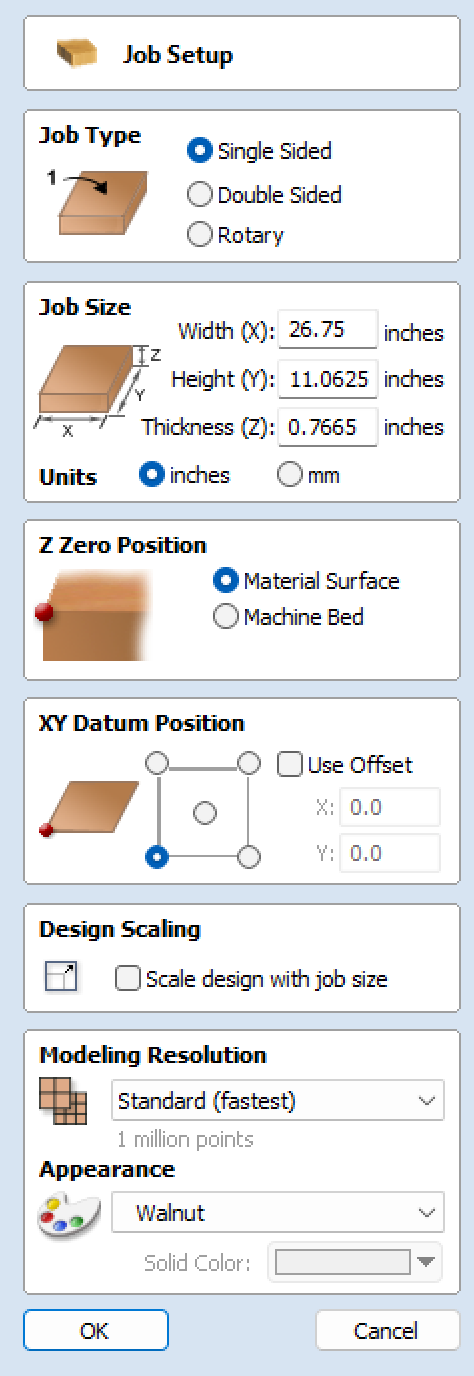
Job setup:

Text is true type, edwardian script, no bold, no italic, text alignment is center.

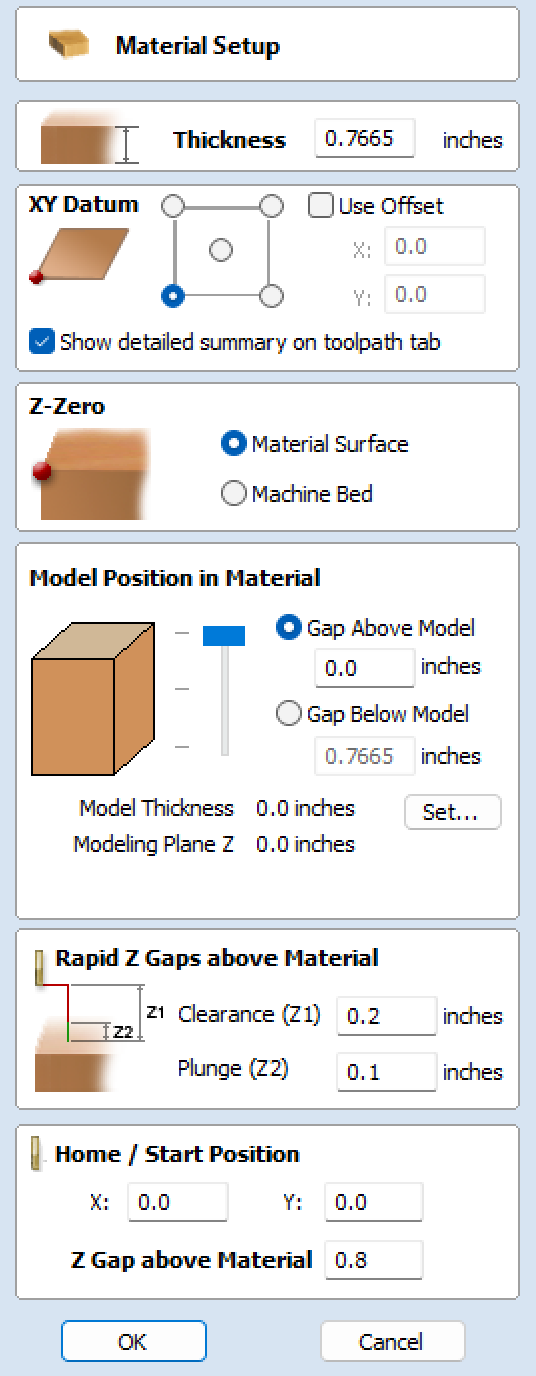
Material setup description:
I use a set of rockler calipers to measure the z thickness.


Select 2D profile toolpath, parameters below.

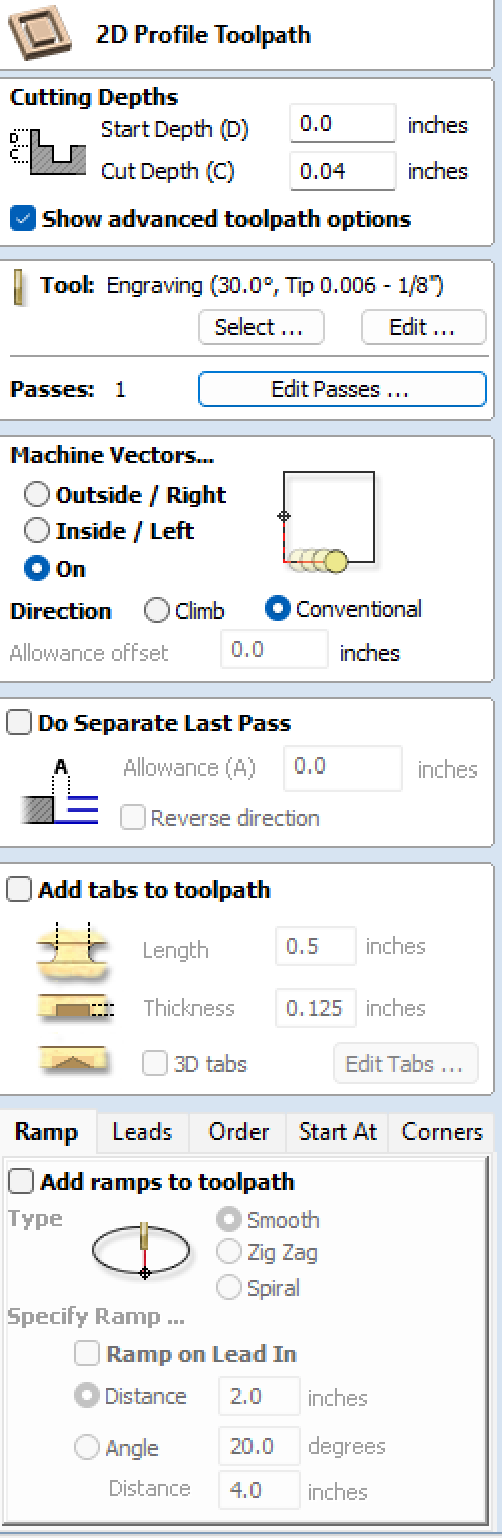
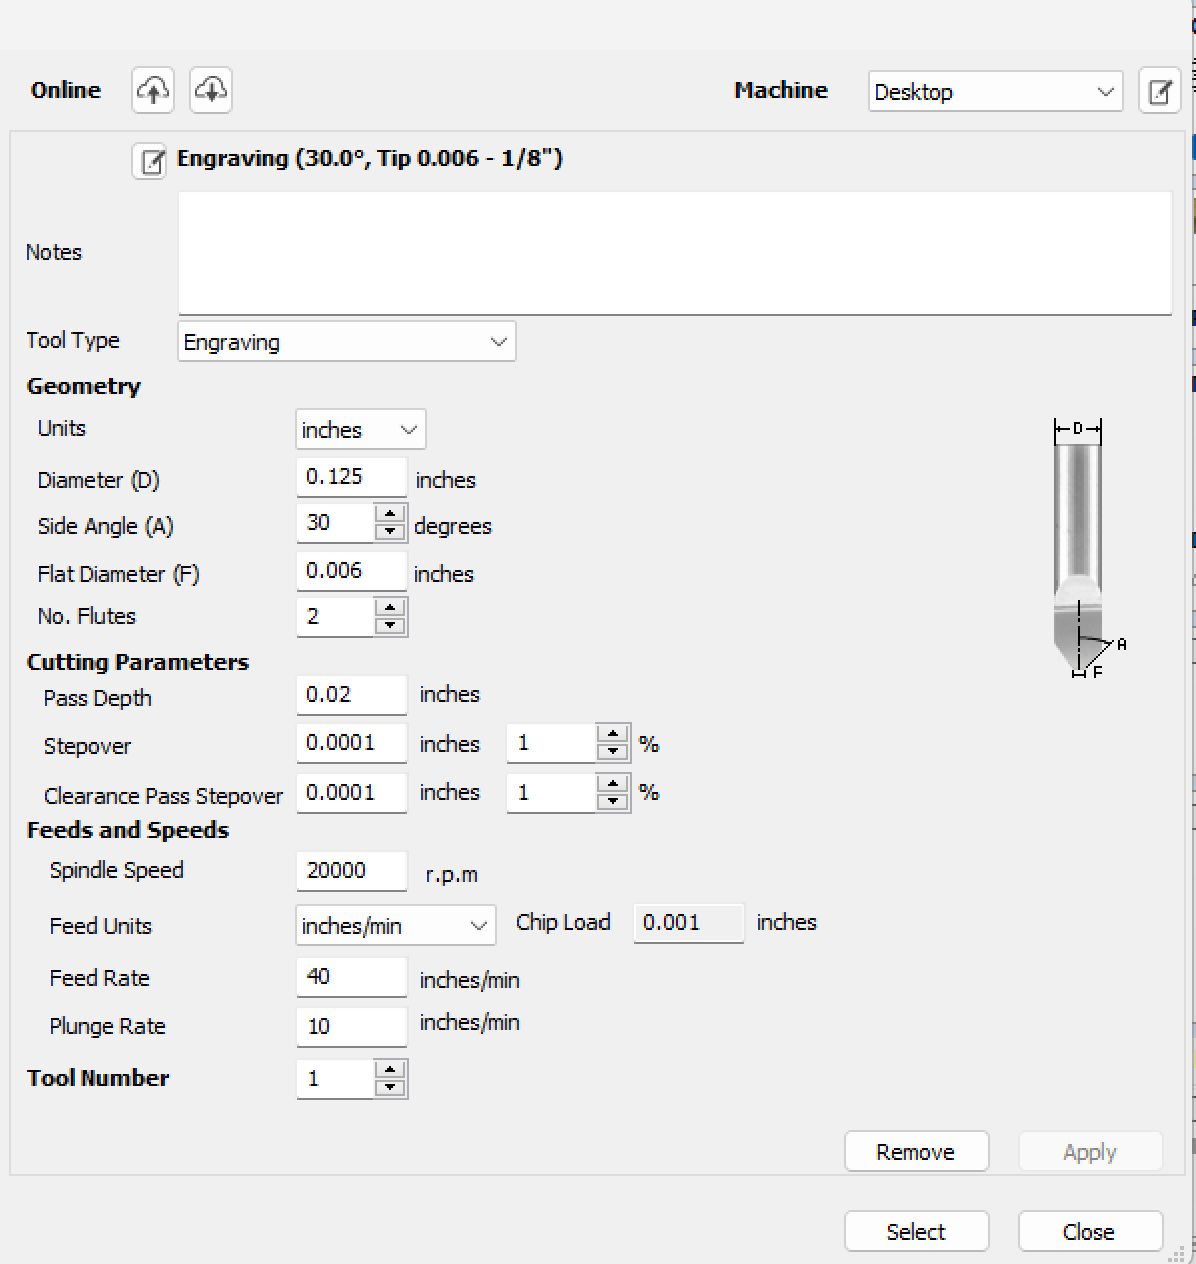
The 30 degree engraving bit parameters. Note: i’ve changed the cutter parameters to reflect the picture of the final product below, but i’ve also used stepover and clearance pass stepover both at the default 40% with the same outcome of inconsistent depth

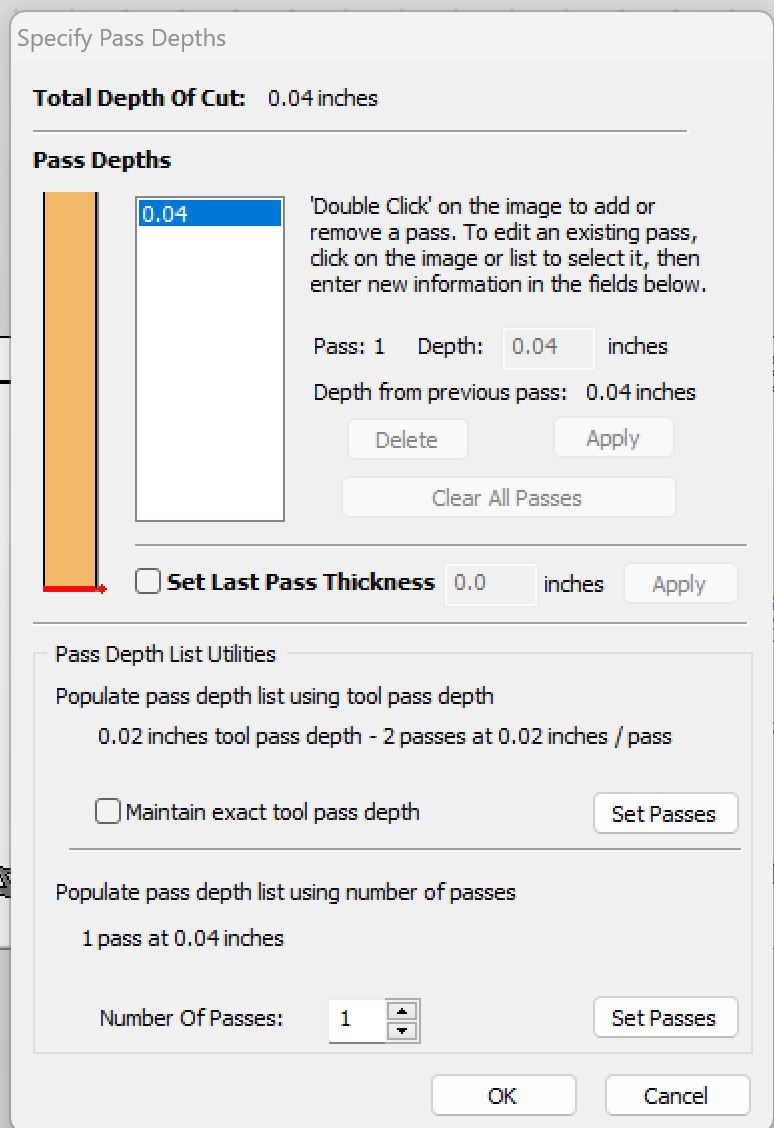
specified pass depths. note: i’ve also selected the maintain exact tool pass depth in other runs but it just created a shallow first pass at .02 with a final pass at .04 inches with the same outcome

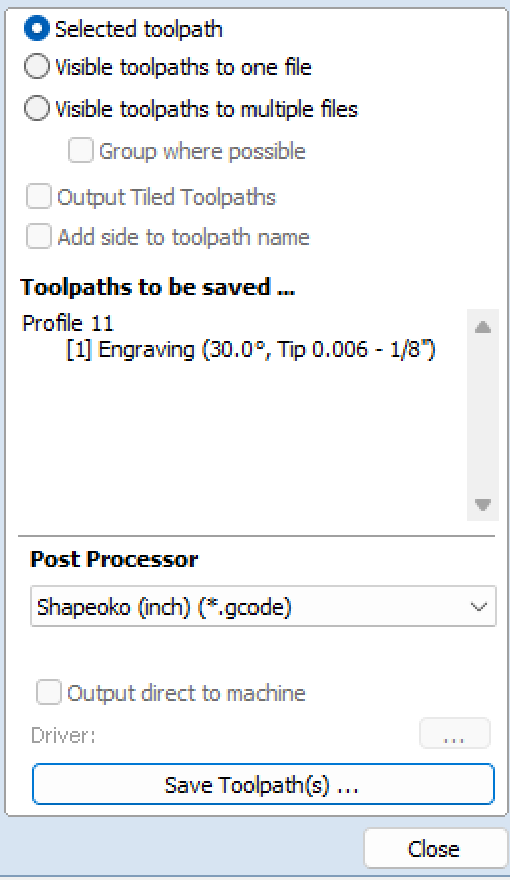
I select calculate, preview tool path, then save gcode. Ensure post processor is shapeoko (inch) (gcode).


Detailed setup description: I’ve ensure using latest Carbide Motion build 578. I’ve ensured the shapeoko HDM parameters are loaded in CM. I secure the material to the spoilboard using the standard carbide clamps, each clamp is on the same rail on each side of the material. I initialize machine, install bit and it measures the bit using the bitsetter. I load to gcode. I then jog it to the bottom left corner and using a bitzero vs two and successfully probe the bit to find the x, y axis corner. I’ll then separately probe the z function successfully. note: i’ve also attempted the manual method using a sheet of paper in separate attempts. I then hit start.

It did not completely finish the project because I stopped it due to fear of damaging the bit.


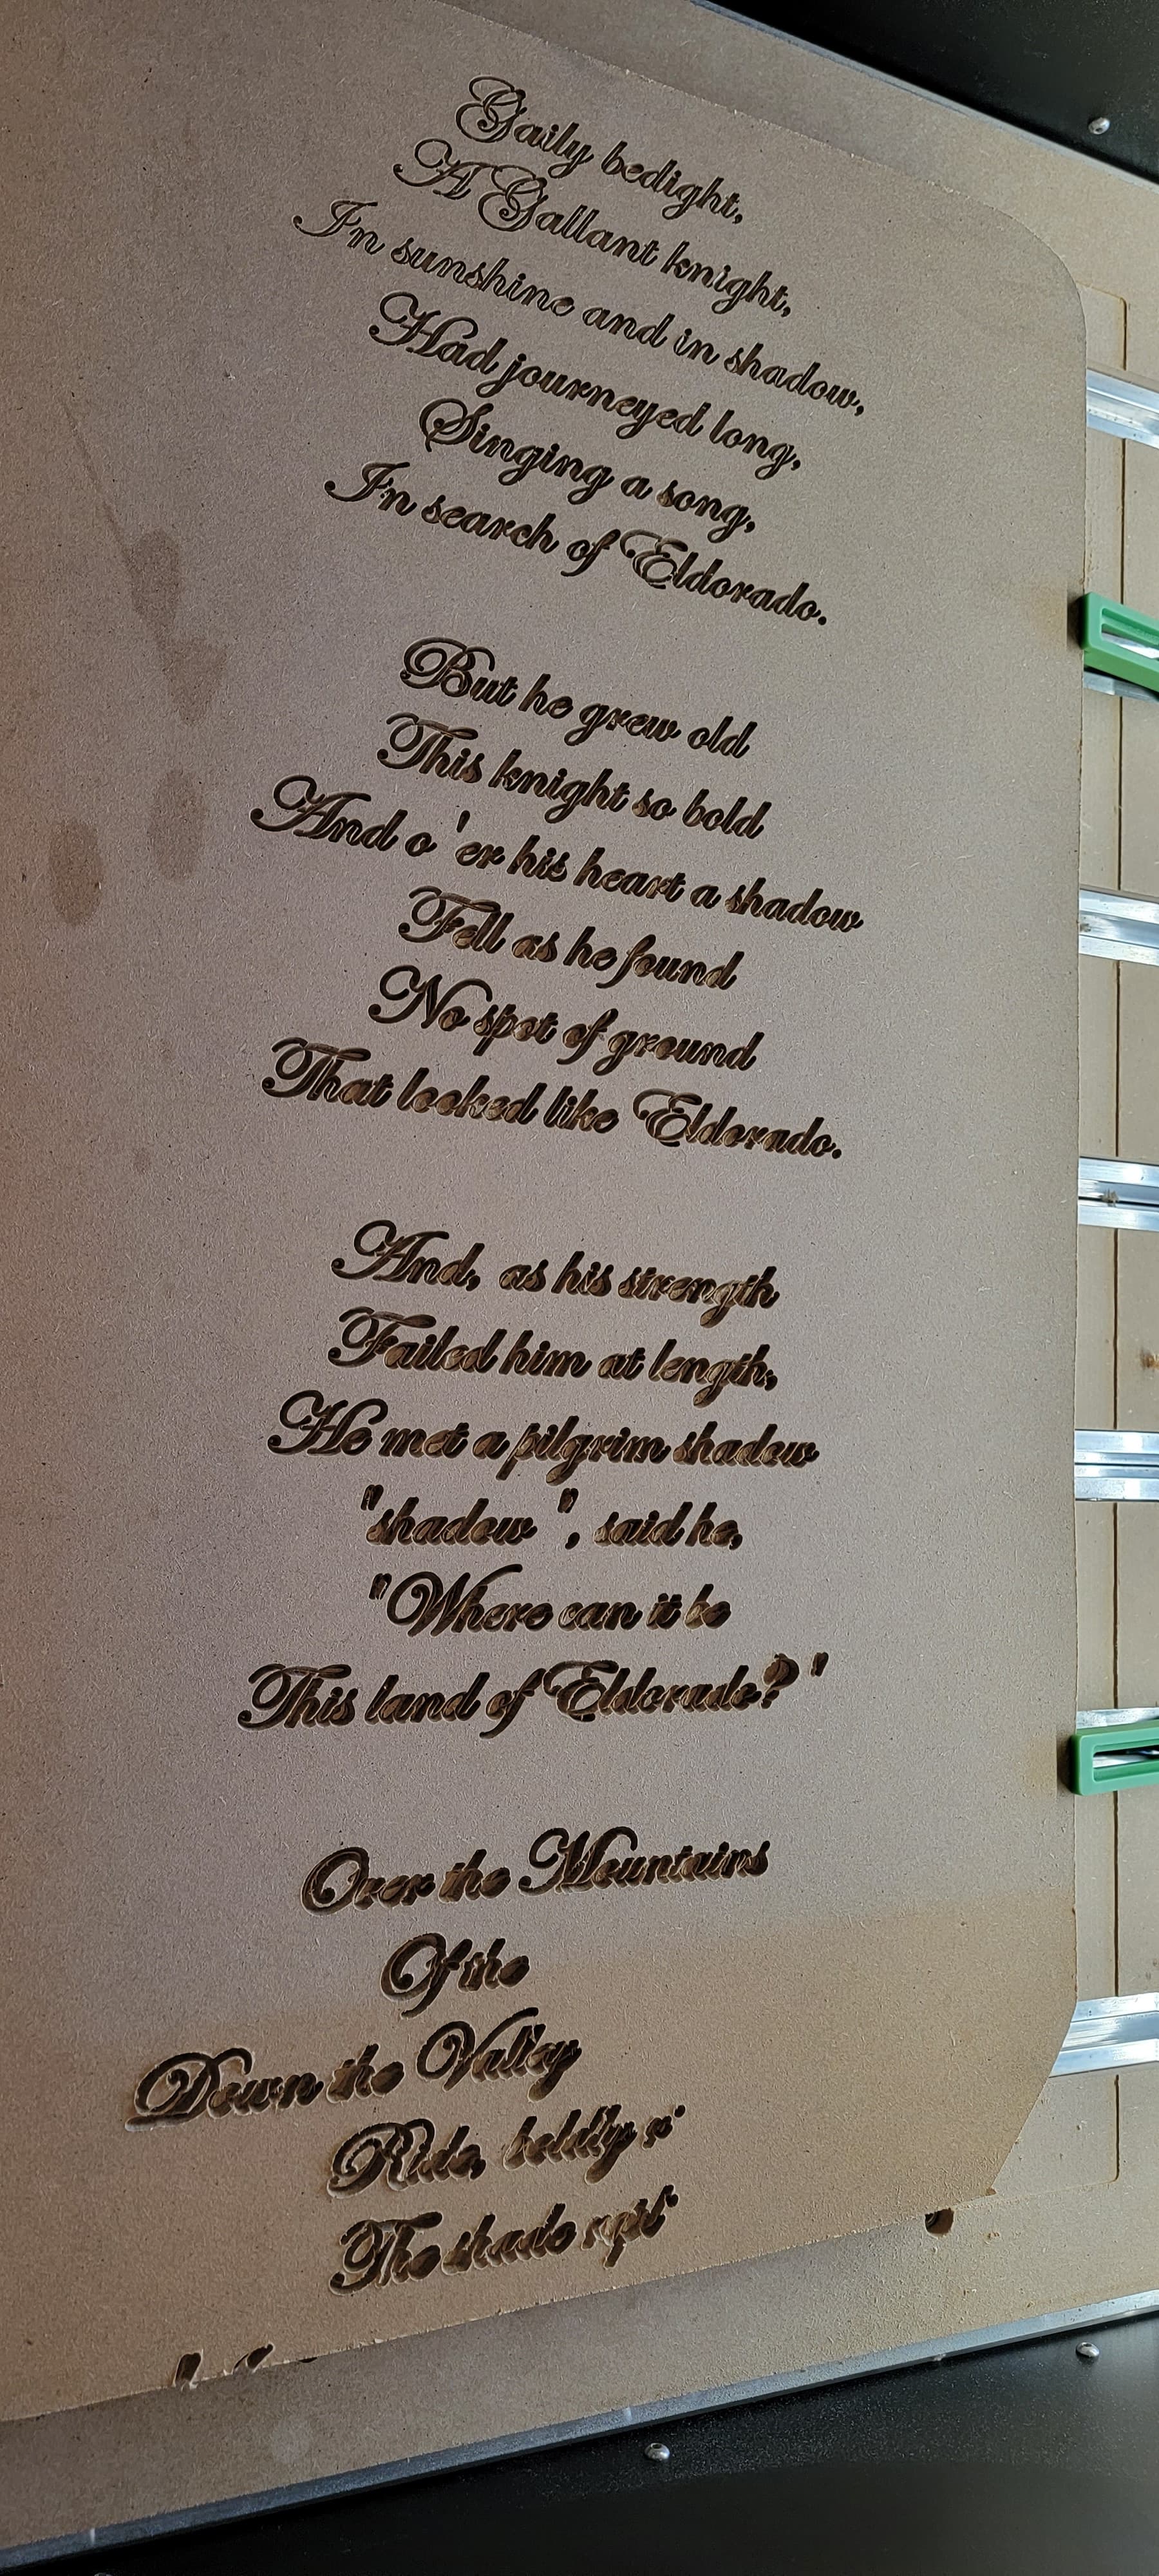
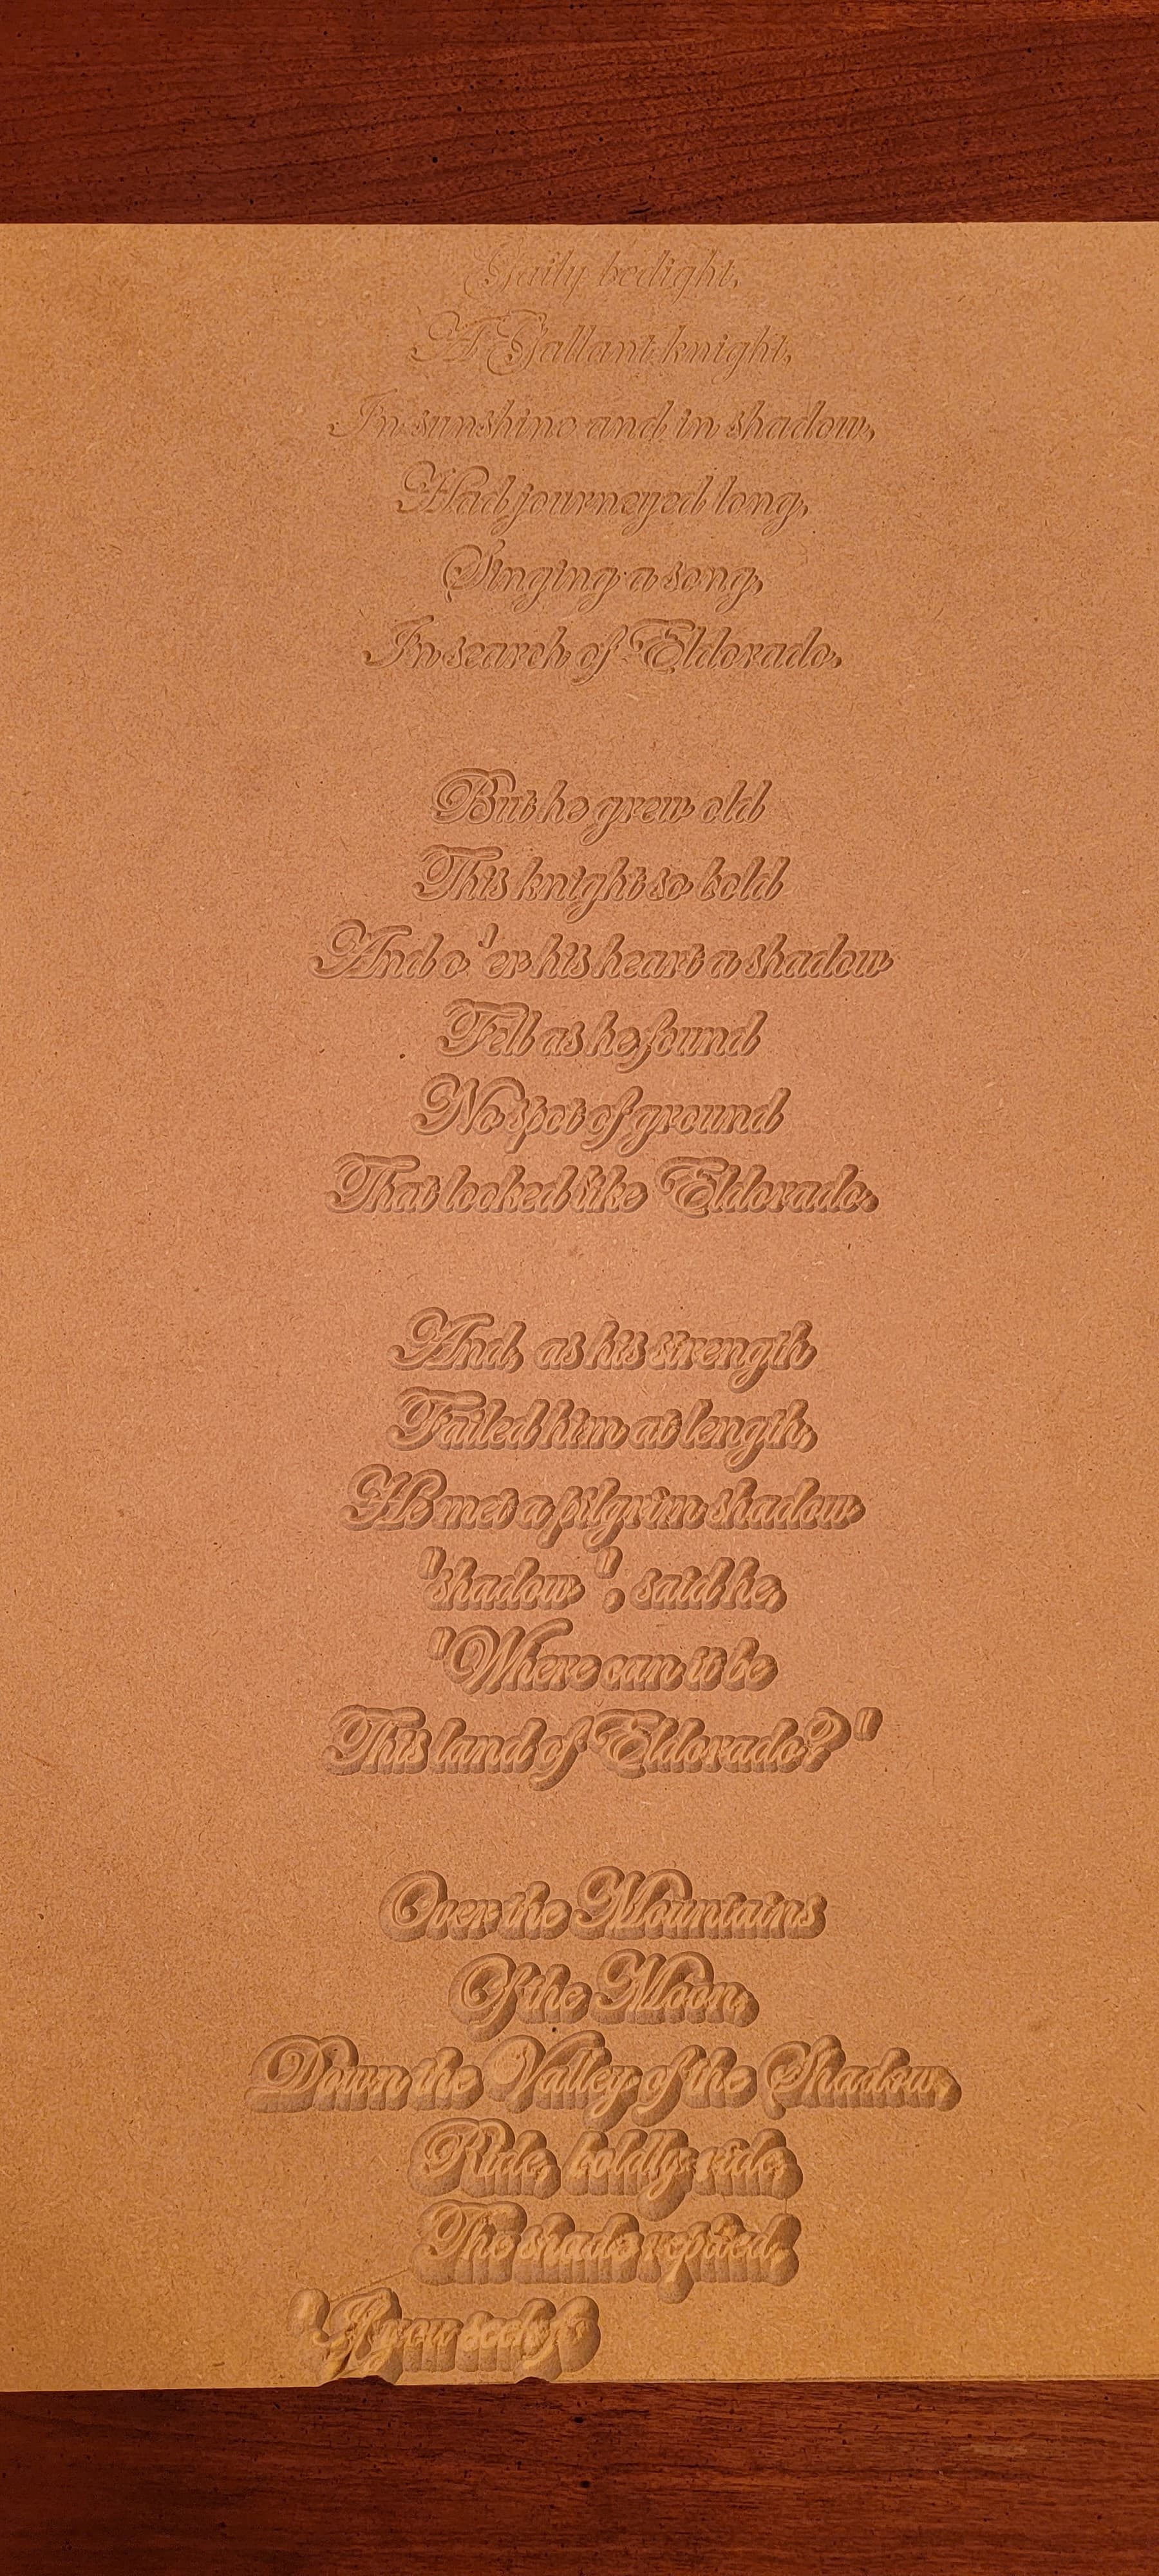
Here is a separate attempt with just a .05 cut depth parameters

The only thing I haven’t tried is planning the actual cut material. Other than that, i’m at my wits end. Please help. Thanks in advance

I would try:

  • machining a pocket for your material
  • facing off the material

If your material is the same thickness, and level with your spoilboard, and you’ve verified that your cutting bit isn’t slipping out of the collet, I would check the electrical connections for your Z axis motor.

1 Like

Also check the Z-axis motor coupler — let us know about this at support@carbide3d.com


Is the MDF sitting down in the pocket all the way/

1 Like

A Quick test - if you carve only 2 rows of text, one at the top and one at the bottom, do you see the same difference in depth?

If so, then this is most likely a problem where the top surface of your material is not all sitting at the same Z Zero. Could be because the spoilboard isn’t level W.R.T. the spindle, or the material is not a consistent thickness.

If the depth differences don’t look the same as your bigger test, then that means something is changing over time. So, check your machine mechanicals:

  • Bit Slipping
  • Motor wiring
  • Motor connector
1 Like

Thanks for your reply, can you point me towards something that shows how to check the z-axis electronic connections?

I have verified that all motor coupler screws are secured tightly

If you jog your machine to the almost back of the project and then do a rapid position of Z+6MM and measure that. Then jog to the front of your material and do the same Z+6MM and measure that. If they are the same that would indicate your spoilboard and/or material are flat. If they are not the same measurement than that would indicate that your spoilboard is not flat and/or your material is not a consistent material. So if you are not the same front and back on the material, take the material out and do the same by jogging down to the surface and set Z zero. Then in the Jog Rapid Positions select the Z+6MM at front and then at back of spoilboard. That will eliminate the spoilboard as the problem and you can look at your material.

Since this is an HDM the rails are not likely to be the problem but just check them to see of they are level and square to each other. Jog your machine all the way to the front. Turn off your power and manually bring the gantry up until it touches. If it touches on both sides you are square. If the gantry is not touching on both sides evenly then review squaring your machine. If the machine is not square that could cause the gantry to dip at the front and rise at the rear.

1 Like

So I proceeded to do the first option of jogging across the entire table on both sides and rapid motion to the z+6mm and measured the same and also the spoil board. Regardless i’ve planned the entire cutting section of the spoil board and planned both sides of the cut piece.

I also believe I checked the rails correctly (I took pictures to ensure I understood you correctly), by turning the power off and moving the gantry manually. However, as you can see everything seems to be evenly touching.

Left side of the Y axis

Right side of the Y axis

top of the Z axis

After planning the spoil board, the cut piece and checking the rails I proceeded to do another cut piece and am still encountering the same issues of the depth dipping deeper from left to right.

I might also add that even before planning my cut piece I flipped it on its X-axis to see if it would start cutting deeper first then getting more shallow but the issue remained consistent in the same fashion.

Will,

Check and check. I planned the spoilboard and the cut piece same issue. I even flipped it on its X-axis to see if it would first cut deeper then proceed to get more shallow but the issue remained consistent.

However, since you are employed at Carbide please make note of this. Maybe this is a separate issue, maybe this is connected or not. But while closely inspecting my HDM during this more seemingly hardware issue i’ve started to notice some quality control issues…

You might need to look close but there’s a screw that’s buried in some cables and cooling lines, not to mention moving parts


This is where the screw came from

Not one, two, or three…

…but four screws missing just on the right side.

These could all be superficial and have no effect on the performance whatsoever. However, with this many i’ve found missing does not give me confidence that there isn’t more that’s missing and these are just the ones I can see.

Please let us know about these issues at support@carbide3d.com

I was losing z-height during jobs and it turned out to be a combination of a sticky Z-Axis and a slipping motor connector. There were several spots where my Z-Axis would jam up and the motor connector would slip. I would almost guarantee you have either a loose motor connector, loose stage on ball screw or binding z axis.

1 Like

After seeing people finding screws and pieces coming off I set up a schedule to check every bolt on my machine every three weeks. This allows me to do a deep clean and check everything as I am doing this.

Good luck

This proved to be the issue. I had previously checked the two screws at the z-axis ballscrew coupling and they seemed locked down tight, although my buddy suggested that I follow this advice you suggested. I had to disconnect the z-axis motor from the ballscrew put some loctite on the motor rod then reinsert into the coupling, let it sit for about 30 mins then boom…no more inconsistent depth.
Part of me is so glad I was able to fix it (with your very helpful suggestion of course) but still frustrating that I lost 2 weeks and a lot of material trying to fix the issue and on the assumption that it couldn’t be that hardware or put together so poorly for $5600. No use complaining now I guess. Thanks again DiscoJon, couldn’t have done it without you.

2 Likes

This topic was automatically closed 30 days after the last reply. New replies are no longer allowed.