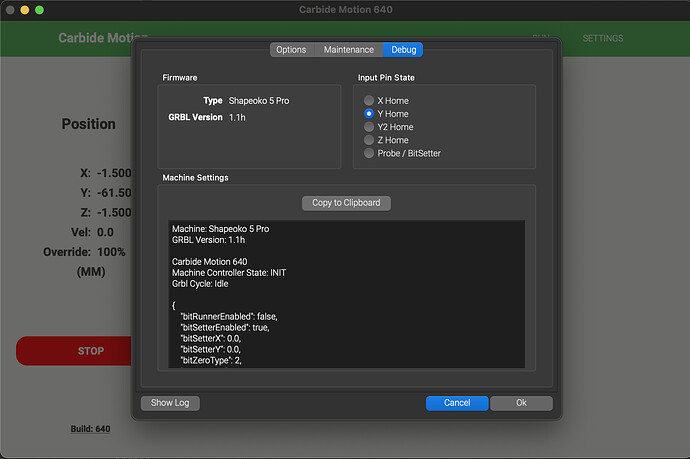
Assembled the machine today and wanted to make my first cut. These are the steps I have performed before I got the message.
1 - Initialize, I was able to go through the entire initialization process, the machine went to the top right, then bottom right, I made a few minor adjustments to be in the center off the bit setter
2 - I secured some MDF board roughly in the center of the machine and then moved the machine to the bottom left corner, used some paper to get close to touching the MDF.
3 - I went to the zero screen and this is probably where I pressed the wrong button “zero all” / I wanted the current position to be my zero all for this job but I likely made a mistake and when pressing this button the machine went to the top right and all the way down to where the bit even caused a small scratch in the right y axis ![]()
4 - After this point, the machine won’t cooperate, I tried going through the initialize again, from the begging and tried starting over as a new machine but it just keeps throwing HM001 and HM008
5 - In the Debug menu the Y Home is always lit and the other probes do not react to my screwdriver. The bit setter probe however reacts when pressed.
HM001: The machine could not pull off the homing switches.
This could be caused by:
-
Mechanical problems jamming a machine axis
-
A malfunctioning homing switch
https://qr.carbide3d.com/error/hm001
HM008: The machine could not pull off the homing switches.
This could be caused by:
-
Mechanical problems jamming a machine axis
-
A malfunctioning homing switch
This is equivalent to GRBL Alarm 8.
https://qr.carbide3d.com/error/hm008
Machine: Shapeoko 5 Pro
GRBL Version: 1.1h
Carbide Motion 640
Machine Controller State: INIT
Grbl Cycle: Idle
{
“bitRunnerEnabled”: false,
“bitSetterEnabled”: true,
“bitSetterX”: 0.0,
“bitSetterY”: 0.0,
“bitZeroType”: 2,
“connection”: 5,
“lastConfigSent”: 0,
“lastProbeIndex”: 0,
“lastSizeOption”: 0,
“odometer”: [
{
“cleared”: false,
“minutes”: 2.4018833333333336,
“startDate”: “2024-12-08”,
“travelX”: 2166.575988292694,
“travelY”: 5194.800048112869,
“travelZ”: 571.5759966373444
}
],
“showCarbideRouterRpm”: true,
“spindleType”: 0,
“travelX”: -1237.0,
“travelY”: -1237.0,
“travelZ”: -155.0,
“version”: 0,
“webhooks”: ,
“workOffsetX”: 0.0,
“workOffsetY”: 0.0,
“workOffsetZ”: 0.0
}
0 = 10, Step pulse, microseconds
1 = 255, Step idle delay, milliseconds
2 = 6, Step port invert, mask
3 = 0, Direction port invert, mask
4 = 0, Step enable invert, boolean
5 = 1, Limit pins invert, boolean
6 = 0, Probe pin invert, boolean
10 = 255, Status report, mask
11 = 0.02, Junction deviation, millimeters
12 = 0.002, Arc tolerance, millimeters
13 = 0, Report inches, boolean
20 = 0, Soft limits, boolean
21 = 0, Hard limits, boolean
22 = 1, Homing cycle, boolean
23 = 0, Homing dir invert, mask
24 = 500, Homing feed, mm/min
25 = 2000, Homing seek, mm/min
26 = 25, Homing debounce, milliseconds
27 = 1.5, Homing pull-off, millimeters
30 = 24000, Max spindle speed, RPM
31 = 0, Min spindle speed, RPM
32 = 0, Laser mode, boolean
100 = 80, X steps/mm
101 = 80, Y steps/mm
102 = 160, Z steps/mm
110 = 5000, X Max rate, mm/min
111 = 5000, Y Max rate, mm/min
112 = 3000, Z Max rate, mm/min
120 = 500, X Acceleration, mm/sec^2
121 = 500, Y Acceleration, mm/sec^2
122 = 500, Z Acceleration, mm/sec^2
130 = 1250, X Max travel, millimeters
131 = 1250, Y Max travel, millimeters
132 = 155, Z Max travel, millimeters
Maintenance:
Travel (km) 0.00, 0.01, 0.00, 0.04 Hours since 2024-12-08
Queue Empty
