Running a stock SO3 that I have slightly elevated above my bench, in order to use my bench vise to hold my workpiece.
I was cutting some fairly deep pockets (a little over 1.3") in 7075 T6 aluminum, using a 3 flute, Zrn coated extended reach .25 mill with a 37deg helix. Was using Fusion360 Adaptive 3D clear for roughing, Makita at 18000rpm, .075" max DOC, .025" optimal load, netting a .001" chip load.
About .75" into the pocket, I heard some pretty loud chatter despite my attentive use of aluminum cutting fluid and active chip clearing, so I paused the cut, checked everything, and unwisely resumed the cut, at which point the machine bit hard into the workpiece, staggering to the edge of the pocket and gouging it before I could again stop it safely. This naturally chipped the ends of the mill, so that was caput as well.
With the lesson learned and the piece wrecked, I checked my Z zero, and found when at my zero, Motion showed me at +.373".
The obvious problem is belt slippage. I do have a few questions though. Are these feeds completely unrealistic for a stock SO3? I adjusted my v wheels to the point that the carriage would move but not allow the carriage to rattle, had the machine meticulously leveled and squared, and the Z belt as tense as I dared (I can get a short strum with my finger plucking it). With this level of discrepancy, I’ve made a grave error somewhere, so for now I’m planning to go back over the machine, then dial back my feeds and speeds significantly to hopefully not repeat my error.
Anyone have other advice on things I should remedy or investigate?
I suppose you used a helical ramping during plunge moves? what plunge rate ?
you did not mention the feedrate you used ? (I guess it’s ok IF you took chip thinning into account to reach an effective 0.001" chipload ? but always worth double-checking)
depending on the width of your pockets, 0.75" starts to be deep enough to increase the likelyhood of chip recutting, especially with a 3-flute. Were you using a blast of air or manually vacuuming chips? I have had similar cases (with a 3 flute indeed) in deep narrow pockets, where my (single) air blast would not have much effect below a certain depth of cut (probably my bad on not orienting it properly enough)
I now tend to favor single flute cutters for deep cuts, much better chip evacuation, have you tried those ?
Did you hear the Z motor skipping steps/clicking at any point ?
if not, have you checked the set screws on the Z pulley ? Sorry if I’m stating the obvious, but 0.4" slippage sounds typical of pulley slipping, but then again it might just be that you lost motor steps during that final crash
I did use helical ramping, with a 0.5 degree approach. My plunge rate was 8in, the ramp feed and plunge were slower (I don’t have the file in front of me, I’ll come back with an edit for exact numbers). I did use the ITAR calculator after running through some old threads and finding VinceFAB’s recommendations and Winston’s adaptive clear recommendations (will come back with the SFM and other feed data as well).
I started with running a dust boot, but did notice pretty early that I was going to have to follow with my vac and a thin funnel manually, which kept it relatively clear.
I haven’t tried a single flute cutter yet, but also haven’t found one with a long neckdown. I did find some 2 flute roughers through MSC and picked those up; we’ll see how they go when they come in.
I didn’t hear the motor skipping, but running through aluminum in a car garage workspace would make it pretty difficult to hear with the necessary ear protection on. I will go in and check the set screws, given that it trying to resume by plunging quite deeply indicates (to me) that I had already lost the steps by the time it went for it.
I did run the same profile cut in 6061 T6 at a shallower depth (I was using bar stock, so I didn’t have the necessary stock depth) with just a dust boot, cutting dry using the 201 cutter (no coating), and it ran fine, coming in within a thou (+/- .0005" for the calipers) of where I wanted each dimension. I ran that pocket with no finishing pass using speeds/feeds slightly slower than Motion’s built in, using Carbide Create’s pocket cut pathing. I’m guessing bringing my feeds/speeds down and inspecting my belts, wheels, set screws, and tram might do it. I’ll probably be thorough and check my motor calibrations too. I appreciate you taking the time, and checking the set screws didn’t occur to me, so thank you for that as well.
Definitely drop the flute count if you can. That’s a pretty deep pocket but its possible to reduce a shank by hand to clear if you want a “one and done”.
One option is using a single flute like the cd3 one and programming the cam to step away from the wall for shank clearance after the cut gets deeper than flute length. Easy to do in fusion, give it at least 10 thou. Then come in with your long three/two flute and run a contour finishing pass on the walls.
I’ll put money on your three flute chip evacuation leading to a skipping Z belt. The stock Z belt is 6mm and can slip pretty easily when stuff loads up. I threw together a 9mm belt conversion that seems pretty beefy.
I love the single flute shank step idea Vince. Would you recommend just extruding my model inside the pocket to the height I’d like it to start stepping over, plus a little safety slop? Or is there a less “bull in a china shop” method?
Also, definitely interested in the 9mm belt conversion. I’d go right to an HDZ, but it looks like the distributor has been long on getting the plates in. Can you point me towards that?
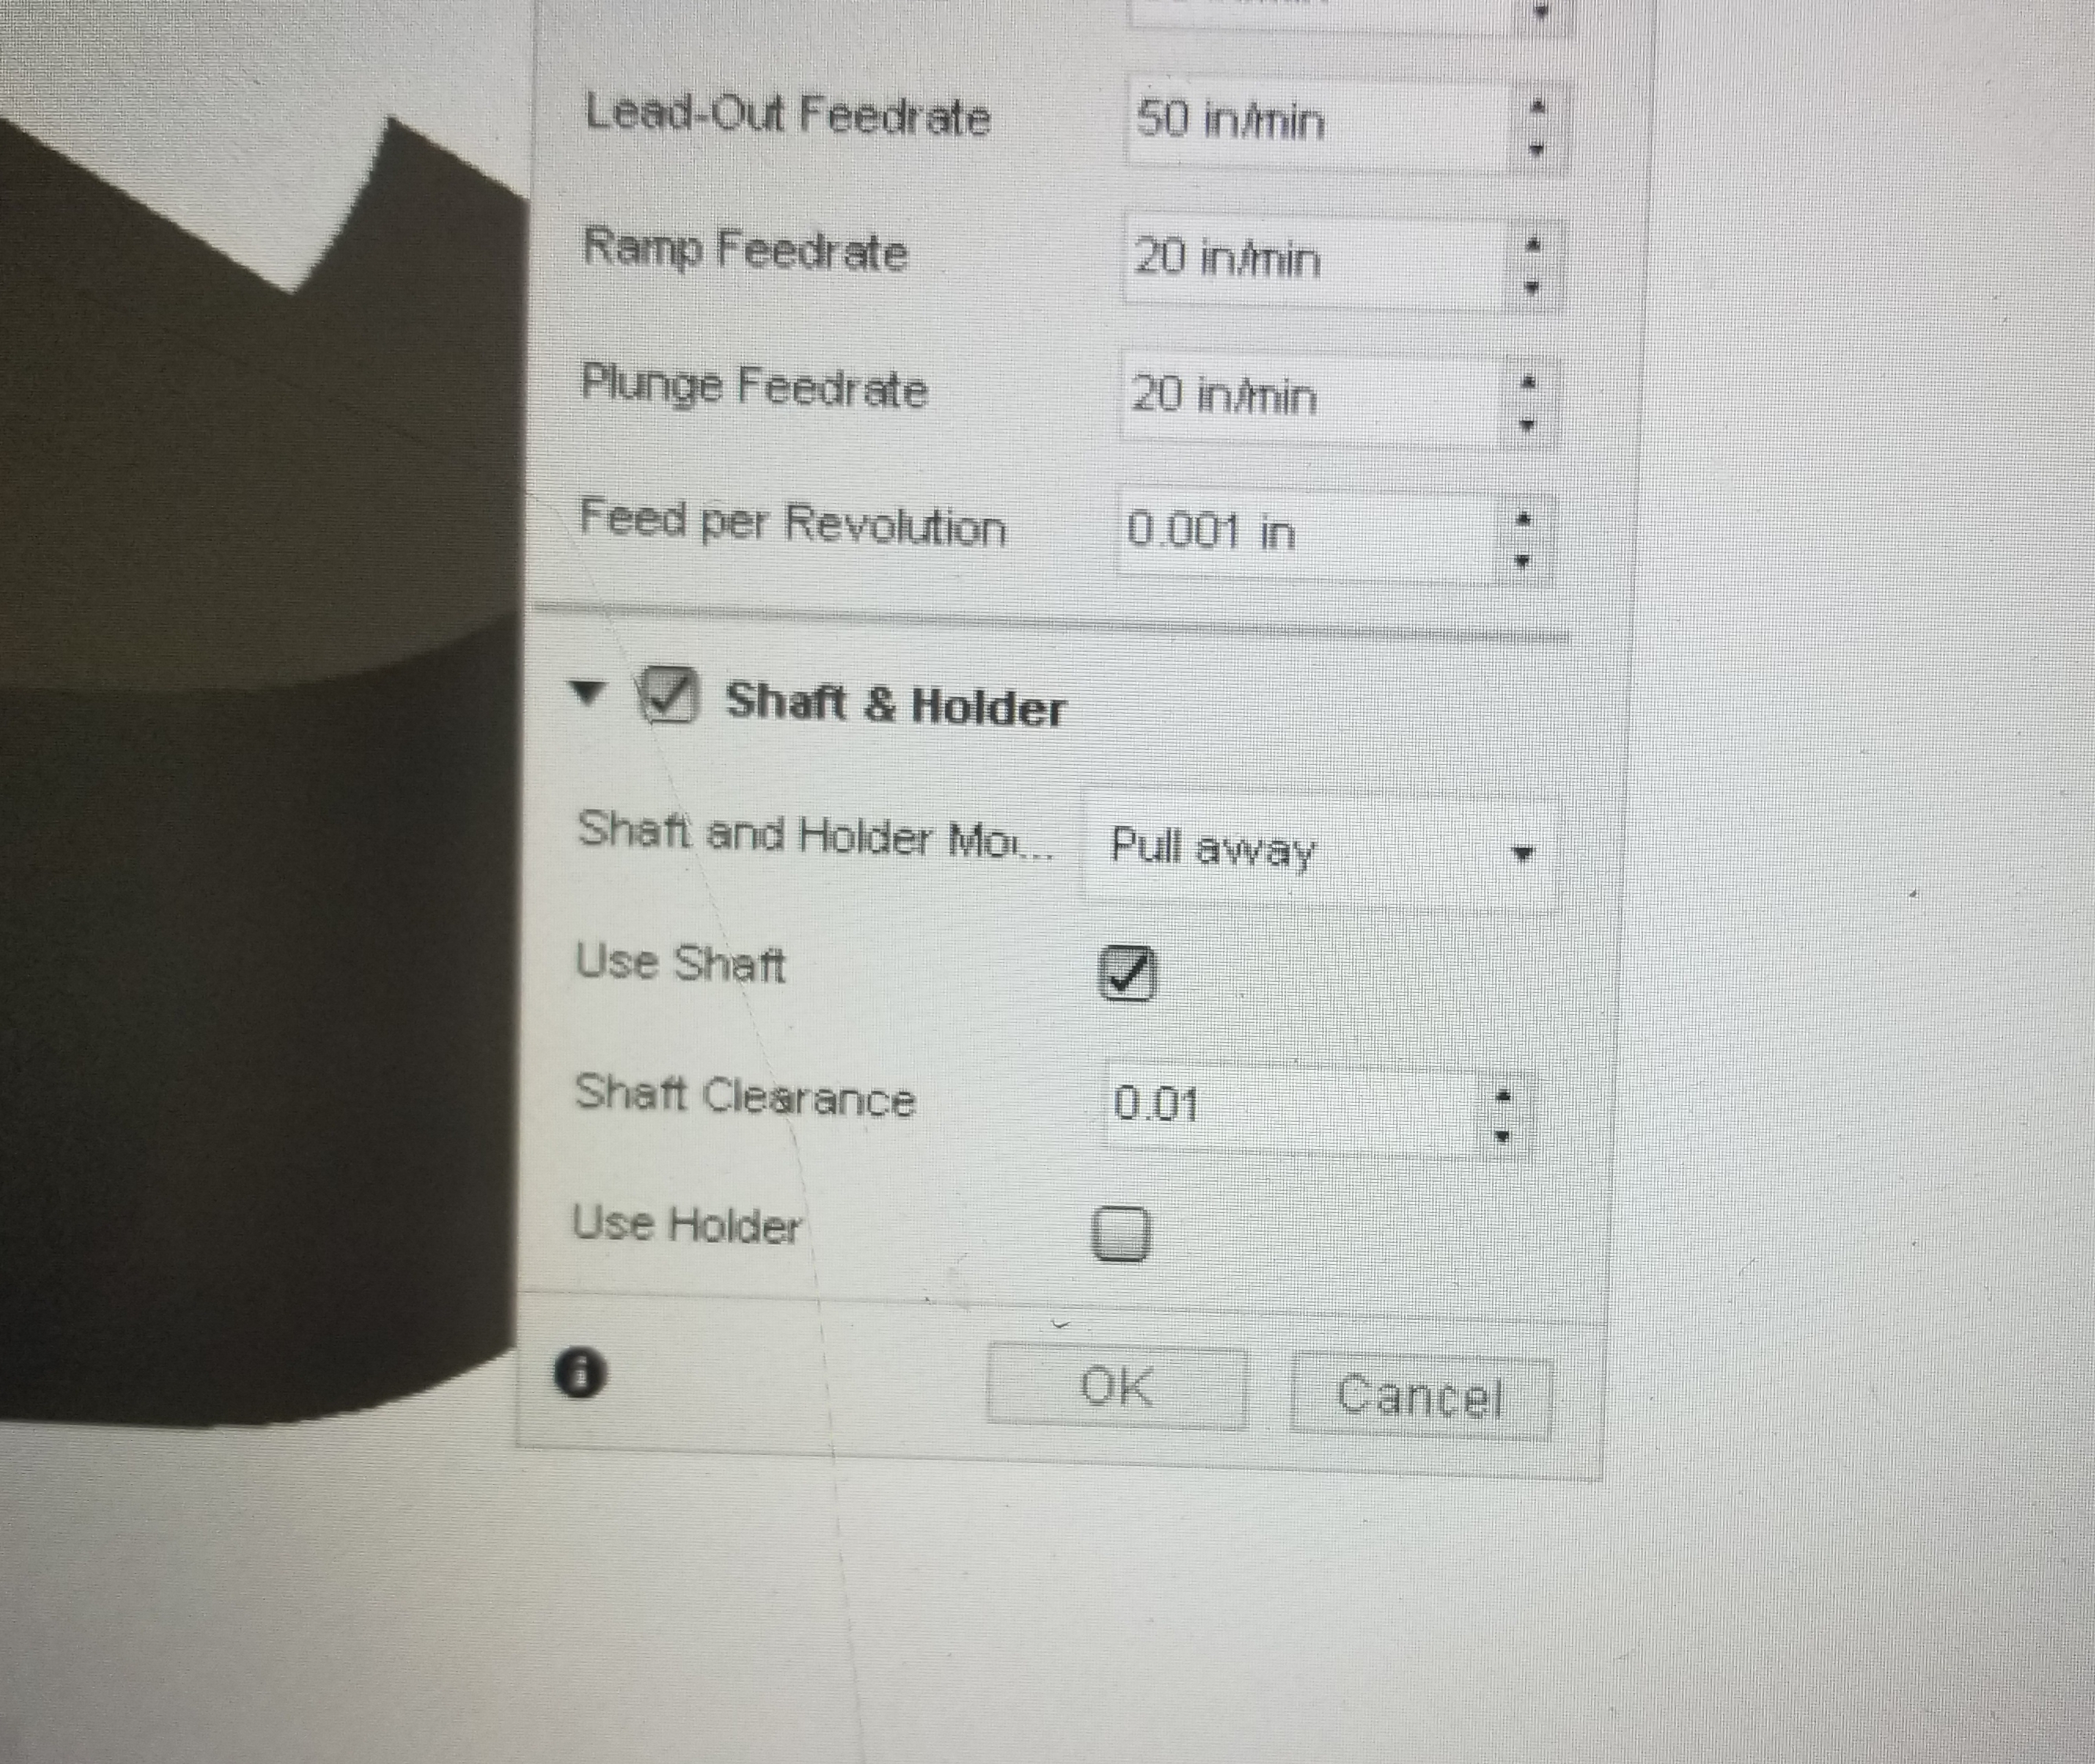
Fusion is easy, just go into your adaptive toolpath and in the Tool tab you’ll see “shaft and holder” option. See attached photo for setup. Usually I’ll only use shaft enabled unless pockets get deeper than the collet nut…super fun lol. Make sure your tool is programmed in your Library exactly*
Also attached a photo of the conversation. Its very simple and only needs little mods. Haven’t really had the time to finish cleaning up the design but it’s a working prototype. Needs upper 9mm pulley. 9mm open length belt, lower puller spacers and the two machined parts. Lower bolt head and rear of the Z plate need to be clearanced a bit.
HDZ is definitely worth it and the Z plus seems to be up there as well if you don’t mind reduced travel.