Thread Milling (Single Form) - Fusion

A while ago, @HeuristicBishop generously sent me a few of the single form threadmills he had acquired. I asked no questions about how many he had, or why the supplier was out of stock… he only asked if I would do a writeup about the threadmilling process. I’m finally making good on that.

This will be a multi-part series as I do some chain-of-consciousness. I program in Fusion, I cut aluminum, and I’m no machinist but I did stay at a Holiday Inn Express that one time.

Part 1: What is threadmilling, and what’s a “single form” tool?

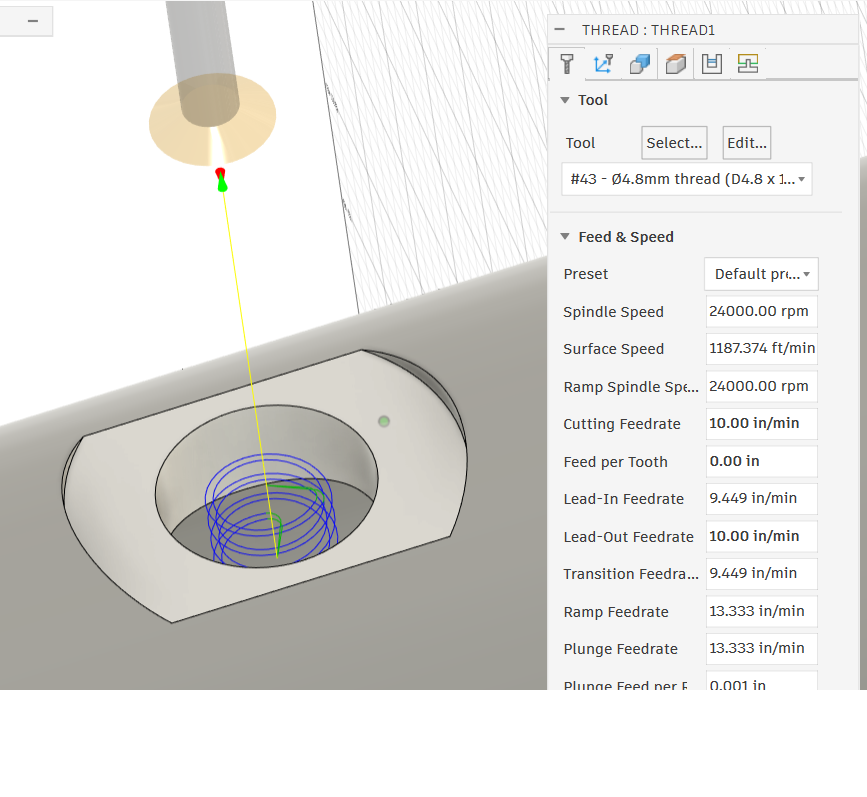
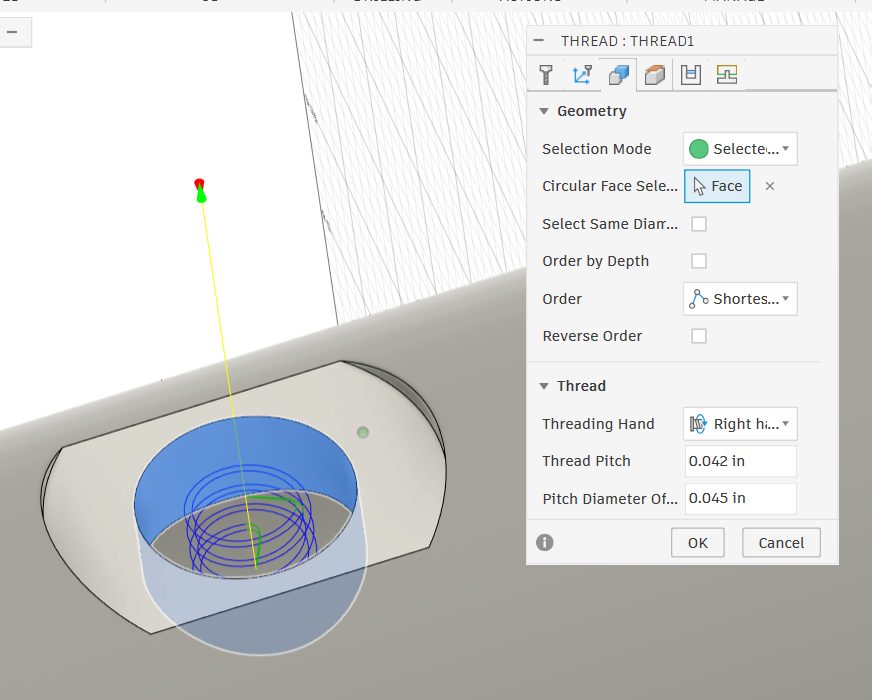
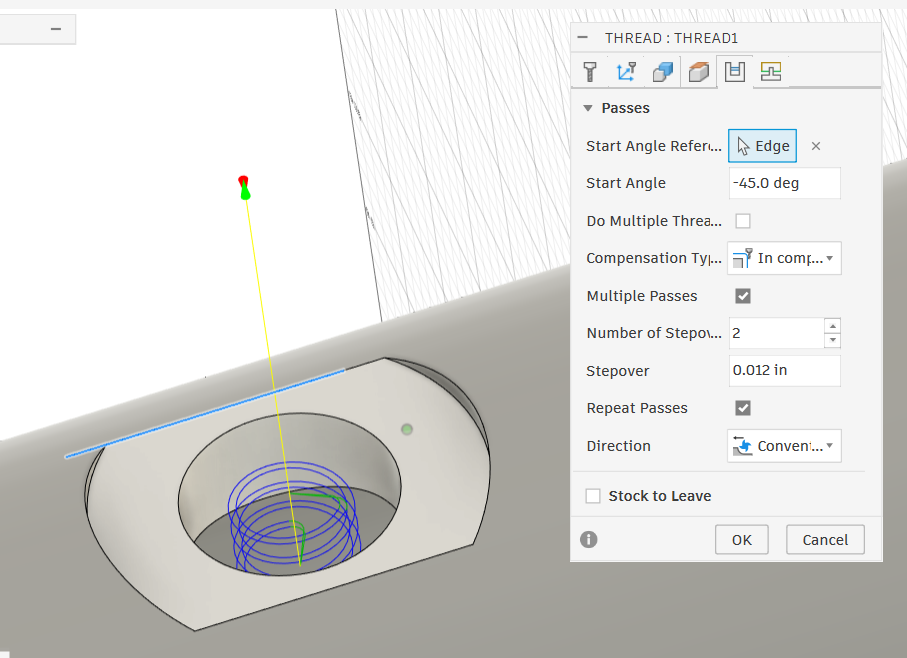
Threadmilling is using a thread-shaped tool that is smaller than the hole to cut a thread form into a hole by “interpolating” in a spiral pattern down the wall. This is different from tapping, which is forcing a screw-sized tool into the hole and cutting the whole thread at once (360 degrees). Threadmilling cuts like an endmill doing a contour cut; it’s only nibbling away 5-10 degrees of the thread at a time and working its way down and around at a controlled rate.

For these smaller, less rigid machines, it’s a godsend. Less torque, less risk of breaking a tool, easier to recover if you do break a tool, and some really unique flexibility advantages that are only available because it’s all CNC. I can’t imagine trying to drive a 3/8"-24 tap with a Nomad 3 into 6061; it’s hard enough with a 6" tap handle. But that’s just what I’m going to show, using a properly-sized single form threadmill.

What’s single form?
Single form is threadmilling one tooth at a time instead of milling the whole depth of the hole in one pass.
A standard threadmill will have a specific size - e.g. a 10-32 threadmill will have 3-15 teeth, and they will each be spaced exactly 1/32" apart. You can threadmill 3/32" - 15/32" of hole depth in one revolution as a result, but you can only machine a 32TPI thread with this sort of tool. Oh, and it takes more torque.

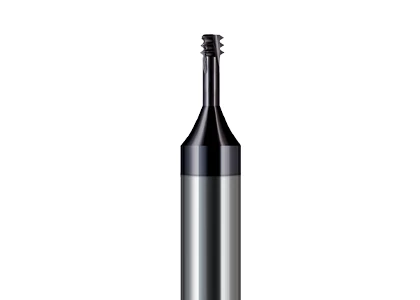
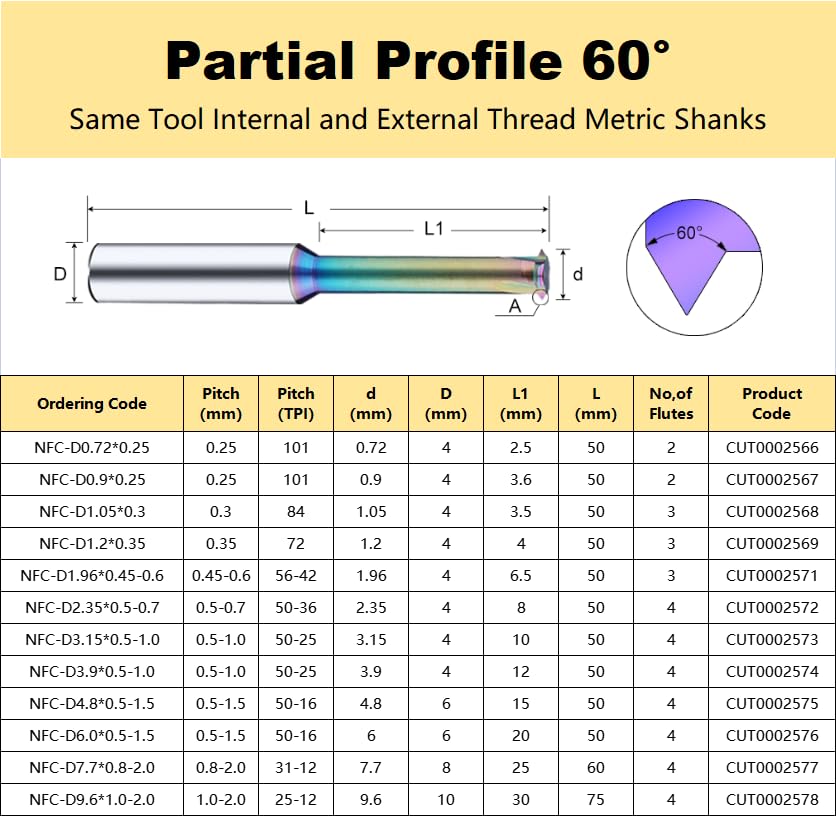
A single form threadmill is just one tooth. Therefore, by adjusting the NC code, I can use my #10 single form threadmill to cut a 10-32, a 10-24, or a 10-28.75 thread. Really any pitch I please (within a few limitations I’ll cover later). If you do a variety of parts (or are only doing one-offs and prototypes), this flexibility means you need a tiny fraction of the number of tools, and can have a backup or two of each tool without breaking the bank. Awesome.

5 Likes

Tools well spent :grin: :beers:

Part 2: How to select a threadmill?

When dealing with a single form threadmill (again, only one tooth), there are 4 tool dimensions that matter most. The first three of these are closely related to your thread data, which you should look up ahead of time.

(I’m a fan of ANSI Internal Screw Threads Size and Tolerances Table Chart and Screw Threads Calculator for Internal Unified Inch Screw and they have other tables for external threads, which can also be threadmilled.)

Minimum hole size (which only matters for internal threads)
Maximum Pitch
Shoulder Length
Tool Length

Minimum hole size - this is the minor diameter of your thread. Any machinist will have (or know where to find) a table of thread properties (see above), including minor diameter. The tool has to be smaller than this minor diameter, or it’s going to be really tricky to get it back out of the hole once you’re done. The minor diameter is the size of the largest pin that you can drop through a threaded hole without it getting stuck. For a 3/8"-24 2B thread, for example, it’s 0.330" to 0.340" (and yes there’s always a class and a tolerance; a 2A external thread will be a little smaller so it doesn’t get stuck in your 2B internal thread. Classes 1 and 3 are looser and tighter fits, respectively.)

When you select a threadmill, make sure the cutting maximum diameter is smaller than your hole minor diameter, and you’re good to go. For my 3/8"-24 thread, then, I need a tool that’s less than 0.330" across the cutter.

Maximum Pitch - this is based on the size of the tooth on your tool.
Let’s say I overcompensate on my “minimum hole size” above, and say “I’ll get a teeny-tiny threadmill so it fits in every hole from a #2-56 up through a 3/4”-10." Yes, it will fit - but I have now limited my threadmill to having a maximum diameter of 0.0667" (the minor diameter of a #2-56 hole). This means by “tooth” can be no bigger than 0.0333" tall (assuming my tool shoulder is 0.001" thick) - so I’m unable to reach the root of any thread with a pitch greater than 30TPI.
(Variable H in this graphic.)

So there is a tradeoff - small threadmills can only cut small pitches. Bigger threadmills can cut bigger pitches, but can’t fit in small holes. And at some point, as the thread gets bigger, the thread crest/ root gets bigger (0.125P and 0.25P in the diagram above), so you’ll get some sloppy, incomplete threads. (Which you could chase with a hand tap in a pinch.) As a result, most threadmills will come with a data card that shows both minimum and maximum pitch allowable. Like this one.

Shoulder Length - Simple stuff. How deep is your threaded hole? Make sure L1 (in the above table) is at least that deep, or the threadmill shaft will bump into the top threads.

Overall Length - How big is the machine; how much Z-travel do you have? I’ve had to cut a few threadmills to length (stick it in a collet, spin it in a lathe, grind it to make a weak spot, then crack it off. Yikes. Wear a mask.)

3 Likes

Part 3: Programming
This will depend heavily on your CAM software, but select a tool, then there are two key variables.

I selected a threadmill of appropriate size, and put in the data for my tool library. It shows a multi-form by default, but when I tell it “1 tooth” the CAD drawing to the right updates. Notice there is a minimum and maximum pitch field (so it warns me if I’m using that #2-56 for a 1/2"-13 thread), as well as shoulder length and all that stuff. You can do ACME and trapezoidal and Whitworth threadmills too, but they have different point geometries (and are harder to find).

Once I have my threadmill selected, time to program the toolpath with my two big variables:
Pitch
Offset

Pitch is the distance the threadmill will travel axially per revolution. (For a 3/8"-24 thread, this is 1"/24, or 0.04167".)

Offset is the distance the tool will plunge radially from the modeled minor diameter. This is a function of your thread height. (For a 3/8"-24 thread, it is 0.375" - 0.330" = 0.045" because Fusion does it in diameter, not radius.)

I select a hole (modeled at my minor diameter and bored to size in a previous operation), then tell it I’m threading. I pick conservative speeds and feeds with light cuts because the narrow neck on these tools makes them flexible and fragile. I should probably slow it down as I’m making more powder than chips but no problems yet, and I’m trying to get a really smooth finish.

Then I input my thread data - the pitch and offset.

Then I fine-tune. On this part, I’m trying to cut a blind thread to install a spring-loaded ball stop in the wall of a tube, as far in as possible without raising a burr at the end of the thread. I want to have a small lead-out, and have the thread stop not on the centerline of the tube, but perpendicular to it, where there’s a little more “meat”. This lets me cut about 0.020" deeper than if I had it stopping at the shallow portion parallel to the tube centerline. So, I told the thread to start at an angle (45 degrees in this point) that gives me my preferred lead out location. Yeah, pretty cool that I know exactly how the thread will be “clocked”. Can’t really do that with a hand tap (which tends to start wherever it wants to). I also decide to do a couple light passes, and repeat them, so the flanks of my threads are nice and smooth. I do a conventional cut direction - which is top-down on a threadmilling operation. You can do a climb cut and start at the bottom and cut up and out, but that seems weird and scary.

Ok, that’s it! That’s the basics of how I pick a threadmill and program the cuts, and it tends to work pretty well. I’ve threadmilled everything from an 8-32 up to an oddball .870-28 (matching male and female, holding 350psi!) using these inexpensive Amazon threadmills, and no issues so far. (I actually turned a part on my lathe, then machined it in the Nomad because I didn’t have the right gear for that weird tooth size.) My luck with hand taps is far less good.

CarbideToolSource has a variety available but all with excessively long shanks (IMO). Harvey has a bit of everything, including ACME. Make sure you’re getting the right coatings (or lack thereof) for the materials you’re cutting (no Al in the coating for Aluminum parts, etc.). Best way to learn, though, is to try it out. There’s something really gratifying about taking a part off the mill and dropping a screw right into it, or threading it right into the mating part. And the threadmilling op is rarely more than a minute long, so the tool change is the extent of the cost.

4 Likes

Wow, excellent writeup, @nwilson! You make me almost want to try it myself… :disguised_face: Thank you for this.

I’ve never threadmilled so I’m just repeating internet rumors, but I’ve read that starting at the bottom is considered by some to be better because you’re not ramping down into an increasing pile of chips if it is a blind thread. Or will at least air blast keep the chips out of the hole?

2 Likes

Hm, hadn’t thought of that.

I use the little collet fan and those (very small) chips wind up at the far corners of my table, but also I usually thread through. I’ll keep that in mind, though. Might be one of those things I remember just when I need it later.

1 Like

Thank you very much !

1 Like

I’ll put a photo of the finished product here for reference, but can’t figure out how to do a video (unless I host on Youtube, which I may).

1 Like

Edit: Saw Your post in the other thread.

That looks like a paintball “printing tool” :laughing: