When trying to setup tile, it defaults to 4 setups. I only want 3. I set the first tile to 27". Then set the second tile to 26". When I look back at the first tile it now has 26". If I change that back to 27" then the second tile has 27". Basically all the tiles want to be the same size. How do I set each to a different size?
It’s not possible to have tiles of different sizes (though you can leave areas uncut in the last tile).
What is your stock height and the Vertical Overlap and X Margin?
I get three tiles w/ a Stock Height of 80" and the settings:

Stock height is 66. And I don’t need any overlap. I was designing a bed headboard with 3 panels. I designed it with 3 seperate designs, but it would have made things a lot easier if I could have used tile and simply slide the board. I want 3 tile with the 1st and last tile the same size and the center smaller… I also have a 2 x 10 x 120 to hold 5 barrels for making vinaigrette. Each barrel is a different size. Would be great to have 5 tiles to cut the barrel slices to fit the barrels. Each tile has different designs. I had to make 5 designs if different sizes and designs to do it… And I had to do my own overlap. Again tiles would have turned these many designs in to a single design with tiles.
biniBarrel.c2d (3.9 MB)
Could you post the file?
The tile function overlaps and cannot be avoided. However if you really have 3 separate areas that do not overlap then just make 3 separate files and figure out the corner of each of your panels and set that point on each of the 3 files when zeroing x and Y on each file. The tile will work but it will overlap. The overlap may be in area that you are not cutting in but the tiles will overlap.
The last job I did that was bigger than my XXL was I basically divided the project into two files. Each half was able to fit on my XXL. I chose the X and Y on the first file as lower left corner and drew a pencil mark where I wanted to X and Y zero and set that manually in jog. Then I marked where the second file should start carving also in the lower left corner and made a mark as zeroed on that mark and started the second file. This is a poor man’s tile but it worked. So if you have 3 separate areas to carve maybe consider that.
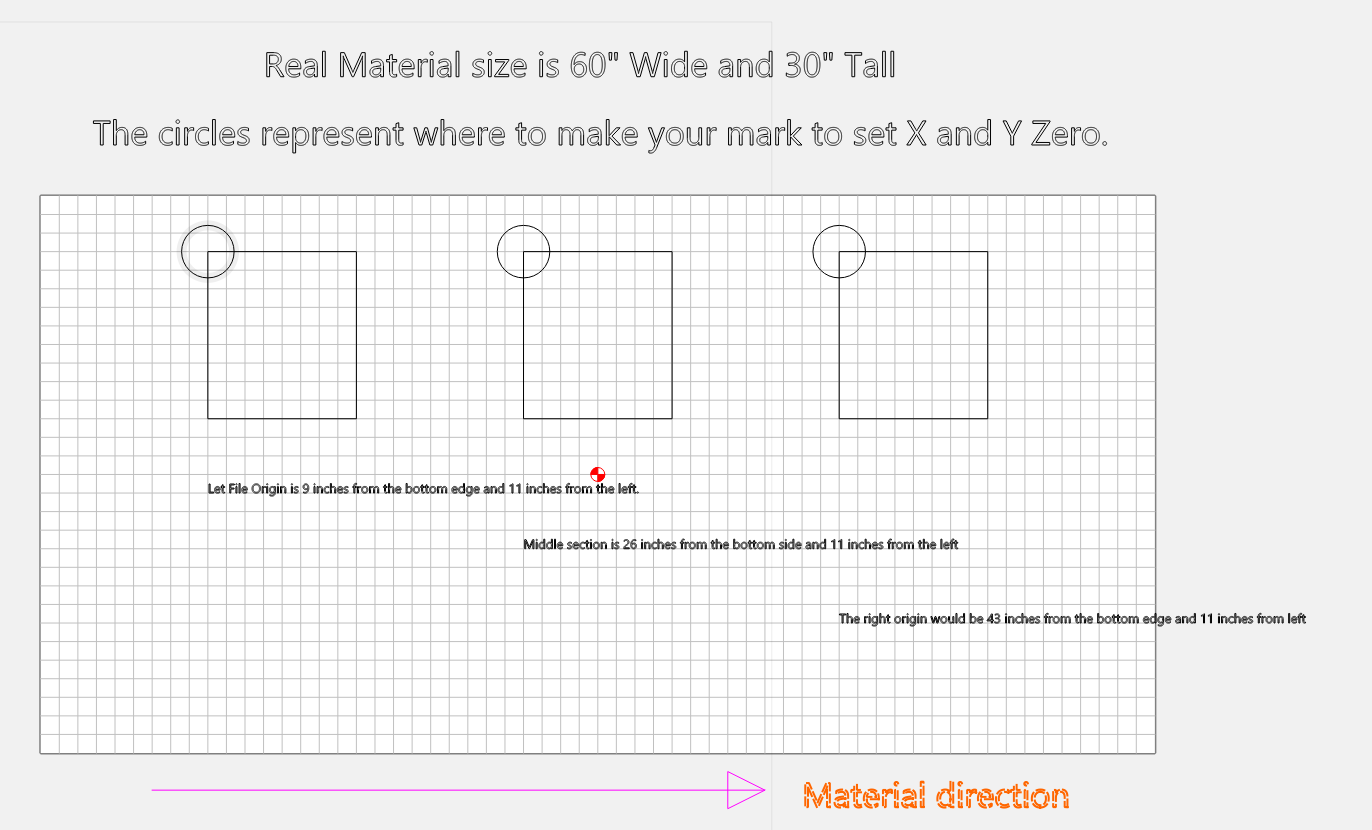
You may need to be creative and lets say your headboard is 30 inches tall and 60 inches wide. The panels you want to cut are 8" x 8" 3 times. Then change your stock size to 8" x 8" and fit your design centered inside that 8" X 8" square. Then if it was 60 inches wide - (3X 8)=36". Then you would divide 36 by 4 for the spaces between the edges and the separate tiles would be 9 inches. So then figure out how far from the top of the 30" X 60" you want each tile to be cut and that is where you would mark each X and Y zero origin. The X and Y origin would be your starting point from the bottom and from the left hand side and mark that spot and zero on each file there. Your headboard would be run through the Shapeoko by the 30" between the Y axis rails. You would rotate your design to march the feed direction of the headboard.
Attached is a sample file that illustrated my concept. The grid was set to 1" to make the example simple.
headboard_example.c2d (1.3 MB)
Here is the picture of the file. Your origin for each separate file would lower left of each 8" x 8" square.
Yep… That is exactly what I had to do. The barrel board was a lot more complicated. You can tell by the attached where I was trying to determine how to design each section separately. So instead of one design for the barrel stand I had to make about 6 drawings. I wanted the groves for the barrels to be in a it’s own drawing. To do that I had to make sure the drawing designs would overlap correctly. It just would have been a lot easier with one design and different tile sizes. So far all the projects I have that could have used tiles will not work unless I can have a different size for each tile.
Thanks for the help…
This topic was automatically closed after 30 days. New replies are no longer allowed.