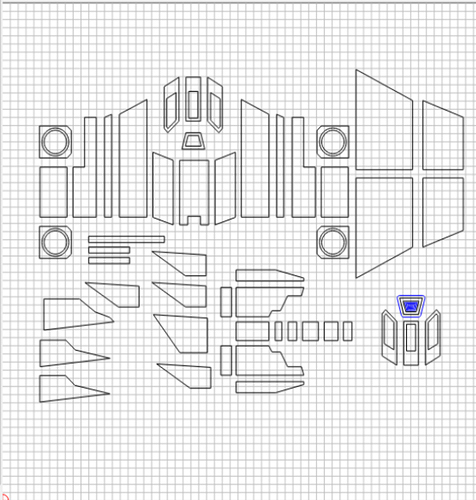
Tiny Milling Operation. Whats the best way to tackle this?

This entire thing is about 12" x 12". It is going to be made out of acrylic.

the .125 cutting tool pretty much can cut everything, just barely.

Is it possible to pocket with the .063 and .032 cutting tools? I realize that is super small, probably will take a while?

Any tips anyone has? I obv want to do this as quickly as possible!

1 Like

Yes, you can pocket with the small mills, and I’ve done so, but you need to be very careful with speed/feed to avoid breakage. .063" isn’t too terrible, but it’s very slow going.

1 Like

Have any recommendations for speeds and feeds for acrylic with such small tools?

You can most certainly pocket acrylic with 1.6 and 0.8mm (1/16" and 1/32") tools. Acrylic is very nice to machine as long as travel speed is sufficient, the tool is sharp, climb cutting is used to minimize rubbing,and chips are cleared properly. You can not move slowly or conventional cut, as any rubbing will melt the material.

I use trochoidal strategies for the most part and helical or predrilled entry. Then a moderate depth of cut with about a 40% radial engagement. For a 1.6mm tool, I’d turn it as fast as I can (Nomad 10KRPM, Shapoko all the way up) travel for a chip of about 0.05mm (0.002"), radial depth of cut of 0.6mm (0.025"), and axial depth of about 0.8mm (0.030") or a bit less, and adjust as needed for efficiency. If you are worried about the tool breaking, or have significant spindle runout, axial engagement should be reduced. For a smaller tool, proportionally reduce radial and axial engagement.

For some materials, I will increase axial engagement to as much as 3 times tool diameter, and reduce the radial a little, so as to use more of the cutting edge of the tool and shift wear away from the corners at the end. For acrylic (and other materials that tend to melt easily and will push away from the tool a lot) you need enough engagement to maintain a good chip without rubbing.

For a smaller tool, you need to proportionately reduce engagement and chip size. My numbers are not real conservative, but not overly aggressive, either. I will push much harder on paying jobs with multiples, figuring that breaking a tool tells me the limits and is part of the job cost.

Now, a story: Years ago, a friend (retired co-worker) was doing a run of several hundred large holes (1-1/2" IIRC) in tough material for a mold shop. The holes were not tight tolerance, so they popped for drill bits, at a couple hundred $US each. They ran the first part real conservative, then upped feed and speed with each successive part. When they fouled the bit on maybe the fifth part (chipped or broke a corner, I think), they backed off two steps and ran the rest of the parts with the second bit. It took half the time they bid it for.

I don’t recommend this for everything you do, but you WILL break tools, and the best thing you can do is record the material, settings, and performance for future reference on everything you do. This gives you basis for future work. And get a decent 5 to 10X loupe (magnifier) to inspect the tools periodically for wear and chipping. A worn tool is bad mojo. It will ruin your day as it ruins your job.
2 Likes

I ran it (.063", 2 flute, in acrylic) through GWizard, and it says .0004" depth of cut at 2 IPM. That seems…slow, but if I switch to something more aggressive it rapidly climbs to 81 IPM, which is WAY too fast. I’d say start at 2 and increase from there if things seem ok. A “fine finish” setting that isn’t excruciatingly slow is 11 IPM at that DOC, but I don’t think I’d go over that.

Don’t know what to tell you, those numbers don’t seem too great. You’re probably not going to break an endmill with the low end numbers, but you might produce some melted-edge plastic. Maybe try a few scrap parts first.

For the 1.6mm (1/16") 2 flute tool, at 10Krpm, 500 to 1000mm/min (20 to 40ipm) is likely about right with axial depth of about 1/2 diameter and radial depth of 40% (0.8mm and 0.6mm). This is assuming a helical entry or predrilling entry points, and that you are using a strategy that can do constant radial engagement.

If you are taking full diameter cuts, the load against the tool goes way up, efficiency drops, and allowable axial depth goes way down. Plowing slots is about as bad as it gets, and is generally to be avoided. If it must be used, leave a finish allowance. I would find a way to run a better strategy for most things, even if it wastes material, since a good trochoidal strategy will usually be faster, reduce wear, and reduce risk of tool breakage, even while removing twice as much material.

For example, the recent project I posted to show workholding (microscope eyepiece dust caps in gallery) had a material removal rate for the pockets (constant engagement spiral of 40% radial and 2D axial in HDPE with a 3.2mm tool) of about 5 times the slotting for the outside profile of the parts. Slotting saved time in this case, since the finish was not critical, running an more efficient strategy would have required removing much more material, and it made it easy to leave tabs to support the stock for the finishing operations that were needed. It was the tabs that made the decision, though. If I didn’t need follow up operations (or I had been willing to put the tabs into the model rather than using the automatic tool), slotting would not have been used.

As another key thing with acrylic, tool coating is very important to good performance, since it so strongly influences friction and chip clearing. I have been using TiCN (titanium carbonitride, the purple-ish coating) for acrylic. It isn’t the highest temperature rating, but it holds up well to acrylic and the chips flow very well. There are other options. Thermoplastics are a place where you really can’t make up for the wrong coating with coolant or changes to feed/speed.

Wow, if you think that is tiny, you should see what I do. Most of my work is smaller than a dime. I do cnc jewelry work with my Nomad. I think everyone else here has covered what I can contribute re feeds and speeds. I do most of my acylic work with a laser. If you have access to a Makerspace the laser loves acrylic and can cut parts up to .5" thick in a single pass.

This topic was automatically closed 30 days after the last reply. New replies are no longer allowed.