So, I ended up purchasing this bit. 1/8 inch compression bit and I’d like to add tool information (cutting parameters, speeds and feeds, etc). I can’t find much on a Google search, their store, etc.
So, I’m hoping someone out there might have the right information. As I understand, this information will all change depending the material being used. So I’d essentially want to figure out how to get the correct tool info for your basic material options in carbide create. - hardwood, softwood, mdf -
I’m honestly having a hard time understanding all of this information for bits that I purchase. I use amana’s website for when I purchase their bits and enter in the info and change as needed but jfc, I’m tired of breaking small bits like this and I feel like most of the time I’m changing speeds and such as needed based on past experiences rather than full knowledge (math) It’s something that just hasn’t “stuck” yet.
Hell, I’ve even purchased etsy files one time of all the common amana tools used (Some I own and some I don’t) with all their appropriate tool information and added that to CC.
I’m getting discouraged it might not ever stick, lol. If anyone has any helpful information that would be great! I’m hoping that at some point, my brain dead butt will comprehend knowledge like this and it’ll become more “normal”
Appreciate the information but I’ve actually read through all of this previously (amazing resource) but unfortunately it’s still kind of difficult for me to grasp…
Here’s an example of feeds and speeds for a cut I did in plywood with a 1/8th compression endmill similar to yours
More generally speaking, if you are breaking bits you may be cutting too deep (excessive deflection is the #1 cause for tool breakage) or running an inappropriate chipload.
0.001" is almost always a safe spot, and you can determine the associated feedrate by multiplying the chipload by the RPM and number of flutes.
Keep it simple, pick a RPM value you can bear, say 18.000 RPM
Your tool has 2 flutes.
Hence feedrate should be 0.001 * 18000 * 2 = 36ipm
For depth of cut , 50% of the endmill diameter is the universal safe setting.
Note that compression bits are special, they work best when the full length of cut is engaged, so in a way they are trickier to use that other endmills
Is there a NON xlsx file that’s been created to plug and play to do the math for multiple tools? I ask cause I have a macbook and .xlsx files aren’t supported to be saved and edited unless I’m gonna pay a subscription for a microsoft program.
I almost always run my makita router at 18k rpm, never really changed it, as I understood, that was kind of just the “norm” in my research.
At the end of the day, I understand there is a learning curve to this. I do. It’s just not every single person learns the same way and I have YET to find the way that works for me, apparently. There seems to be some disconnect from what I read, compared to that of what I see in CC, and then to what I do.
To be honest, I haven’t even really found a video or set of videos that “explains like I’m 5”. Just like some old saying (don’t really remember it) if you want to learn more about understanding science, read a science kids book? - something like that.
I’m not ranting, nor upset. I guess I just haven’t found a way that has “clicked” for me and to say the process is frustrating is an understatement. Again, the A to Z book is phenomenal in regards to the value of free information but it’s so word heavy, I find myself going back and forth, back and forth, just when I thought I understood something, nope. “this is also a factor, but don’t forget about this/that/the other” then I go back, read more, and I’m fried.
Now I have cut signs, made bowls, catch all trays, etc. but only after much trial and error, however; I can say that I’ve gotten to end results (some of which I’m happy with and others, I’m like how or why did this happen?) I guess with all good things, comes experience, hence why I’m here on this board with the amazing community it has and looking and asking for answers. For that, I’m thankful.
Yep, it’s a serious learning curve and very frustrating initially because you don’t seem to be making any progress for a while.
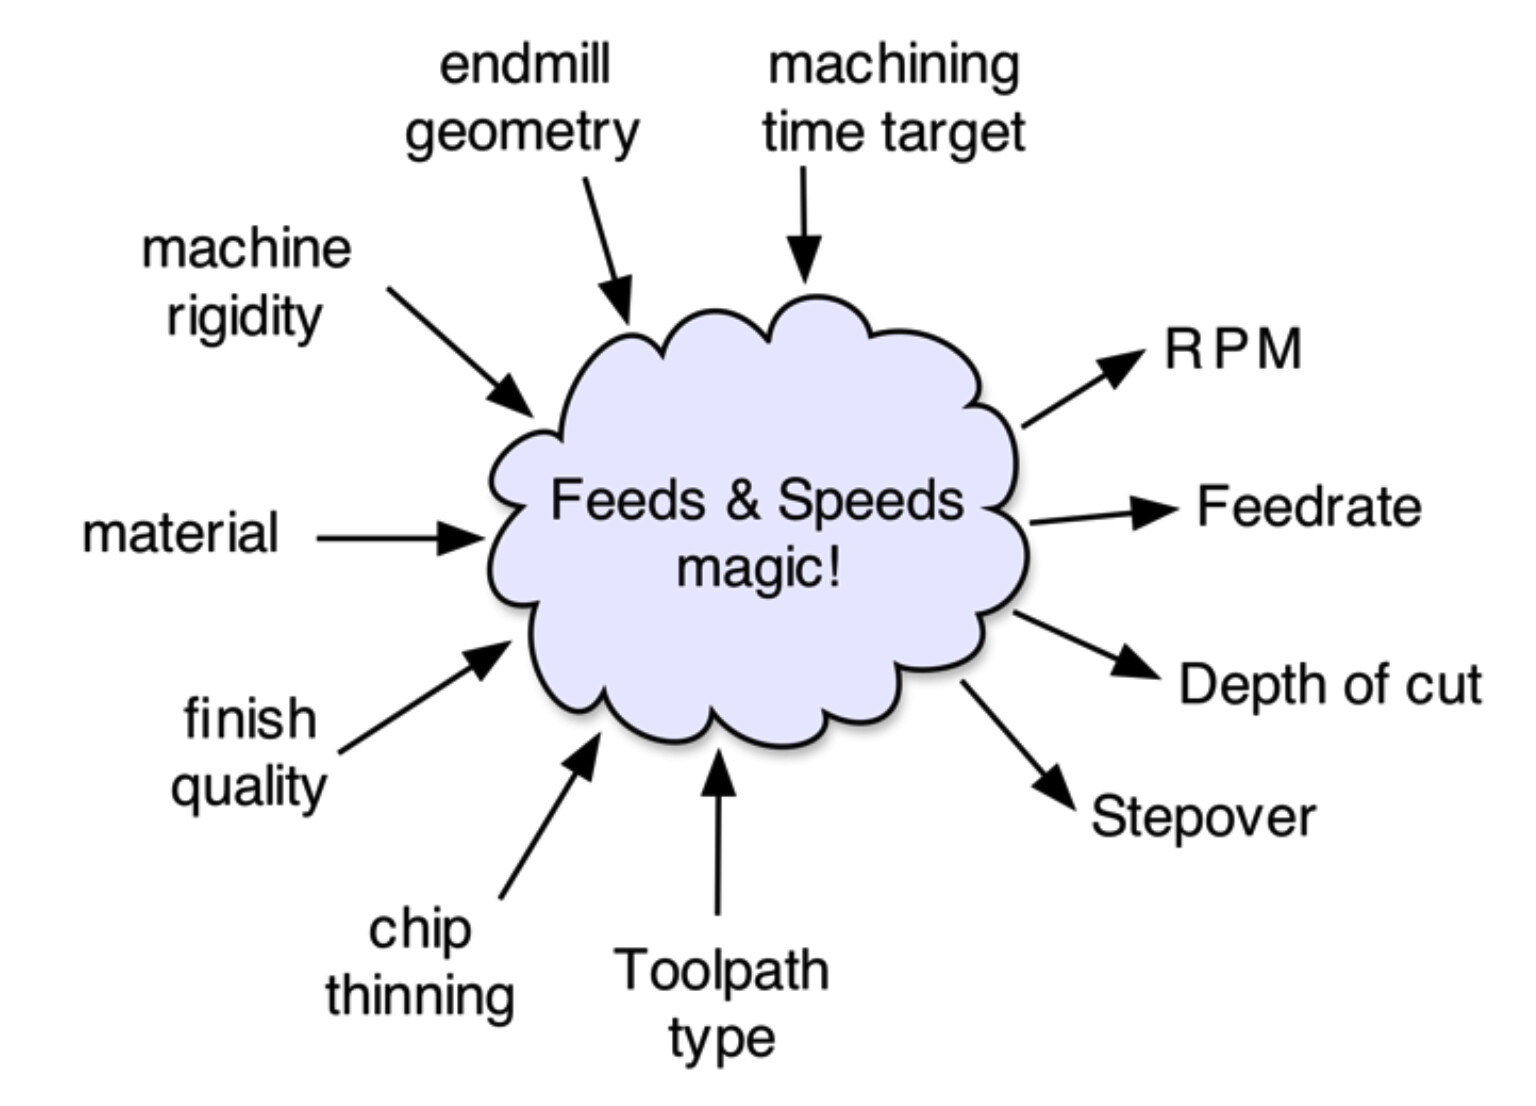
Whilst quite a few folks have tried to write simple introductions (Julien’s e-book is a good example) there are some fundamentals about how (many) humans learn which are hard to evade. Your diagram actually sums up this basic problem pretty well…
As you learn things you have what we can think of as a ‘knowledge wavefront’ which describes the outer limit of your knowledge. As you learn a new thing you extend this wavefront to include that thing. Different subjects and different aspects are all spread out along the wavefront. There are two main problems as you first try to learn this whole big pile of new stuff.
You can only easily learn something which is only one step forward from what you currently know (e.g. you know about RPM and endmill diameter and you learn how these give you surface speed for the cutting edge)
In many cases you need to know a bunch of adjacent things in order to make that step and understand it properly, going too deep on one element leaves you without context (e.g. how machine movement speed and router RPM work together to give you the size of each chip, or ‘feed per tooth’, if you’re fuzzy on either you will have trouble understanding how they work together)
One useful approach (for some people, everyone learns a little differently) is to draw yourself a mental or literal map of the terrain so that you know what ‘stuff’ you will be learning and approximately how that stuff is related. Your diagram above is a pretty good start, it lists out a bunch of the things you might want to know about.
It might be worth taking some of this information in some semi-logical order to deal with it a learnable chunk at a time. Don’t consider any of what I’ve written below to be a definition, I’m just listing stuff out to give a shape that might help. Learn a piece at a time, go away and let it sink in, then come back for another bite.
Go through the various terms and relationships for what the machine is doing moving the cutter around
Depth of Cut - how deep it is cutting in the material (lengthwise down the cutter)
Width of Cut - how wide a slice it is cutting (relative to the width of the cutter, full width slotting down to a tiny shaving) - stepover comes after this as it’s generally just how wide a cut is taken on the next pass
Feed rate - how fast the machine is moving the router and cutter around the workpiece
Once you understand DoC, WoC and feed rate you have a reasonable grasp of how hard you are working the machine in terms of how much material it’s going to have to cut away to allow the X, Y movement without snapping the cutter off or stalling
There’s a bunch of stuff about what happens as the machine moves, what affects how fast you can go etc. toolpath types, chip thinning, material, machine rigidity etc. forget about that stuff until you are really comfortable with the basics
Go through the terms and relationships for what the cutter itself is doing as it rotates, hopefully in contact with some material due to the stuff from 1 above
RPM - how fast is it going round (there are reasons to vary this but starting at 18k until you know why to change it is fine)
Number of flutes - a cutter with 1 flute at 6000 RPM makes 100 cuts per second, a cutter with 2 flutes at 6000 RPM makes 200 cuts per second
Surface speed - what speed is the cutting edge on the outside of the cutter travelling at? This matters much more in metals and plastics than in wood
Again, forget about endmill geometry and other stuff until you have the basics grokked
Put together the machine movement and cutter movement
Feed per tooth - this is the big one, how big a bite is the edge of the cutter taking every time it comes round? This is the result of how fast the machine moves, how fast the router is spinning and how many flutes (teeth) the cutter has. There are some generally accepted “it’s probably fine” ranges for this, see Julien’s ebook for those
Again, a load of other stuff to learn later, but only useful in the context of understanding how machine movement and cutter rotation work together.
Read about the other stuff and start to understand the machine limits
Learn what the machine sounds like when it is ‘happy’, you’ll hear this from a cut with little Depth of Cut at a decent ‘feedrate’ and high RPM in wood where nothing is stressed.
Play with cuts & feed override and learn the nasty vibrating sharp harmonics the machine make when it is not happy, try not to make those noises, if a toolpath you calculate somewhere makes the unhappy noise, it’s probably not good.
This is why I have so much respect for teachers, everyone learns differently and it is HARD to come up with something that makes sense for everyone. I tend to approach things in a very “analytical” (some will say geeky) manner, so it does end up being wordy.
Great advice from @LiamN above, I believe many folks here go by the rules in 4), that experimental approach is absolutely valid too.
I’m not sure there is any shortcut in that learning process, but the closest thing is posting here about a specific case you have and would like to determine/optimize feeds and speeds for, and discussing it. Chances are you’ll get both an answer and an insight into how different people think about this. Reading about someone else’s case is useful too, but at least for me it does not “stick” in my brain as efficiently.