I hesitated a long, long time before putting 100$ in a tramming device (after using the “bent hanger” method and a variety of things in between), but finally gave in to gear lust (again…sigh), and got the Mini Pro Tram, and I must say tramming ALMOST becomes a rewarding experience.
The left/right tramming was the easiest thanks to Luke’s eccentric nuts tramming system (BUT it still took more a good ten tries to get it perfect, since fastening everything tight changes the tramming just enough to be off by a tiny bit).
The front/back tramming, that was another story, I had to play “fold the exact right amount of aluminium foil” game for 30 min. While I was able to reach “perfect” tramming on left/right, I could not get the two indicators closer than 4 thou apart on the front/back direction, but decided to call it good enough.
All in all, the difficulty of tramming is in the mechanical adjustements, but the Pro Tram at least got the measurement precision hassle out of the way, it’s a breeze to use (well for 100$, it’d better be)
By the way I have no idea, what do YOU consider good enough tramming to be?
I also have a HDZ on the way and have been wondering what the best way to attack the tramming is. when you’re getting down to a couple of thousandths, can you be sure that it’s the router mount and not the gantry that is out? I just had some ideas about putting some sort of eccentric washer on the gantry beam mounting bolts and rotating the gantry that way?
My understanding is that if the gantry is slightly rotated, and you shim the spindle mount square, that you’re still out of tram. At this stage I can still only square my gantry with an engineers square, which I couldn’t guarantee more than 4 thou. In saying that… I only ever used the bent coat hanger approach and have never had an issue
I like to be within a thou over 6" and have recently been using my probe led as an indicator over the swing combined with a tenths gauge. High tech bent hanger!
If you have an aluminum table try using the probe, set to mm for more accurate z adjustments
If you test this approach, I’m very interested to hear about your results. The shimming part is not fun, and it would be neat to have some kind of “easy tram for front/back”.
I’m not sure I visualize why this would be the case ? There are a large number of elements in that mechanical chain (bed => side plates geometry => side rails alignment => Y vwheels tolerances => Y plates geometry => gantry tilt => x/z vwheels tolerances => HDZ tolerances => shimming => router mount => router => router collet collet), some are easier to play with than others, a weird combination of those can make tramming impossible, but router mount orientation/shimming should take care of compensating for all of those small deviations ?
Yeah the bent coat hanger thing (or its high-tech version as Vince does) is probably just as good, really. I was just curious about actual numbers, since they hardly ever show up here. And if 1 thou is good for @Vince.Fab’s shinies, 4 though is plenty good for me
I think an eccentric washer is the best way to go with the gantry adjustment, but at this stage I haven’t found the hardware to do it, nor do I have the time (HDZ arriving today, rewiring the whole machine, new base and wasteboard) So I’ll get those sorted then chase the washers
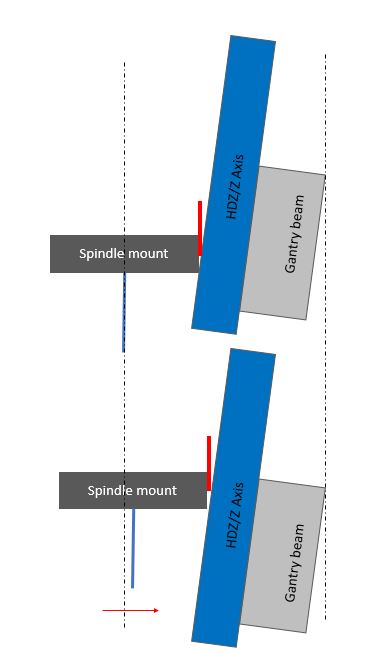
This is what I was picturing, in a very agricultural drawing… My thinking is that if the gantry is rotated and you shim the spindle mount square, then when your Z-axis moves up and down you actually move in the Y axis, moving you out of tram - which would be seen on vertical walls. Whether or not you would ever notice it is another question… likely not at the small amounts that it would be out.
On my Z axis (not an HDZ), I first shimmed the Z axis rails so they were perfectly plumb. It was easier than shimming the spindle mount, as you have a much, much longer leg in the adjustment triangle. (This does not necessarily preclude shimming the spindle mount.)
Mmh, I see now, good point. Maybe this should be a two-step thing:
first tram the HDZ itself, this should be doable by attaching the tramming device (whatever it is) directly to the HDZ front plate, and rotating the gantry until it is trammed.
then tram the router & its mount (shimming)
While I did have cases where the bottom of my pockets showed sub-optimal tramming, I never looked at whether walls themselves were perfectly vertical. It’s probably difficult to tell it apart from good old endmill deflection though, considering the very small vertical error.
i was always curious how difficult it would be to create an easy tram hop up for the X axis ends (rotate off one bolt then tighten the rest using the hole slop in the end plate).
you could address the Y axis in this manner, then address the spindle mount via shims. probably more effort to dial in but less shims sounds nice haha.
Once I locked my extrusions using the flat-head screws (two per plate), I found my Z was a little kicked-out at the top. Perfect left/right, but enough to warrant a shimming washer between the bottom wheels, and the router carriage. I haven’t done so, though, because it isn’t causing a problem now. I just know it is there.
I also wouldn’t mind finding a kit of round washer shims. So far I’ve found what I needed by going to the hardware store w/ my calipers. But I wouldn’t mind finding an inexpensive kit of various shim thicknesses intended to fit between the wheels and the frame components.