Looking for a tutorial for designing inlay using carbide create using V 756, start to finish. The tutorials on you tube are 1 or more years old and are not using current V 7
See:
I’m having trouble wrapping my head around making the plug . 25 bigger ( rather than smaller) outside off set, or do I just trust the tutorial.
When I apply this step, capital letter A leaves the center portion not selected
I like to keep both my plug and pocket the same size. Typically .2" depth. On the plug though, select “Inlay Mode” and I use .001" for the glue gap. Some like .002". I have not had any issues doing it this way. Although, I will mention I use a 30 degree v-bit when doing inlays.
Post a screen grab and the file at the point where you are stuck.
Ok, I will trust the tutorial. I will let you know the results after I cut the plug and pocket
Thanks for the help
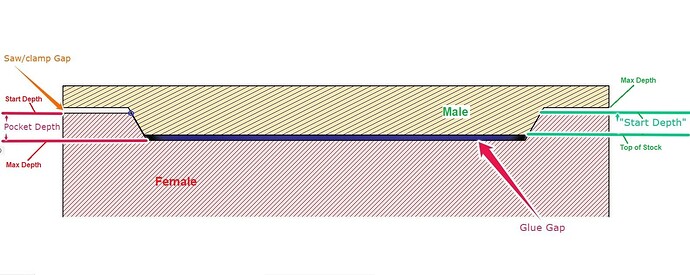
This graphic has helped me make sense of it. Doesn’t include the new “glue gap”, but that is essentially the “Saw Gap” for the male side only.
Trying to wrap my brain around start depth being so much lower than top of stock for the plug in your image. What am I missing?
The start depth for the male (without the new glue gap function) needs to match the start depth for the female. The vector that you are tracing is likely on the top of stock for the female, which needs to be near the bottom of the pocket for the male.
With the new “Glue gap” function with the Inlay function for the male side, it offsets the Start Depth for where the male side traces the vector, but still allows you to use the depth per cut to get down to that depth.
If you can see the blue circle on the left side of the image, that’s the vector that gets traced for the female side. On the male side, that depth would be near the bottom of the pocket.
Make your female pocket and then export the image to an svg. Then open a new file and import the svg and mirror it. The inlay procedure handles the sizes. Make your depth for both files the same and use the same tools for advanced vcarve. The "Inlay does the offset for you that makes the male plug slightly smaller then the female pocket.
If you are carving an A and the middle part of the A is not being cut then select the outside part of the A and use shift and select the inside triangle to make your toolpath. If possible use a 60 degree vee but any angle vee bit will work. The smaller the angle the less glue area you have on the incline to get the two pieces to glue together.
So make the female pocket .2" deep. Then choose the same .2" for the male inlay and check the inlay check box for the magic to happen. If you do not choose the inlay then both the male and female are the same size and the male plug will not go very far down into the female pocket.
I finished the board tonight. Needless to say it came out perfect. All I had to do was TRUST the tutorial
Thanks
Thanks
Thanks ,
David
This topic was automatically closed after 30 days. New replies are no longer allowed.
