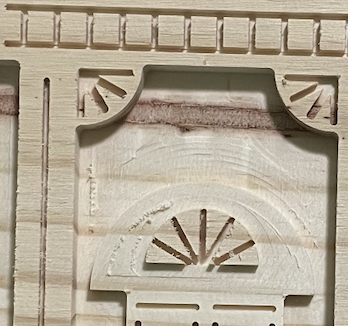
First time user (on my second project) and encountering a consistent issue where pocket depth cuts come out ‘scratchy’ or uneven in parts. (see photo below for example). My assumption is that this is a function of the wood quality and it not being perfectly level - I’m using simple pine hobby boards from Home Depot - as on a single project some depth cuts turn out great while others don’t. But before I invest in a planer to get more level boards to start, wanted to check with the community and see if 1) this is likely the actual issue, or 2) if there is something else I should try before spending the money.
Easiest thing to do is to adjust the Depth per Pass so that the number of passes is increased by one, and the ultimate pass is removing only a shallow thickness of material, e.g., if one is cutting a pocket to a Max Depth of 0.5" with a Depth per Pass of 0.125", resulting in four full depth passes, reducing the Depth per Pass to 0.124" will result in 5 passes, where the final pass only removes 0.004" of material.
Appreciate all the help and quick responses! Didn’t even know ‘depth of pass’ was a thing. I’ll start paying attention to it/playing around with it. Thanks everyone!
I have seen this before, in my own projects. I found out it was because I had the dust shoe too low to the piece, and when enough bristles touch, and the spindle is making small movements relative to the bristle length, as the bristles are forced to change direction, they push the spindle up and you get this.
If you are using a dust shoe that is set to a fixed height, move it up a bit so the bristles are just barely touching, or barely above the top of your stock material.
If you are using a dust shoe that is attached to your spindle, and moves up and down with it, you will need to adjust it higher, and keep adjusting it as your spindle moves down deeper into your stock material.
Agree with MadHatter, stock dust shoe on my S5Pro (65mm spindle) and I run the bit length at least a 1/2” lower than the bottom of the bristles. The deeper the intended cut the higher I will adjust dust shoe. This does allow some dust chips to escape they are not what I breathe in and cleans up easily. All of the dust is easily removed which is the intent of the “dust’ removal system including MDF.
This is a large pine board and you do have some deep machining areas. I have seen pine twist and warp in many types of machining. If this is a glued up project board you have many boards wit different grain directions. I have found that using these boards my outcome is better when I use the blue tape and super glue along with the regular hold down clamps. I don’t cover the entire surface with tape super glue but use it in the center of the project large enough depending on size. I also add two layers of tape to the clamp down area keep the material flat to the spoil board.
Set the material down with the tape and superglue first and then clamp it down.
Thanks to everyone for the ideas! Will try the dust collection solution as I do in fact usually set it lower than the bit. So will test it out and report back.