I never paid much attention to my bits before. If they were up cut or down cut
I cut a lot of my designs on PVC. When using a 1/4 or 1/8 inch bit the cut areas clear out pretty well.
But when i use a 1/16 bit the cut area seems to clog up with the cuttings and i have to dig it out.
Guess its time to check my bits and see if they are up or down cut
Anyone have any experience with this.
If you turn the bit in the direction of rotation of the router then you’ll see that the flutes will either be ‘moving up’ the cutter as you rotate or ‘moving down’. This is the shear and chip direction and gives you upcut or downcut.
That makes sense. So my Makita router rotates clockwise. Is that the same for all routers? When they tell you a bit is Up or Down Cut are they assuming clockwise rotation of the router?
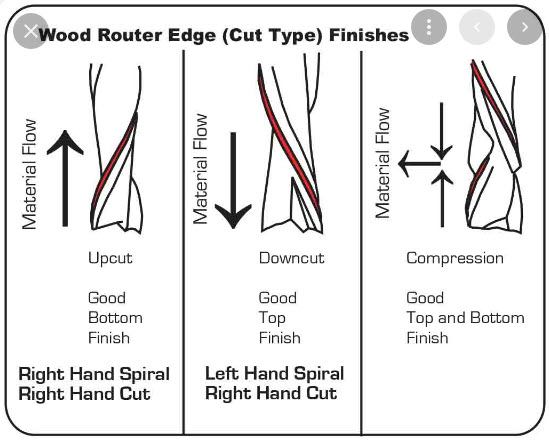
On the chart i found below, they talk about Right Hand Cut. Not sure what that means. Does this chart assume clockwise rotation of the router.
I’ve never heard of a spindle or router that spins counterclockwise, but I suppose it’s possible given they are made all over the world. It’s safe to assume all you’re likely to encounter are the same. It’s worth noting from the diagram the cutting surface on the bit follows the direction of cut. Upcut bits have the cutting surface on top and downcut bits have them on the bottom. This is the easiest way for me to tell one from the other.
It’s also worth noting that for a compression or combination bit to work properly, the first pass must go beyond the upcut portion of the bit. Otherwise the bit becomes an upcut for the first pass and defeats the purpose of using it. Unfortunately in CC you can’t specify a different cut depth for the first pass and you’ll need to define a separate toolpath if you want different cut depths. Other software such as Vectric allow you to define different cut depths.
Tool manufacturers usually specify the depth at which the transition occurs. Amana specifies this as B1 and is generally speaking close to the diameter of the bit.
Cutter rotation is mostly standardised. Some spindles let you reverse direction but, as you’ve spotted there, the cutting face of each flute assumes clockwise rotation on most cutters. Same as drill bits, the flutes pull chips up out of the hole, but the face of the drill is shaped to have cutting edges rotating clockwise, it will just rub going backwards.
So you’re looking at
The direction of rotation in which the edges cut (generally clockwise)
Whether the shearing forces are up or down during that cut (or both in the case of a compression cutter whose spiral reverses)
The VFD spindles will mostly reverse, especially if you get the phase wiring wrong. If you run it backwards then cutters will give you melty-burny finish instead of speedy chips…
I’ve done some PVC and feed rate is your friend, as is dust extraction.
The key is to not let it heat up, I would not use a downcut on PVC, I always use the dust extraction, on a couple of occasions I’ve sprayed a fine mist of water onto the piece to reduce static building causing chips to clump too.
Start with a really shallow depth of cut moving as fast as you dare, then if you need the job to complete faster slowly increase the depth of the passes. Also try to avoid full slotting, slots tend to clump up and melt chips.
Feed rate has a lot to do with it. There are other variables you can work with as well. Nests generally form because the cutter is making small threads which aren’t dense enough to be thrown off by rotational forces and instead become wrapped around the cutter. The idea is to make larger and thicker threads that will be thrown off. If you find nests start when the plunge happens, you might need a faster plunge rate. As previously mentioned dust extraction becomes a factor as it gives strands that are being thrown off somewhere to go. If nothing you are trying is working, the cutter you are using may be the culprit. Single O flute designs like the Amana set C3D sells for plastic cutting do better.
Tried moving speed to 150 and full depth of cut and that didn’t help. Ran the job again and it cleaned everything up. Next ill try shallow depth of cut and see what happens. Only seems to be an issue with 1/16 bit so could be the bit. Strange that this is the first time ive had an issue with PVC. Ill keep trying different things
I found that using ‘O’ flute plastic cutters made a big difference, for me the bit really needed to be sharp to fling PVC chips and not gum up, I blunted a couple on some old slate loaded high molecular weight stuff and it was useless on PVC afterwards.
I just “discovered” down cut bits.
Even though one came with the kit, I was using the 1/4 up cut due to all the posts about chip clearance, etc.
Then I got the Amana “sign bits” and was totally blown away at how smooth my cuts were. No tear out!
Wait! C3D has a 2 flute dc bit that I never opened. Can talk all day about quality and price, but thats not the point. A down cut is great for a smooth surface.
I do a lot of shallow adv. V carves and while the v bit generally took care if rough edges, the results are so much better using a down cut bit! I feel stupid for not figuring this out sooner.
Best news is i found a source for affordable 1/8 dc bits that should really help with smaller designs.