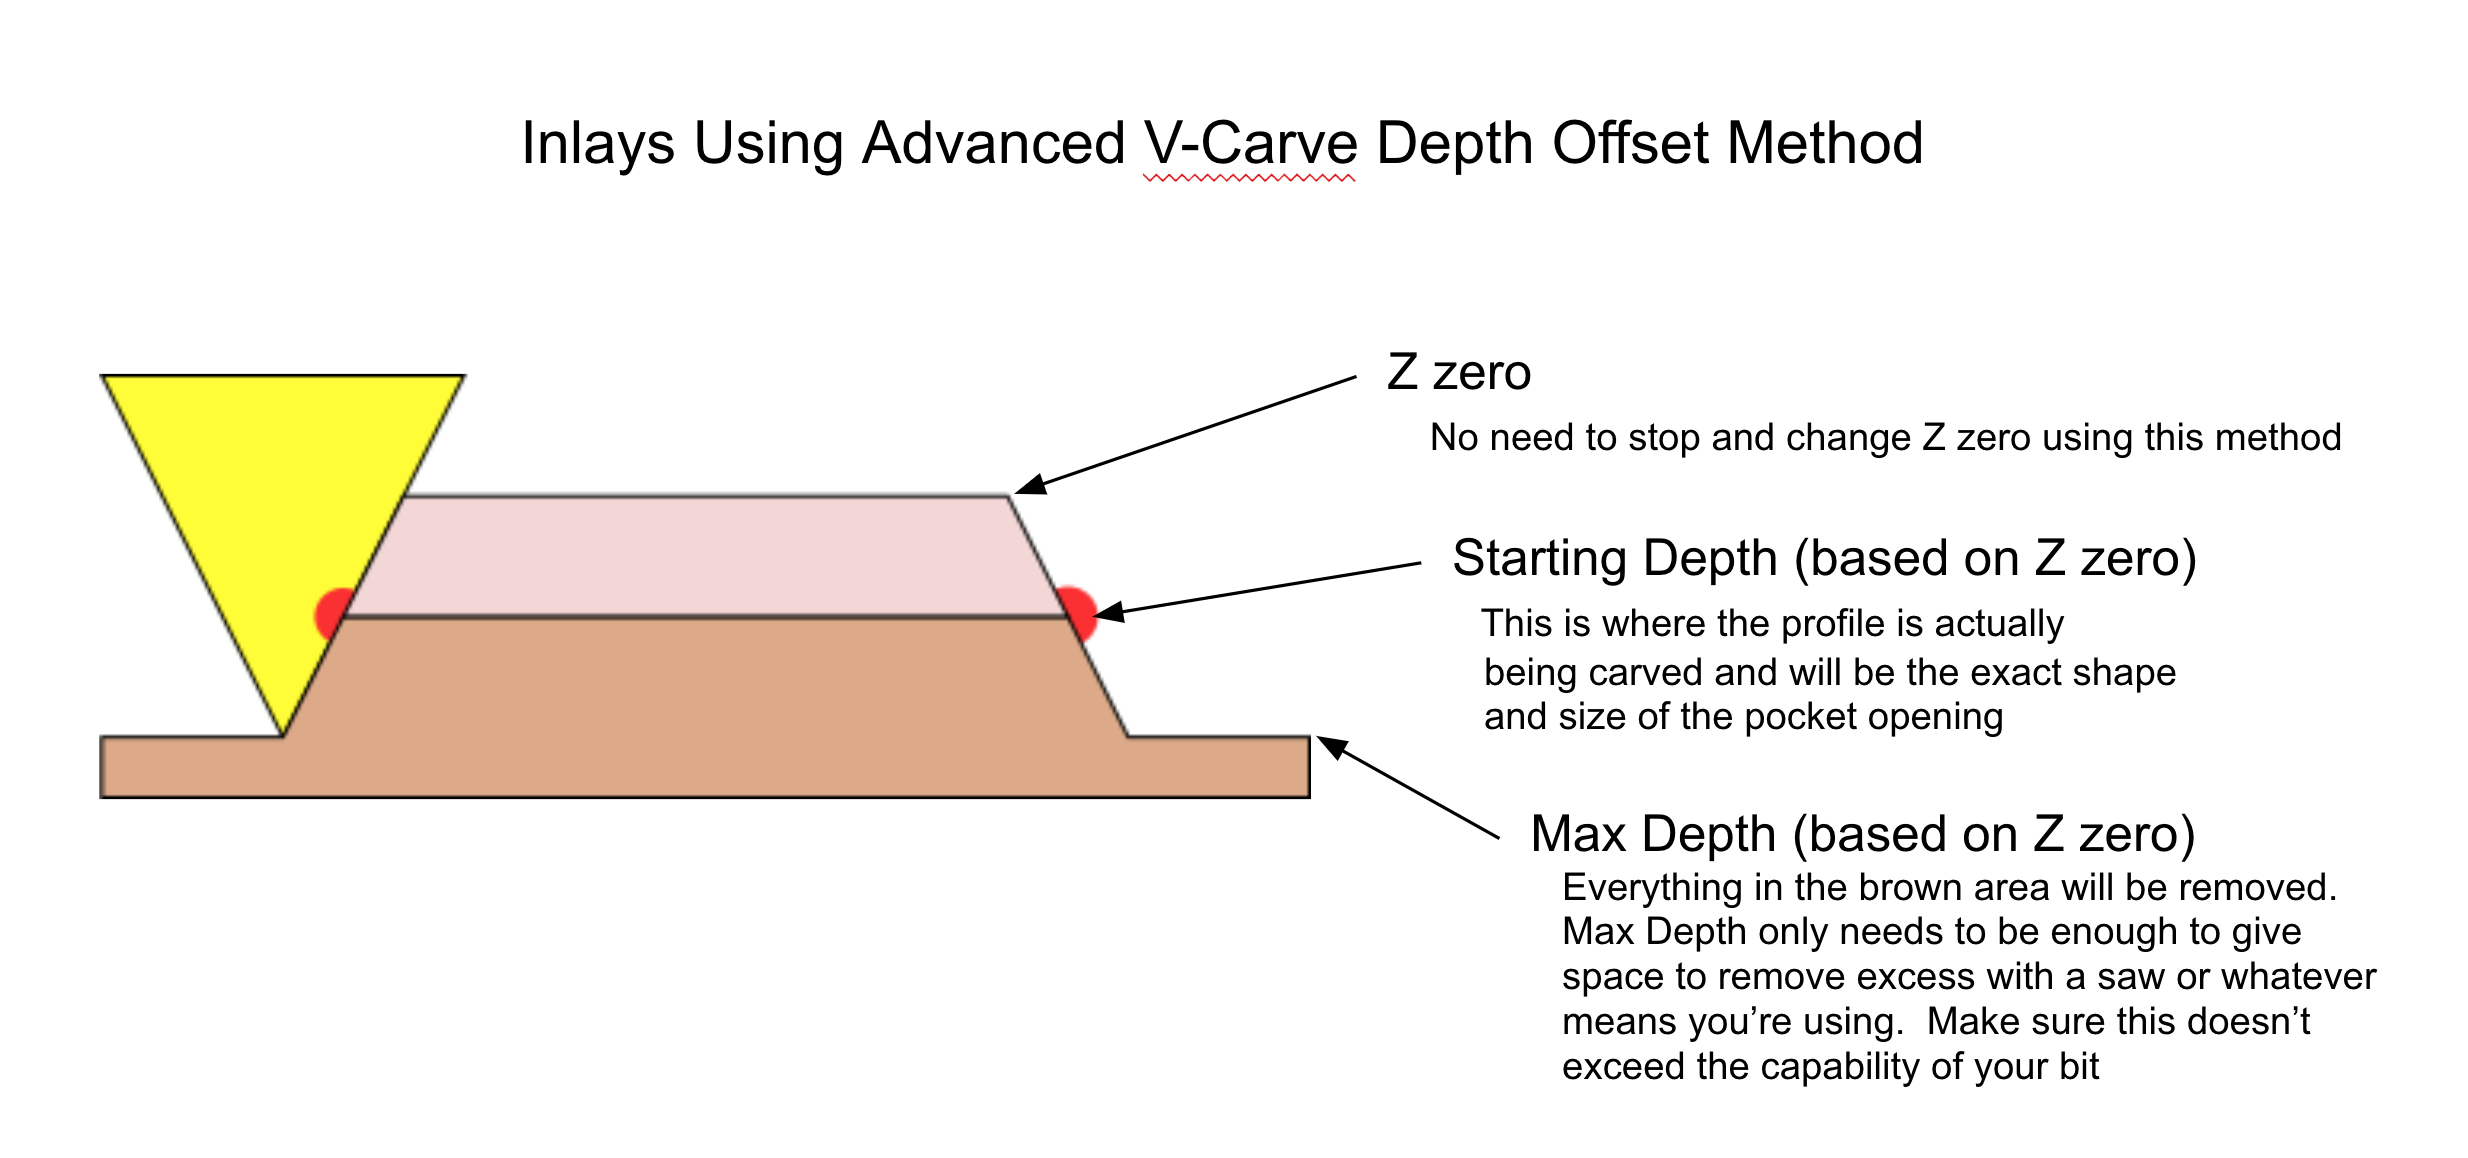
Using "Advanced VCarve" in Carbide Create 461 to make Inlays

Doh I meant adjusting it down. That makes sense having to do it outside the workspace. I use the touch probe so once I had my z point I figured adjusting it down would be a snap.

I am still learning the advanced v-carve feature but isnt adjusting the Z starting depth done in the advanced v-carve toolpath? There is an box for it.

Yep. The starting depth can be set in the advanced v-carve feature.

So if we use that we can skip step 12 and lowering the Z? I am still having issues with the plug just barely fitting. If I am using thicker stock and want to fit more into the I change the Max depth deeper and adjust the starting depth on the plug but still get very little penetration and end up with the huge glue zone and hollow space. How do I get more of the plug deeper.

This is probably super easy and it is just not clicking in my head. If I adjust the starting Z point lower on the plug shouldn’t I be fitting more of the plug into the hole?

My apologies!!!

You should be setting the Start Depth to the depth of the pocket minus whatever space you want for glue. For example. If your pocket was .25" deep. I would set the Start Depth to .20" which would leave .05" for glue. That might be too much, but this is an example. Then, the Max Depth setting determines the amount that the plug sticks out of the pocket. I would probably add .05" to .1" just to give space for a blade or something. So overall, for a .25" pocket, I would set Start Depth to .2" and Max Depth to .3". One more thing. Max Depth is not in addition to the Start Depth. It is from Z zero.

2 Likes

Ok that make soooo much more sense. I will give it a shot this afternoon and let you know how it turns out.

Just wanted to add a visual to help those who are more visual learners like myself.

3 Likes

This very helpful.

I ran a test of both methods. I have to say that I am not very good at the Z height adjustment method because I get inconsistent results because of my short working memory. Or lack of attention to details…

Anyhow, for my test I cut a female pocket of 0.2.

For my male insert I wanted to cut it to 0.1 with the remainder for glue (I know this is a lot, but I am still very new to this and wanted to err on the side of the piece fitting).

I don’t think I did the Z height adjustment correctly. The piece didn’t fit.

My order of operations was to
1 Cut the pocket for the entire piece
2 Cut the inlay with vee crave starting depth of 0.1 and a max depth of 0.2
3 Stop the process. Go to Z10 and reset to Z=12.54
Run the vee carve on the second line

when you say “does not fit”… can you be more specific
not the whole thing will go in, only half of it will go into the pocket

Yes, I couldn’t even get the parts to insert. Your instructions are very clear, but somehow my execution seems to cause me to have trouble. I am trying to get 0.1" to insert.

@iantyndall I’m a little unclear on the operations you listed above. Are you doing both the Start Depth adjustment and resetting the Z to 12.54? What do you mean “Run the vee carve on the second line”? You might want to set the Max Depth slightly larger as well so you have a little gap for glue and whatnot to escape.

No I am sorry.

I created two lines of text for my test. One line was based on setting the start depth of 0.1 and the second method was based on fenrus excellent instructions. The second method requires stopping the instructions and resetting the Z height.

Wanted to thank everyone for your insights… It took awhile but the light bulb finally went off. I did a quick test this afternoon and was happy with the results! Super tight fit and nice small glue Gap at the bottom. The pics are just scrap pine I had laying around so I put a little stain on it to see if it would help differentiate the wood and then I cut it in half in order to check the gap. Perfect! Thanks everyone I would have been struggling forever! BTW I used a 30 degree vbit and 1/8" endmill for the pocket.

1 Like

@iantyndall Which of the lines above is which? I’m thinking the one on the right looks closer to being what you want.

Yes, the one on the right was achieved by setting the starting depth to 0.1

But that one still didn’t fit into the pocket? If not, I’m not sure what else to try. Maybe more clarification and pictures of the process.

Dan thanks for all the help… things are working better but I have another question. Setting the start depth to .20 as in your example causes the bit to plunge deep on the first cut to get to that start depth and then it uses the depth per pass setting after the initial pocket clearing pass. This is extremely hard on my poor little 1/8" endmill especially when cleaning out hardwood. Am I doing something wrong?

this is why I suggest roughing first…

You’re right. That would be the behavior. You could do as @fenrus suggests and “rough” it first by doing the cut without setting the start depth low first. Basically have two tool paths you run. Does that make sense? You could do the rough by running the path with a high z zero first too. This would be similar to the other method where you adjust the zero deeper later.

I had been trying to do roughing passes last night and every time my depths would be all over the place and it was really frustrating me to the point I gave up. I just typed up this whole long description of every toolpath, measurement and detail for you but it got me thinking. I went out to the shop and started re-measuring everything and it turns out I had just changed out my waste board the other day and now I have a .15 crown in the one spot where I was working last night so I must have something stuck under the board that is throwing off my numbers off. I feel like a smuck. I will be taking off my waste board to investigate today. Sorry for wasting your time!!

3 Likes

No problem. If it were a waste of my time, I wouldn’t have even responded. :wink: Sometimes talking something through us all that is needed to work something out in your mind. I hope you find what is causing the issue.

1 Like