Wall Finish Quality on 1.5" thick Black Acrylic

@Vince.Fab thank you for posting these. I feel a lot better at what i’m able to achieve sans any 2sided machine on an XXL without nearly the number of mods as you.

I got a maintenance kit along with the new C3D router. We’ll see if i can get any more resolution with some tune ups.

3 Likes

0.250 hss straight sf. 0.500 depth/0.020 step. 1.000 depth/0.005 step. No spring

Datron 8mm sf 0.500 depth/0.020 step, 1.000 depth/0.005 step. No spring

I ended up going to an 0.002 stepover on the actual parts for the best finish. That’s what I want to try the curves with again. Tolerance and smoothing were set in the tenths range.

Linear rails would make a huge difference, maybe someone with a Pro can test as well.

2 Likes

I hope the V wheels in the kit are the heavy duty ones that come on the HDZ as they are beefier then the factory v wheels that came on my machine. I would also run them slightly tighter to reduce their deflection even more. Just don’t go caveman on them. Running steel core belts may help some as they are more rigid then the fiberglass core but Vince has more experience then I do with the performance difference between the two so I am curious on his opinion regarding them.

I don’t even machine plastics but I am glued to this topic as I want to absorb any and all machining tactics information I can. Did you ever finish setting up your linear rail SO3 with Daniels story plates?

This machine is a stock s3 with Z plus, white steel cores, and SMW plate plus stiffeners. Its running the HD wheels and I haven’t been able to beat the precision the white steel cores offer without any step adjustments in grbl. Consistently sub ± 0.003 without Fusion adjustments either.

The fully linear S3 needs motor extensions soldered for the flipped setup but almost ready to go.

2 Likes

I have a very big surprise coming !!! stay tuned!

5 Likes

@Julien
1.800 diameter circle, full depth with yg1 3F @ 0.001 stepover.

6 Likes

Smooooth. Gotta try 3F again I guess

1 Like

I also found this, no idea if it would be useful to you:
http://www.sdplastics.com/acryliteliterature/13196EFFFabTBEdgenSurfaceFinishing.pdf

I may have gotten overly excited, but still an improved result. New Router, Tightened V Wheels, and Some EVO cutting oil added. Finishing was done at .04 DOC, .035 WOC. .004 Feed per tooth at 20k.

I thought it was a really good result while it was sitting on the machine, but the oil was deceptive. Still this is my best result to date. And I’m beginning to understand why @Vince.Fab decided to 2-side machine his.

material was two pieces of .75" fused together this time. The left side is the top of the cut and it is very good, if this was consistently the finish all the way to the bottom, I wouldn’t bother with sanding. And it’s good to know I can achieve an acceptable finish if this were only .75" thick acrylic. But after .75" in depth things start to get a little wonky.

After a quick sanding of 220, 320, 600, 800 the difference in cut quality is clear in the bottom half of the cut.

Next time I’m going to try this cutter to eliminate the Amana Unicorn bit variable.

1 Like

@Julien here’s a curve if you were curious.

It’s not able to achieve a mirror on curved letters, but I actually prefer the visual consistency of the cut on curves (Less of a visual juxtaposition)

3 Likes

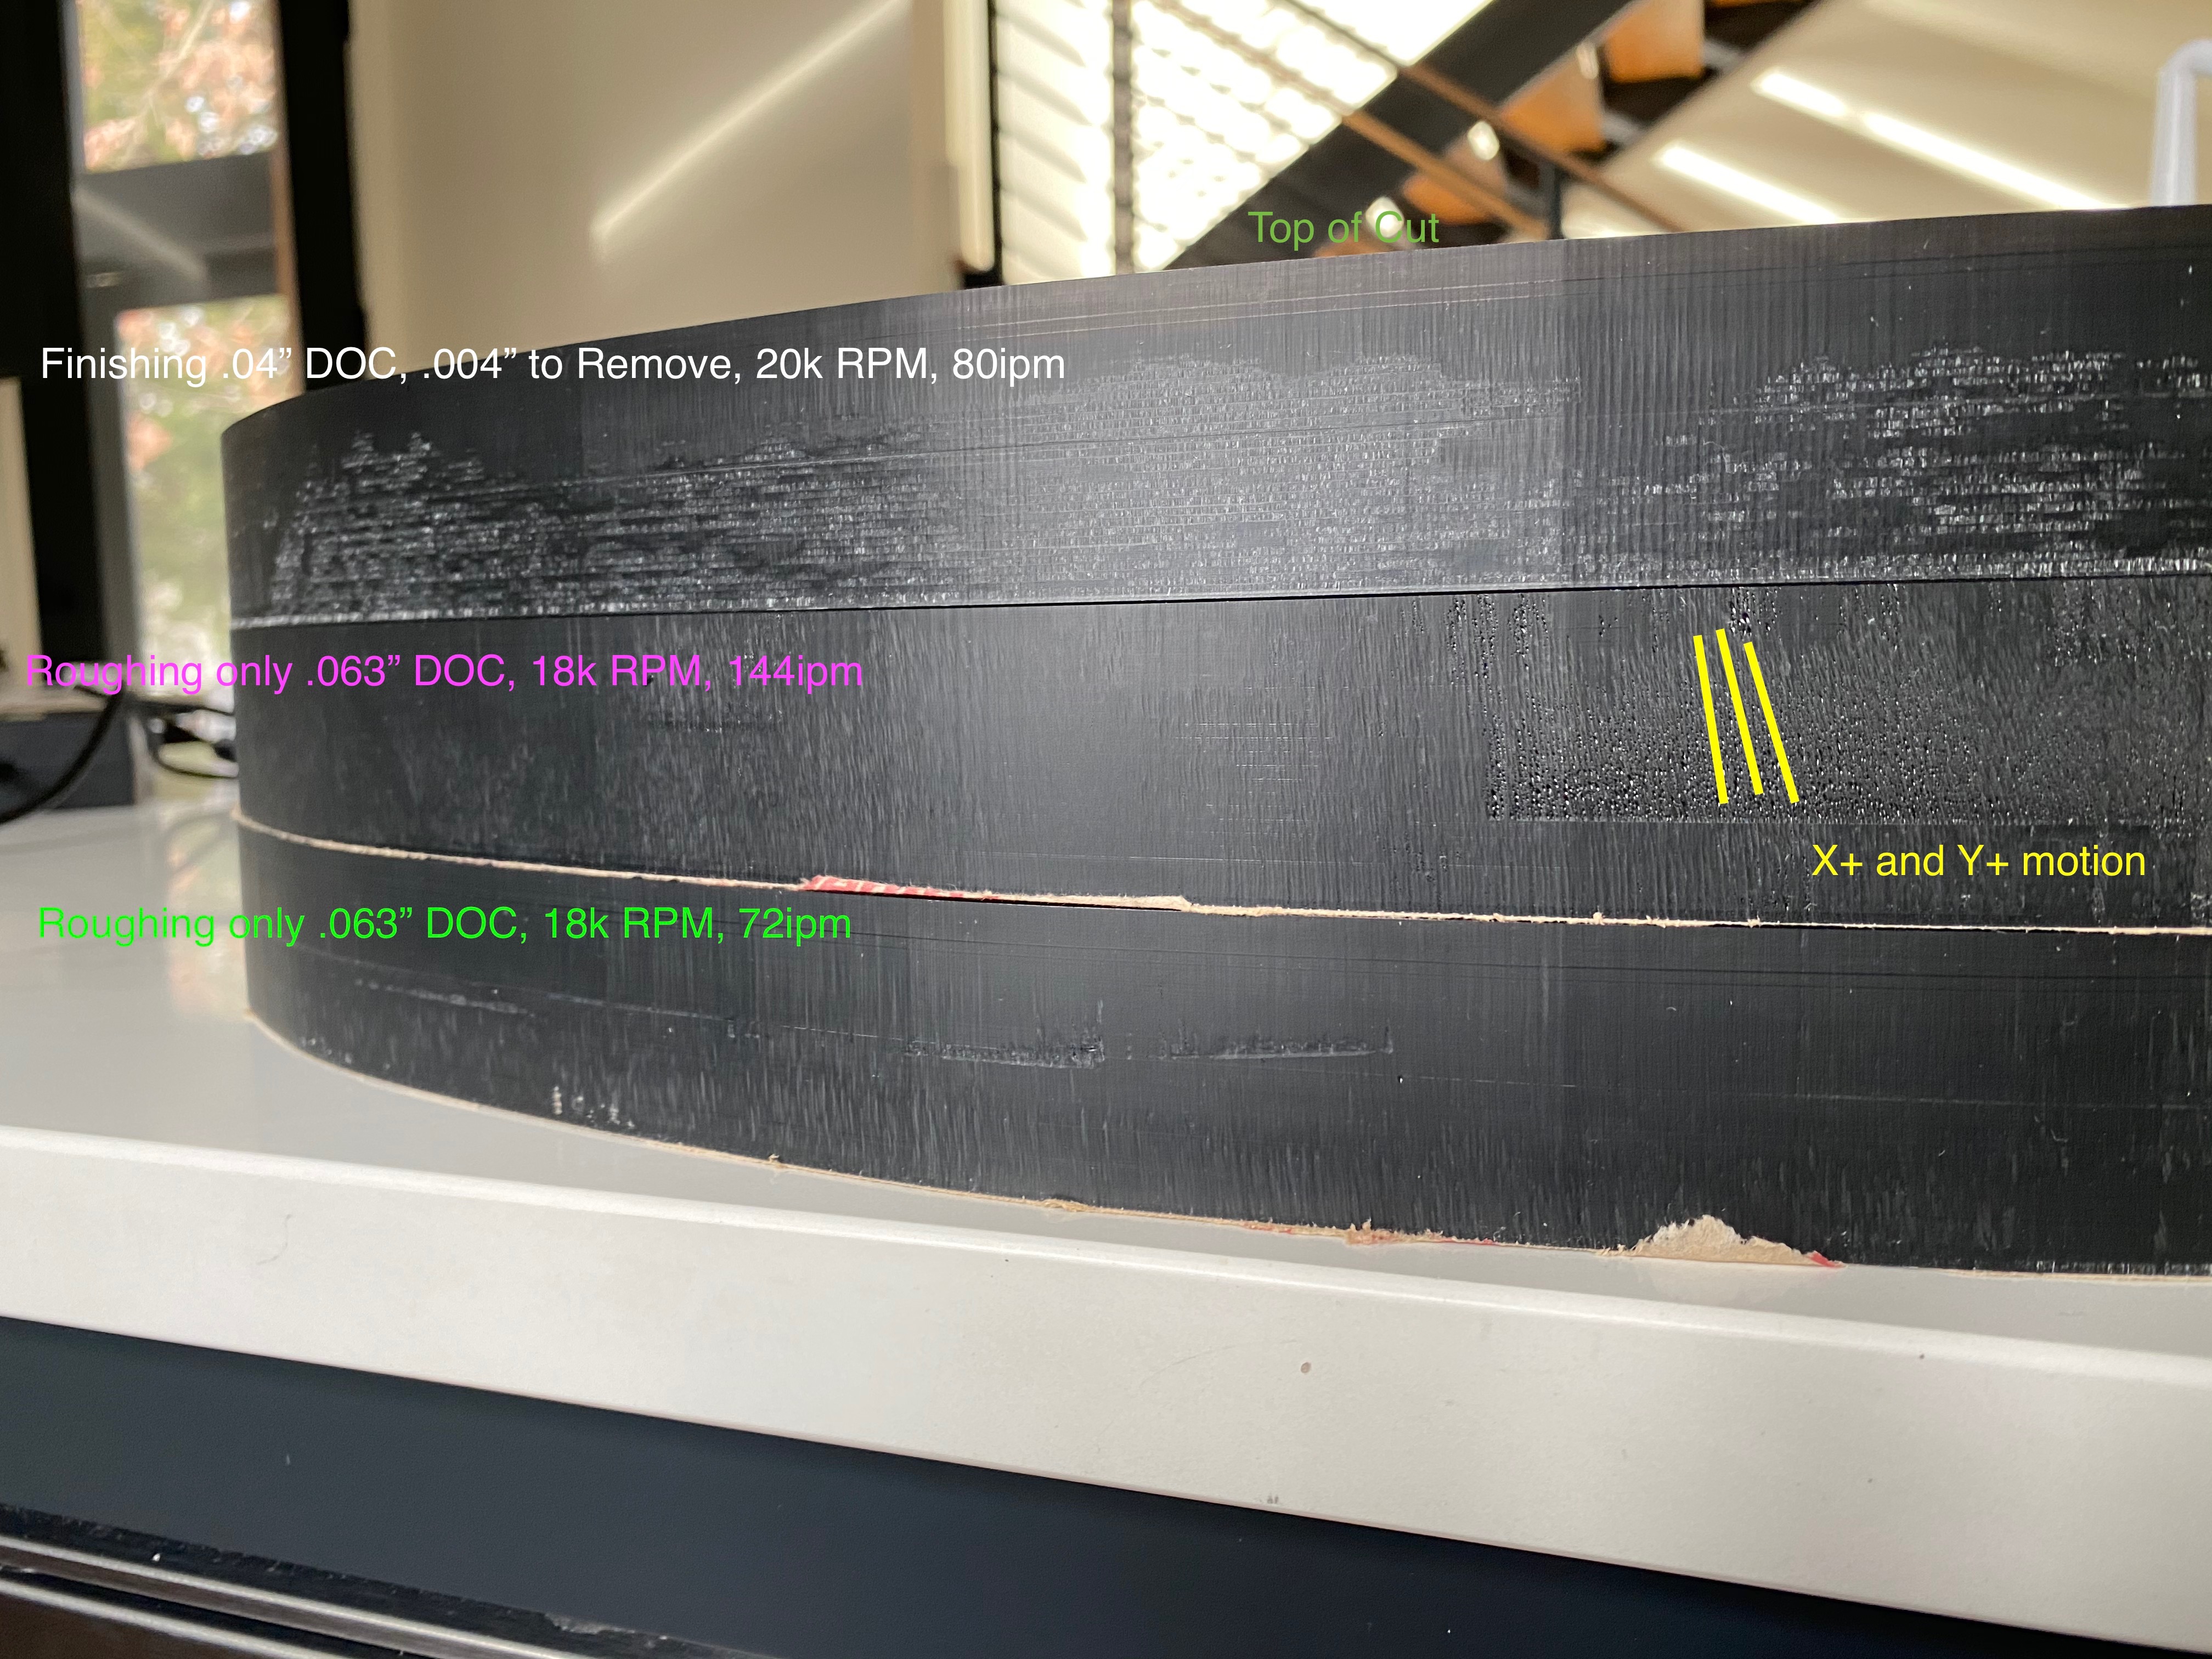
Using the LMT Onsurd Bit.


Visually, the only difference I can see in the geometries of the LMT vs Amana bit is the LMT is a bit “flatter” at the tip where the Amana comes to more of a point. So I wasn’t expecting MUCH difference but the LMT did produce some interesting differences.

In fairness, I was cutting much more curved shapes this time around, but in short the conclusions that I’m drawing are:

  1. Finishing results on both bits are almost identical with the top half of the of the 1.5" cut being pretty consistent but then loosing it >.75" down, with the LMT producing less of a Mirror finish.
  2. Roughing results on the LMT were more visually acceptable, but not smoother. When the Amana roughed it attempted to polish the cut more then the LMT does so the end result was a visual juxtaposition in black that is very noticable. However, when the LMT roughed the cut was more matte all the way through pretty much to the point where it looks uniform enough from a distance.

The LMT also produces more audible chatter to combat that I tried various combinations of RPM and feed rate. Results pictured below.

10 Likes

I am improving… best result on a straight edge yet. Biggest change here is that the finishing pass went from .04" DOC to .125"… it seems to like more depth. This is the LMT bit btw.

Question, why on some of my contours does the bottom (right side of the image) show roughing marks at the bottom of the cut? I used to think this had to do with getting some double sided tape on the bit, but now I think it has to do with the Rough at Final and Finish at Final settings in F360 along with whether the finish stroke was moving climb or conventional. This is the same letter just the opposite side.

I’m finding that it’s possible to get better results selecting portions of a contour and instructing that part of the contour to be cut either climb or conventional. But this gets very tedious with something like letters and I still haven’t found a way to deal with inside corners and tangentially expanded toolpaths on portions of a contour.

6 Likes

New F360 feature! I’m sure i’ll have to pay for it soon.

2 Likes

Small edit to the post above… i perviously noted that i had increased the DOC from .04 to .0625 on the finishing pass… In reality it was .125!

2 Likes

I thought the climb/conventional setting was global with respect to the selected contour. I don’t believe I’ve ever seen the machine change direction to accommodate otherwise. But maybe I am simply misinterpreted your statement. Maybe you’re trying to accommodate for the lack of cut uniformity as it relates to the Shapeoko position and direction of movement? Which is certainly beyond my depth and motivation. As for corners, my only consideration thus far has to been the use of corner comp to reduce my chip load.

I have been cutting with the “acrylic specific” endmill they now offer. Looks decidedly similar, but notably different than the 750 series. The sound of cut is exceptionally different. Haven’t experimented too much, as it’s just been for “work”, but I’ve gone a different direction. For finishing passes, leaving DOC minimal, I’ve been increasing my WOC. No time advantage, but the finish has been good enough to finish with block only.

1 Like

Exactly… I would like to stipulate that when traveling along the Y axis to always preform the cut from North to South and when Traveling along the X axis to always perform the cut from West to East. I’ve found that depending on the direction of travel of the 1.5" single flute end mill either I end up with a very nice 220grit surface… or a rougher 80/120grit surface.

Finally, I found that diagonal travel is best when travelling South East on a letter but in general diagonal travel is rougher then linear travel in terms of finish.

You can do this in Fusion by selecting partial contours and stipulating the direction of travel per contour. But when you have a ton of inside corners as you do with 14 letter (70-100 partial contours) being cut from a 32x32" sheet it become very cumbersome to select and even more so to delete parts of the toolpaths so as to not not tangentially expand in an inside corner.

Because I am brand new to the CNC thing, I have absolutely NO IDEA what I’m talking about, but I accidentally ran across this link, that I am sure you already know about:

https://www.stepcraft.us/blog/stepcraft-blog-6/post/cutting-acrylic-8-guidelines-to-get-the-best-results-1

Completely understand, and can confirm that such is the case with my machine. To this point, when testing strategies, I use a hexagon or something of the variety, and determine which strategy provides the best average finish across segments. Sometimes the piece with the most beautiful finish on one(or more) segment(s), will also also have an equally unsatisfactory segment(s) elsewhere. You have gone much further, much respect.

I just received an order of machined .5" black acrylic from a supplier. Previous to playing with the Shapeoko, I payed little attention to the quality of the finish, it was good enough. Now I marvel at the uniform, pure matte black finish, of the edges. These shops typically have edge processing machines, that spit out perfectly glass clear edges, but I don’t believe they would be usable on my designs. Otherwise, I’d buy one at this point.

1 Like

This topic was automatically closed 30 days after the last reply. New replies are no longer allowed.